- 1. API with NestJS #1. Controllers, routing and the module structure
- 2. API with NestJS #2. Setting up a PostgreSQL database with TypeORM
- 3. API with NestJS #3. Authenticating users with bcrypt, Passport, JWT, and cookies
- 4. API with NestJS #4. Error handling and data validation
- 5. API with NestJS #5. Serializing the response with interceptors
- 6. API with NestJS #6. Looking into dependency injection and modules
- 7. API with NestJS #7. Creating relationships with Postgres and TypeORM
- 8. API with NestJS #8. Writing unit tests
- 9. API with NestJS #9. Testing services and controllers with integration tests
- 10. API with NestJS #10. Uploading public files to Amazon S3
- 11. API with NestJS #11. Managing private files with Amazon S3
- 12. API with NestJS #12. Introduction to Elasticsearch
- 13. API with NestJS #13. Implementing refresh tokens using JWT
- 14. API with NestJS #14. Improving performance of our Postgres database with indexes
- 15. API with NestJS #15. Defining transactions with PostgreSQL and TypeORM
- 16. API with NestJS #16. Using the array data type with PostgreSQL and TypeORM
- 17. API with NestJS #17. Offset and keyset pagination with PostgreSQL and TypeORM
- 18. API with NestJS #18. Exploring the idea of microservices
- 19. API with NestJS #19. Using RabbitMQ to communicate with microservices
- 20. API with NestJS #20. Communicating with microservices using the gRPC framework
- 21. API with NestJS #21. An introduction to CQRS
- 22. API with NestJS #22. Storing JSON with PostgreSQL and TypeORM
- 23. API with NestJS #23. Implementing in-memory cache to increase the performance
- 24. API with NestJS #24. Cache with Redis. Running the app in a Node.js cluster
- 25. API with NestJS #25. Sending scheduled emails with cron and Nodemailer
- 26. API with NestJS #26. Real-time chat with WebSockets
- 27. API with NestJS #27. Introduction to GraphQL. Queries, mutations, and authentication
- 28. API with NestJS #28. Dealing in the N + 1 problem in GraphQL
- 29. API with NestJS #29. Real-time updates with GraphQL subscriptions
- 30. API with NestJS #30. Scalar types in GraphQL
- 31. API with NestJS #31. Two-factor authentication
- 32. API with NestJS #32. Introduction to Prisma with PostgreSQL
- 33. API with NestJS #33. Managing PostgreSQL relationships with Prisma
- 34. API with NestJS #34. Handling CPU-intensive tasks with queues
- 35. API with NestJS #35. Using server-side sessions instead of JSON Web Tokens
- 36. API with NestJS #36. Introduction to Stripe with React
- 37. API with NestJS #37. Using Stripe to save credit cards for future use
- 38. API with NestJS #38. Setting up recurring payments via subscriptions with Stripe
- 39. API with NestJS #39. Reacting to Stripe events with webhooks
- 40. API with NestJS #40. Confirming the email address
- 41. API with NestJS #41. Verifying phone numbers and sending SMS messages with Twilio
- 42. API with NestJS #42. Authenticating users with Google
- 43. API with NestJS #43. Introduction to MongoDB
- 44. API with NestJS #44. Implementing relationships with MongoDB
- 45. API with NestJS #45. Virtual properties with MongoDB and Mongoose
- 46. API with NestJS #46. Managing transactions with MongoDB and Mongoose
- 47. API with NestJS #47. Implementing pagination with MongoDB and Mongoose
- 48. API with NestJS #48. Definining indexes with MongoDB and Mongoose
- 49. API with NestJS #49. Updating with PUT and PATCH with MongoDB and Mongoose
- 50. API with NestJS #50. Introduction to logging with the built-in logger and TypeORM
- 51. API with NestJS #51. Health checks with Terminus and Datadog
- 52. API with NestJS #52. Generating documentation with Compodoc and JSDoc
- 53. API with NestJS #53. Implementing soft deletes with PostgreSQL and TypeORM
- 54. API with NestJS #54. Storing files inside a PostgreSQL database
- 55. API with NestJS #55. Uploading files to the server
- 56. API with NestJS #56. Authorization with roles and claims
- 57. API with NestJS #57. Composing classes with the mixin pattern
- 58. API with NestJS #58. Using ETag to implement cache and save bandwidth
- 59. API with NestJS #59. Introduction to a monorepo with Lerna and Yarn workspaces
- 60. API with NestJS #60. The OpenAPI specification and Swagger
- 61. API with NestJS #61. Dealing with circular dependencies
- 62. API with NestJS #62. Introduction to MikroORM with PostgreSQL
- 63. API with NestJS #63. Relationships with PostgreSQL and MikroORM
- 64. API with NestJS #64. Transactions with PostgreSQL and MikroORM
- 65. API with NestJS #65. Implementing soft deletes using MikroORM and filters
- 66. API with NestJS #66. Improving PostgreSQL performance with indexes using MikroORM
- 67. API with NestJS #67. Migrating to TypeORM 0.3
- 68. API with NestJS #68. Interacting with the application through REPL
- 69. API with NestJS #69. Database migrations with TypeORM
- 70. API with NestJS #70. Defining dynamic modules
- 71. API with NestJS #71. Introduction to feature flags
- 72. API with NestJS #72. Working with PostgreSQL using raw SQL queries
- 73. API with NestJS #73. One-to-one relationships with raw SQL queries
- 74. API with NestJS #74. Designing many-to-one relationships using raw SQL queries
- 75. API with NestJS #75. Many-to-many relationships using raw SQL queries
- 76. API with NestJS #76. Working with transactions using raw SQL queries
- 77. API with NestJS #77. Offset and keyset pagination with raw SQL queries
- 78. API with NestJS #78. Generating statistics using aggregate functions in raw SQL
- 79. API with NestJS #79. Implementing searching with pattern matching and raw SQL
- 80. API with NestJS #80. Updating entities with PUT and PATCH using raw SQL queries
- 81. API with NestJS #81. Soft deletes with raw SQL queries
- 82. API with NestJS #82. Introduction to indexes with raw SQL queries
- 83. API with NestJS #83. Text search with tsvector and raw SQL
- 84. API with NestJS #84. Implementing filtering using subqueries with raw SQL
- 85. API with NestJS #85. Defining constraints with raw SQL
- 86. API with NestJS #86. Logging with the built-in logger when using raw SQL
- 87. API with NestJS #87. Writing unit tests in a project with raw SQL
- 88. API with NestJS #88. Testing a project with raw SQL using integration tests
- 89. API with NestJS #89. Replacing Express with Fastify
- 90. API with NestJS #90. Using various types of SQL joins
- 91. API with NestJS #91. Dockerizing a NestJS API with Docker Compose
- 92. API with NestJS #92. Increasing the developer experience with Docker Compose
- 93. API with NestJS #93. Deploying a NestJS app with Amazon ECS and RDS
- 94. API with NestJS #94. Deploying multiple instances on AWS with a load balancer
- 95. API with NestJS #95. CI/CD with Amazon ECS and GitHub Actions
- 96. API with NestJS #96. Running unit tests with CI/CD and GitHub Actions
- 97. API with NestJS #97. Introduction to managing logs with Amazon CloudWatch
- 98. API with NestJS #98. Health checks with Terminus and Amazon ECS
- 99. API with NestJS #99. Scaling the number of application instances with Amazon ECS
- 100. API with NestJS #100. The HTTPS protocol with Route 53 and AWS Certificate Manager
- 101. API with NestJS #101. Managing sensitive data using the AWS Secrets Manager
- 102. API with NestJS #102. Writing unit tests with Prisma
- 103. API with NestJS #103. Integration tests with Prisma
- 104. API with NestJS #104. Writing transactions with Prisma
- 105. API with NestJS #105. Implementing soft deletes with Prisma and middleware
- 106. API with NestJS #106. Improving performance through indexes with Prisma
- 107. API with NestJS #107. Offset and keyset pagination with Prisma
- 108. API with NestJS #108. Date and time with Prisma and PostgreSQL
- 109. API with NestJS #109. Arrays with PostgreSQL and Prisma
- 110. API with NestJS #110. Managing JSON data with PostgreSQL and Prisma
- 111. API with NestJS #111. Constraints with PostgreSQL and Prisma
- 112. API with NestJS #112. Serializing the response with Prisma
- 113. API with NestJS #113. Logging with Prisma
- 114. API with NestJS #114. Modifying data using PUT and PATCH methods with Prisma
- 115. API with NestJS #115. Database migrations with Prisma
- 116. API with NestJS #116. REST API versioning
- 117. API with NestJS #117. CORS – Cross-Origin Resource Sharing
- 118. API with NestJS #118. Uploading and streaming videos
- 119. API with NestJS #119. Type-safe SQL queries with Kysely and PostgreSQL
- 120. API with NestJS #120. One-to-one relationships with the Kysely query builder
- 121. API with NestJS #121. Many-to-one relationships with PostgreSQL and Kysely
When managing the architecture of our system, we often deal with sensitive data. It’s our job to ensure they don’t fall into the wrong hands. An excellent example of confidential information is the database password and the Json Web Token secret key. In this article, we explore how we can use the AWS Secrets Manager to increase the security of our NestJS application.
Defining environment variables
It’s tough to hide a piece of information when it is included in the source code of our application.
database.module.ts
|
1 2 3 4 5 6 7 8 9 10 11 12 13 14 15 16 17 18 19 20 21 22 |
import { Module } from '@nestjs/common'; import { TypeOrmModule } from '@nestjs/typeorm'; import { ConfigModule, ConfigService } from '@nestjs/config'; @Module({ imports: [ TypeOrmModule.forRootAsync({ imports: [ConfigModule], inject: [ConfigService], useFactory: () => ({ type: 'postgres', host: 'postgres', port: 5432, username: 'admin', password: 'myStrongPassword', database: 'nestjs', autoLoadEntities: true, }), }), ], }) export class DatabaseModule {} |
With the above approach, everyone with access to our code has full access to our database. This is a significant security issue that might lead to compromising our database. This might be especially apparent if we write open-source software, but it is not limited to it. For example, we might have teammates we trust enough to provide them with the code, but we wouldn’t want them tinkering with the production database.
Besides that, our testing environment will surely use a different database than the production environment. When we include environment-specific details in our code, we don’t have a straightforward way of reusing our code across different environments.
We can solve the above problems by externalizing specific values in the form of environment variables. The NestJS application we’ve created during this series has a bunch of them. A good example is the password of our PostgreSQL database. A good way of introducing an environment variable is to add it to our validationSchema. When doing that, we force NestJS to check if all necessary environment variables are provided. If we forget to provide a specific variable we marked as required, the application won’t start.
app.module.ts
|
1 2 3 4 5 6 7 8 9 10 11 12 13 14 15 16 17 18 19 20 21 22 23 24 |
import { Module } from '@nestjs/common'; import { ConfigModule } from '@nestjs/config'; import * as Joi from 'joi'; @Module({ imports: [ ConfigModule.forRoot({ validationSchema: Joi.object({ POSTGRES_HOST: Joi.string().required(), POSTGRES_PORT: Joi.number().required(), POSTGRES_USER: Joi.string().required(), POSTGRES_PASSWORD: Joi.string().required(), POSTGRES_DB: Joi.string().required(), JWT_SECRET: Joi.string().required(), JWT_EXPIRATION_TIME: Joi.string().required(), PORT: Joi.number(), }), }), // ... ], controllers: [], providers: [], }) export class AppModule {} |
Using environment variables, we can now improve our DatabaseModule and avoid hardcoding sensitive information in our code.
database.module.ts
|
1 2 3 4 5 6 7 8 9 10 11 12 13 14 15 16 17 18 19 20 21 22 23 24 |
import { Module } from '@nestjs/common'; import { TypeOrmModule } from '@nestjs/typeorm'; import { ConfigModule, ConfigService } from '@nestjs/config'; import Address from '../users/address.entity'; @Module({ imports: [ TypeOrmModule.forRootAsync({ imports: [ConfigModule], inject: [ConfigService], useFactory: (configService: ConfigService) => ({ type: 'postgres', host: configService.get('POSTGRES_HOST'), port: configService.get('POSTGRES_PORT'), username: configService.get('POSTGRES_USER'), password: configService.get('POSTGRES_PASSWORD'), database: configService.get('POSTGRES_DB'), entities: [Address], autoLoadEntities: true, }), }), ], }) export class DatabaseModule {} |
Providing the values for the environment variables
When we develop and run our application locally on our machine, we can provide the values for our environment variables by creating a dedicated file called .env.
It is a good practice to avoid commiting the .env file to the repository.
.env
|
1 2 3 4 5 6 7 8 9 10 |
POSTGRES_HOST=postgres POSTGRES_PORT=5432 POSTGRES_USER=admin POSTGRES_PASSWORD=admin POSTGRES_DB=nestjs JWT_SECRET=K@%96e86Dnkp2Zye JWT_EXPIRATION_TIME=21600 PORT=3000 |
Since our application runs in Docker, we need to point it to the file containing our environment variables.
docker-compose.yml
|
1 2 3 4 5 6 7 8 |
services: nestjs-api: build: context: . target: install-dependencies env_file: - .env # ... |
If you want to know more about running NestJS using Docker, check out API with NestJS #91. Dockerizing a NestJS API with Docker Compose
Environment variables values in ECS
In one of the previous parts of this series, we learned how to deploy our NestJS application using Amazon Elastic Container Service. One of the important parts of it was providing the environment variables for our application running in the cluster.
So far, we’ve been doing that by putting the values directly into the task definition.
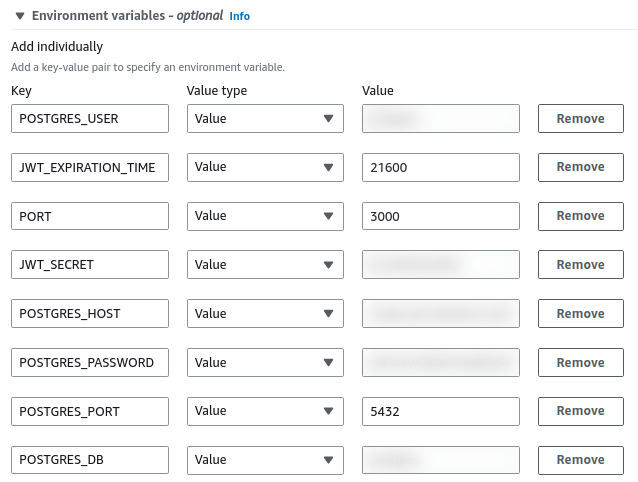
Unfortunately, this has some downsides. First, we need to acknowledge that in real-life scenarios, a web application is managed by a whole team of people. Each person might have their own AWS account and access to certain parts of our configuration.
With the above approach, everyone who can access our task definition has access to all of our environment variables, including sensitive data. To deal with this issue, we can use the AWS Secrets Manager.
Introducing AWS Secrets Manager
With AWS Secrets Manager, we can control access to sensitive information, such as database credentials and private keys. We can also rotate them by configuring AWS to change the passwords automatically.
Integration with RDS
Let’s start by opening the Secrets Manager dashboard and going to the secrets page. When we do that, we notice that we might already have some secrets defined.
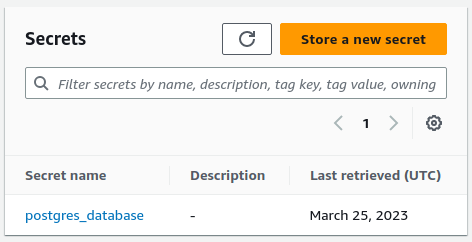
This is because Relational Database Service (RDS) is integrated with the Secrets Manager. When we created our database, AWS stored our credentials in the Secrets Manager.
If you want to read morea bout using the Relational Database Service, check out API with NestJS #93. Deploying a NestJS app with Amazon ECS and RDS
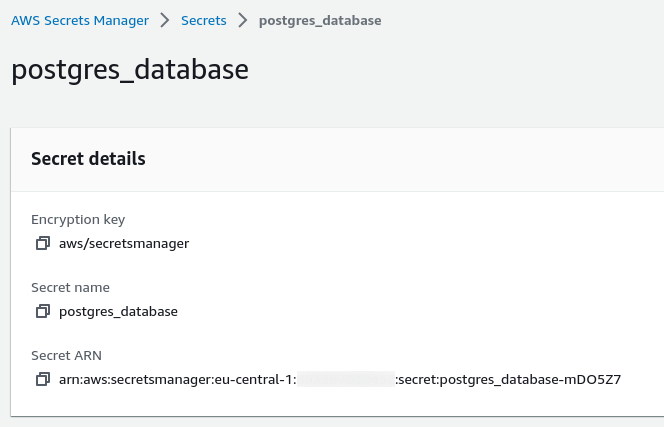
When we click on the name of our secret, we can access all of the associated values.
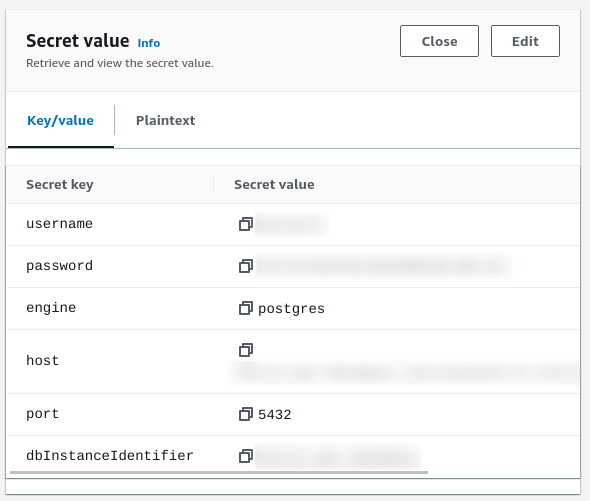
To be able to refer to the secret values in the Elastic Container Service, we need the Amazon Resource Name (ARN) of our secret. You can find it at the top of the page.
Creating new secrets
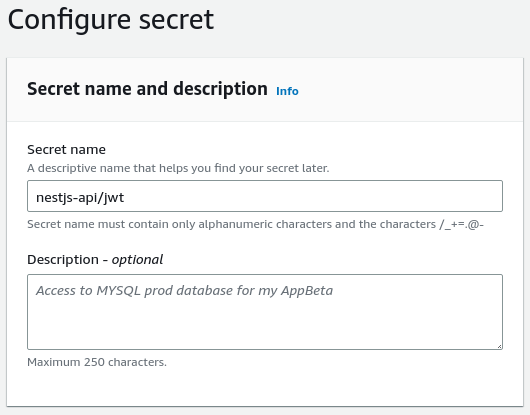
Besides the database, we also have other sensitive information in our environment variables, such as the JWT secret key. Therefore, let’s create a new secret to hold it.
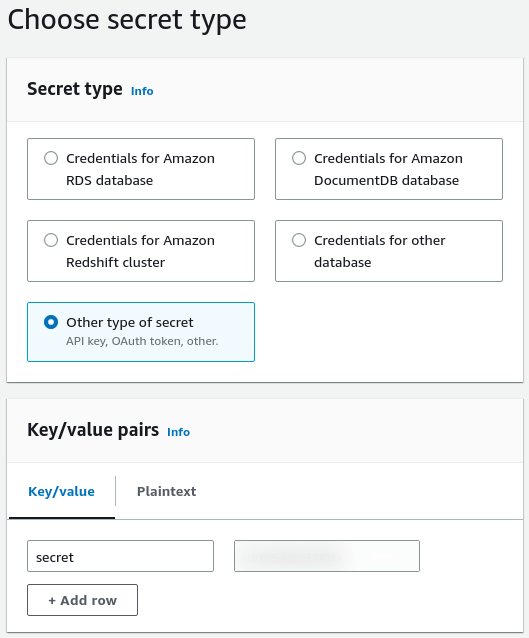
To do that, we need to click the “Store a new secret” button on the secrets page. Then, we must choose the right secret type and define key/value pairs. In the case of our JWT token, the only thing we want to store for now is the secret key.
We also need to provide our secret with a name.
Allowing the service to use our secrets
By default, our services can’t access any of our secrets. To allow that, we need to create an IAM policy with the correct permissions.
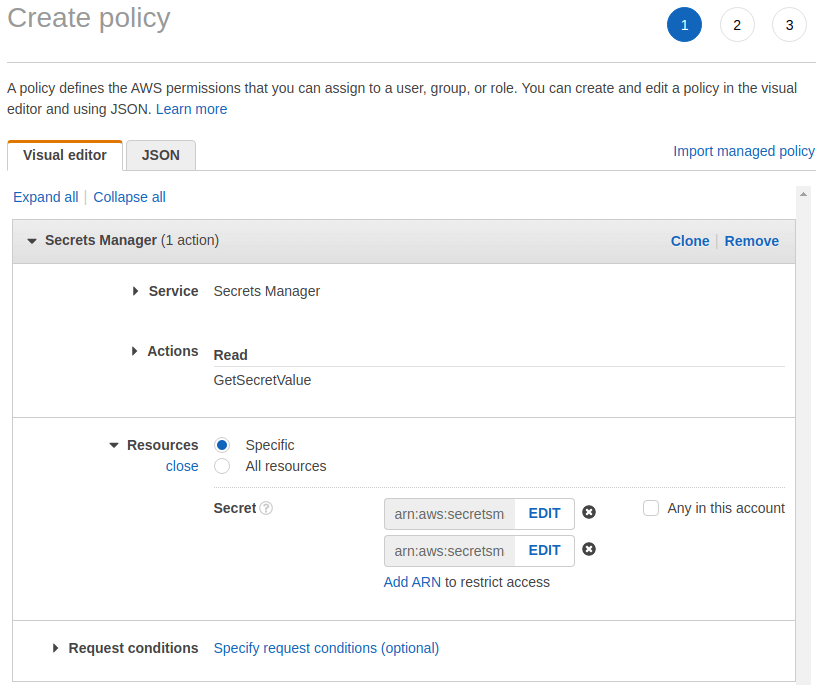
Make sure to put the correct resource names in the resources part of the above interface. You can find the Amazon Resource Name (ARN) of each secret on its page in the Secrets Manager.
We also need to give a name to our policy.
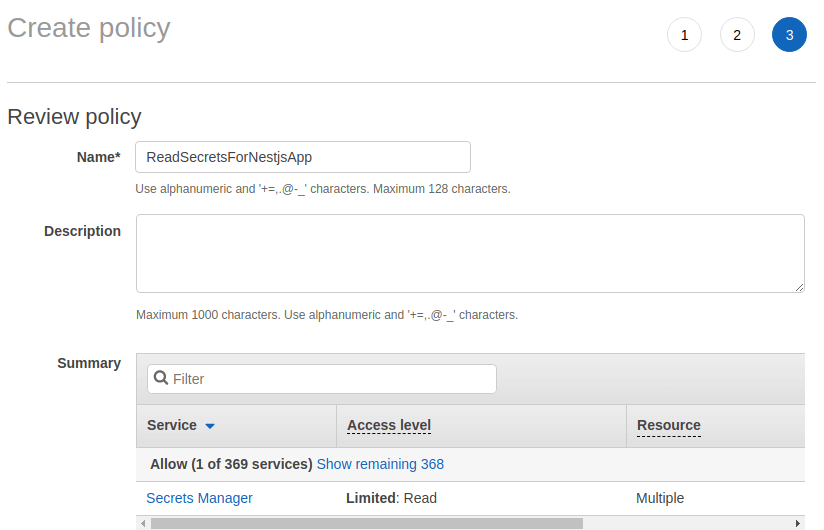
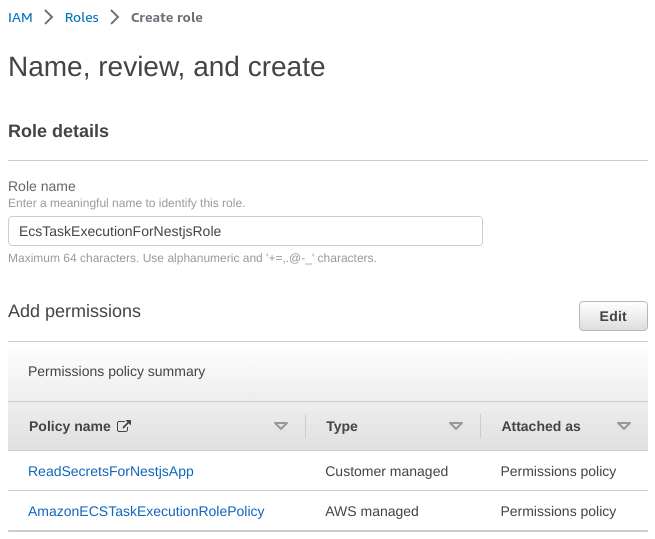
By default, AWS uses the ecsTaskExecutionRole IAM role when executing our ECS tasks.

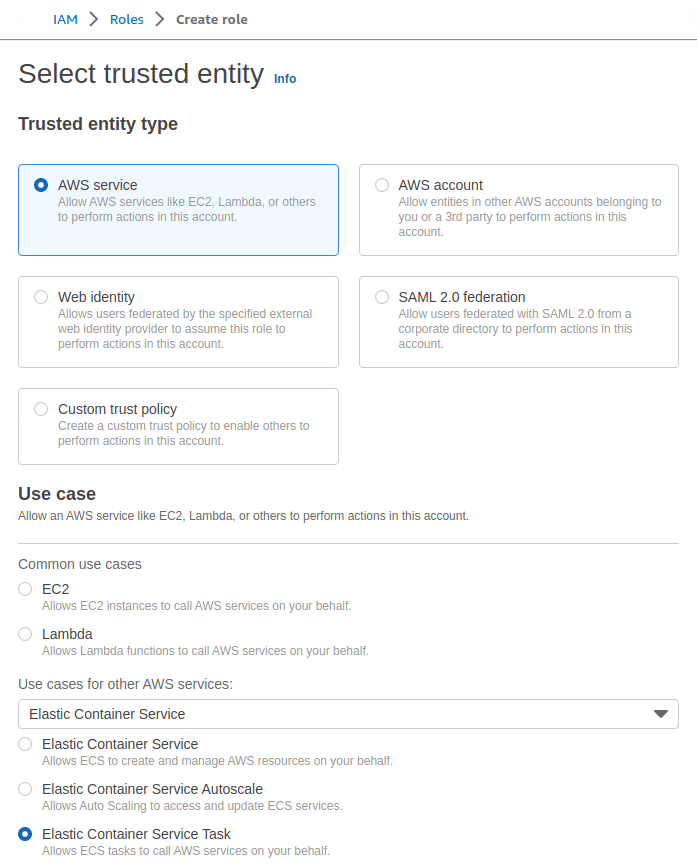
We can create our custom IAM role containing the permissions in the ecsTaskExecutionRole and our new ReadSecretsForNestjsApp policy. When doing that, it’s important to select the correct use case.
We also need to provide our new role with the required permissions.
Thanks to doing the above, we can choose our new role when defining the task definition. If we do that, our service will be able to use the secrets we’ve created.

Using the secret values
The last step is to modify our task definition to use the values from the secrets manager.
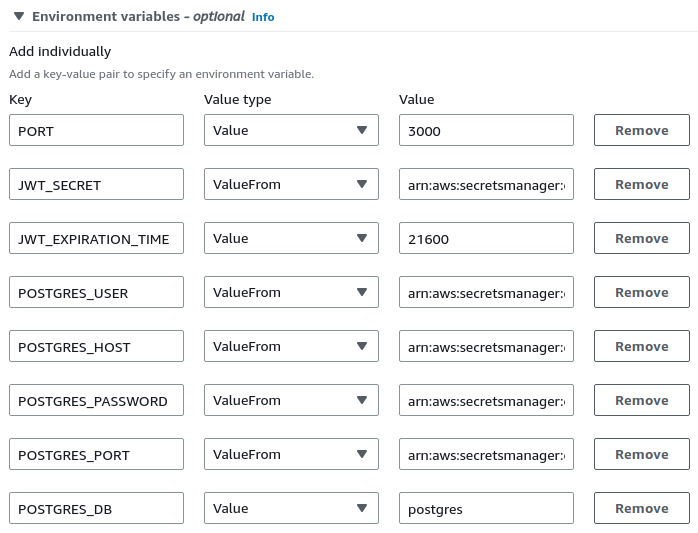
To use a value from the secrets manager, we must choose ValueFrom as the value type. The most crucial thing is using the right resource name as values in our environment variables.
The resource name consists of the following parts: arn:aws:secretsmanager:[region]:[aws_account_id]:secret:[secret_name]. By adding :[key_name]:: at the end of the resource name, we can refer to one of the keys of our secret, for example, postgres_database-mDO5Z7:password::.
Therefore, in our case, we use the following values:
- arn:aws:secretsmanager:eu-central-1:[aws_account_id]:secret:nestjs-api/jwt-jnN3CB:secret::
- arn:aws:secretsmanager:eu-central-1:[aws_account_id]:secret:postgres_database-mDO5Z7:username::
- arn:aws:secretsmanager:eu-central-1:[aws_account_id]:secret:postgres_database-mDO5Z7:host::
- arn:aws:secretsmanager:eu-central-1:[aws_account_id]:secret:postgres_database-mDO5Z7:password::
- arn:aws:secretsmanager:eu-central-1:[aws_account_id]:secret:postgres_database-mDO5Z7:port::
Summary
In this article, we’ve increased the security of our architecture. To do that, we stored sensitive data necessary for our NestJS application to run in the AWS Secrets Manager. While doing that, we also had to create additional policies and roles so that our service would have access to the secrets. Thanks to all of the above, we’ve improved our workflow and learned more about AWS.

