
- 1. API with NestJS #1. Controllers, routing and the module structure
- 2. API with NestJS #2. Setting up a PostgreSQL database with TypeORM
- 3. API with NestJS #3. Authenticating users with bcrypt, Passport, JWT, and cookies
- 4. API with NestJS #4. Error handling and data validation
- 5. API with NestJS #5. Serializing the response with interceptors
- 6. API with NestJS #6. Looking into dependency injection and modules
- 7. API with NestJS #7. Creating relationships with Postgres and TypeORM
- 8. API with NestJS #8. Writing unit tests
- 9. API with NestJS #9. Testing services and controllers with integration tests
- 10. API with NestJS #10. Uploading public files to Amazon S3
- 11. API with NestJS #11. Managing private files with Amazon S3
- 12. API with NestJS #12. Introduction to Elasticsearch
- 13. API with NestJS #13. Implementing refresh tokens using JWT
- 14. API with NestJS #14. Improving performance of our Postgres database with indexes
- 15. API with NestJS #15. Defining transactions with PostgreSQL and TypeORM
- 16. API with NestJS #16. Using the array data type with PostgreSQL and TypeORM
- 17. API with NestJS #17. Offset and keyset pagination with PostgreSQL and TypeORM
- 18. API with NestJS #18. Exploring the idea of microservices
- 19. API with NestJS #19. Using RabbitMQ to communicate with microservices
- 20. API with NestJS #20. Communicating with microservices using the gRPC framework
- 21. API with NestJS #21. An introduction to CQRS
- 22. API with NestJS #22. Storing JSON with PostgreSQL and TypeORM
- 23. API with NestJS #23. Implementing in-memory cache to increase the performance
- 24. API with NestJS #24. Cache with Redis. Running the app in a Node.js cluster
- 25. API with NestJS #25. Sending scheduled emails with cron and Nodemailer
- 26. API with NestJS #26. Real-time chat with WebSockets
- 27. API with NestJS #27. Introduction to GraphQL. Queries, mutations, and authentication
- 28. API with NestJS #28. Dealing in the N + 1 problem in GraphQL
- 29. API with NestJS #29. Real-time updates with GraphQL subscriptions
- 30. API with NestJS #30. Scalar types in GraphQL
- 31. API with NestJS #31. Two-factor authentication
- 32. API with NestJS #32. Introduction to Prisma with PostgreSQL
- 33. API with NestJS #33. Managing PostgreSQL relationships with Prisma
- 34. API with NestJS #34. Handling CPU-intensive tasks with queues
- 35. API with NestJS #35. Using server-side sessions instead of JSON Web Tokens
- 36. API with NestJS #36. Introduction to Stripe with React
- 37. API with NestJS #37. Using Stripe to save credit cards for future use
- 38. API with NestJS #38. Setting up recurring payments via subscriptions with Stripe
- 39. API with NestJS #39. Reacting to Stripe events with webhooks
- 40. API with NestJS #40. Confirming the email address
- 41. API with NestJS #41. Verifying phone numbers and sending SMS messages with Twilio
- 42. API with NestJS #42. Authenticating users with Google
- 43. API with NestJS #43. Introduction to MongoDB
- 44. API with NestJS #44. Implementing relationships with MongoDB
- 45. API with NestJS #45. Virtual properties with MongoDB and Mongoose
- 46. API with NestJS #46. Managing transactions with MongoDB and Mongoose
- 47. API with NestJS #47. Implementing pagination with MongoDB and Mongoose
- 48. API with NestJS #48. Definining indexes with MongoDB and Mongoose
- 49. API with NestJS #49. Updating with PUT and PATCH with MongoDB and Mongoose
- 50. API with NestJS #50. Introduction to logging with the built-in logger and TypeORM
- 51. API with NestJS #51. Health checks with Terminus and Datadog
- 52. API with NestJS #52. Generating documentation with Compodoc and JSDoc
- 53. API with NestJS #53. Implementing soft deletes with PostgreSQL and TypeORM
- 54. API with NestJS #54. Storing files inside a PostgreSQL database
- 55. API with NestJS #55. Uploading files to the server
- 56. API with NestJS #56. Authorization with roles and claims
- 57. API with NestJS #57. Composing classes with the mixin pattern
- 58. API with NestJS #58. Using ETag to implement cache and save bandwidth
- 59. API with NestJS #59. Introduction to a monorepo with Lerna and Yarn workspaces
- 60. API with NestJS #60. The OpenAPI specification and Swagger
- 61. API with NestJS #61. Dealing with circular dependencies
- 62. API with NestJS #62. Introduction to MikroORM with PostgreSQL
- 63. API with NestJS #63. Relationships with PostgreSQL and MikroORM
- 64. API with NestJS #64. Transactions with PostgreSQL and MikroORM
- 65. API with NestJS #65. Implementing soft deletes using MikroORM and filters
- 66. API with NestJS #66. Improving PostgreSQL performance with indexes using MikroORM
- 67. API with NestJS #67. Migrating to TypeORM 0.3
- 68. API with NestJS #68. Interacting with the application through REPL
- 69. API with NestJS #69. Database migrations with TypeORM
- 70. API with NestJS #70. Defining dynamic modules
- 71. API with NestJS #71. Introduction to feature flags
- 72. API with NestJS #72. Working with PostgreSQL using raw SQL queries
- 73. API with NestJS #73. One-to-one relationships with raw SQL queries
- 74. API with NestJS #74. Designing many-to-one relationships using raw SQL queries
- 75. API with NestJS #75. Many-to-many relationships using raw SQL queries
- 76. API with NestJS #76. Working with transactions using raw SQL queries
- 77. API with NestJS #77. Offset and keyset pagination with raw SQL queries
- 78. API with NestJS #78. Generating statistics using aggregate functions in raw SQL
- 79. API with NestJS #79. Implementing searching with pattern matching and raw SQL
- 80. API with NestJS #80. Updating entities with PUT and PATCH using raw SQL queries
- 81. API with NestJS #81. Soft deletes with raw SQL queries
- 82. API with NestJS #82. Introduction to indexes with raw SQL queries
- 83. API with NestJS #83. Text search with tsvector and raw SQL
- 84. API with NestJS #84. Implementing filtering using subqueries with raw SQL
- 85. API with NestJS #85. Defining constraints with raw SQL
- 86. API with NestJS #86. Logging with the built-in logger when using raw SQL
- 87. API with NestJS #87. Writing unit tests in a project with raw SQL
- 88. API with NestJS #88. Testing a project with raw SQL using integration tests
- 89. API with NestJS #89. Replacing Express with Fastify
- 90. API with NestJS #90. Using various types of SQL joins
- 91. API with NestJS #91. Dockerizing a NestJS API with Docker Compose
- 92. API with NestJS #92. Increasing the developer experience with Docker Compose
- 93. API with NestJS #93. Deploying a NestJS app with Amazon ECS and RDS
- 94. API with NestJS #94. Deploying multiple instances on AWS with a load balancer
- 95. API with NestJS #95. CI/CD with Amazon ECS and GitHub Actions
- 96. API with NestJS #96. Running unit tests with CI/CD and GitHub Actions
- 97. API with NestJS #97. Introduction to managing logs with Amazon CloudWatch
- 98. API with NestJS #98. Health checks with Terminus and Amazon ECS
- 99. API with NestJS #99. Scaling the number of application instances with Amazon ECS
- 100. API with NestJS #100. The HTTPS protocol with Route 53 and AWS Certificate Manager
- 101. API with NestJS #101. Managing sensitive data using the AWS Secrets Manager
- 102. API with NestJS #102. Writing unit tests with Prisma
- 103. API with NestJS #103. Integration tests with Prisma
- 104. API with NestJS #104. Writing transactions with Prisma
- 105. API with NestJS #105. Implementing soft deletes with Prisma and middleware
- 106. API with NestJS #106. Improving performance through indexes with Prisma
- 107. API with NestJS #107. Offset and keyset pagination with Prisma
- 108. API with NestJS #108. Date and time with Prisma and PostgreSQL
- 109. API with NestJS #109. Arrays with PostgreSQL and Prisma
- 110. API with NestJS #110. Managing JSON data with PostgreSQL and Prisma
- 111. API with NestJS #111. Constraints with PostgreSQL and Prisma
- 112. API with NestJS #112. Serializing the response with Prisma
- 113. API with NestJS #113. Logging with Prisma
- 114. API with NestJS #114. Modifying data using PUT and PATCH methods with Prisma
- 115. API with NestJS #115. Database migrations with Prisma
- 116. API with NestJS #116. REST API versioning
- 117. API with NestJS #117. CORS – Cross-Origin Resource Sharing
- 118. API with NestJS #118. Uploading and streaming videos
- 119. API with NestJS #119. Type-safe SQL queries with Kysely and PostgreSQL
- 120. API with NestJS #120. One-to-one relationships with the Kysely query builder
- 121. API with NestJS #121. Many-to-one relationships with PostgreSQL and Kysely
In the latest articles, we deployed our NestJS application using AWS. However, we’ve been exclusively using the HTTP protocol so far. You probably noticed that almost every website nowadays uses HTTPS. And no wonder, because it solves a bunch of problems and makes surfing the internet more secure. In this article, we prepare our architecture to use HTTPS with AWS Certificate Manager. We also explain why establishing a secure connection to our API is worth it.
How using HTTPS benefits us
One of the malicious behaviors HTTPS can mitigate is the man in the middle. In this situation, the attackers put themselves between the client and the server. As a result, they can see the traffic, modify it, and pass it to the destination. All while remaining unnoticed. Picture sending a password to your banking account when they are listening!
The above situation is possible because we send the data in plain text when using HTTP. On the other hand, HTTPS uses encryption. Even if the attackers eavesdrop on our communication, they can’t make much sense of it. It is crucial when using a public WiFi network, such as in a restaurant or a hotel. The hacker can set up a WiFi hotspot named after a real public network hoping people would connect to it instead of the real hotspot. This is sometimes referred to as the “evil twin” attack.
Certificates
Besides encryption, HTTPS also aims to authenticate a website’s identity. For example, let’s open Twitter and click on the padlock next to the URL. By doing that, we can view its certificate.
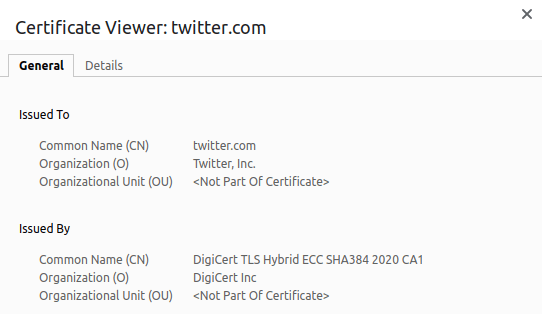
To implement HTTPS on our site, we need to have a certificate issued by a certificate authority. In the screenshot above, you can see that the certificate for Twitter was issued by DigiCert. The owner of each website that uses HTTPS needs a certificate that verifies their ownership of the domain. Chrome gets the list of certificate authorities from our operating system. Firefox manages its own list. If a certificate was issued by an authority that’s not on the list, the browser won’t trust it and will display a warning.
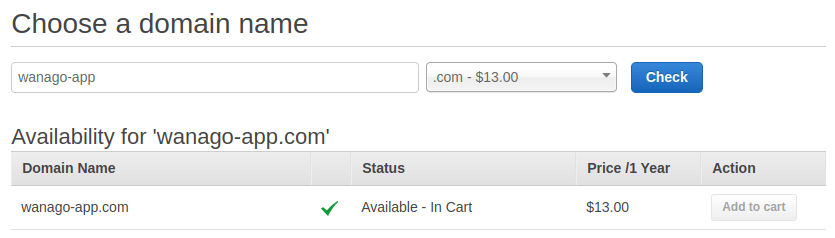
Getting a custom domain with Route 53
Since a part of HTTPS is authenticating a website’s identity, we should get our custom domain first. To do that, we can use the Route 53 service built into AWS.
Once we register the domain, AWS will send us an email with a link. We need to open it to confirm our email address.
In one of the previous articles, we learned how to manage our NestJS instances using the Application Load Balancer. This way, we can access our API through a URL such as http://my-load-balancer-30720979.eu-central-1.elb.amazonaws.com.
When we register a domain through Route 53, it creates a hosted zone for us. It’s a collection of DNS information that describes how we route traffic to the domain and its subdomains.
Since we now have a custom domain bought and managed through Route 53, we can set up our hosted zone to route the traffic to our load balancer.
To associate our domain with our load balancer, we need to go to the configuration page of our hosted zone.
We must now click the “Create record” button and choose the “Simple routing” policy.
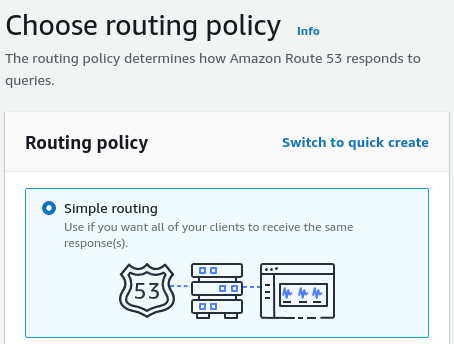
Then, we need to click the “Define simple record” button and choose our existing load balancer.
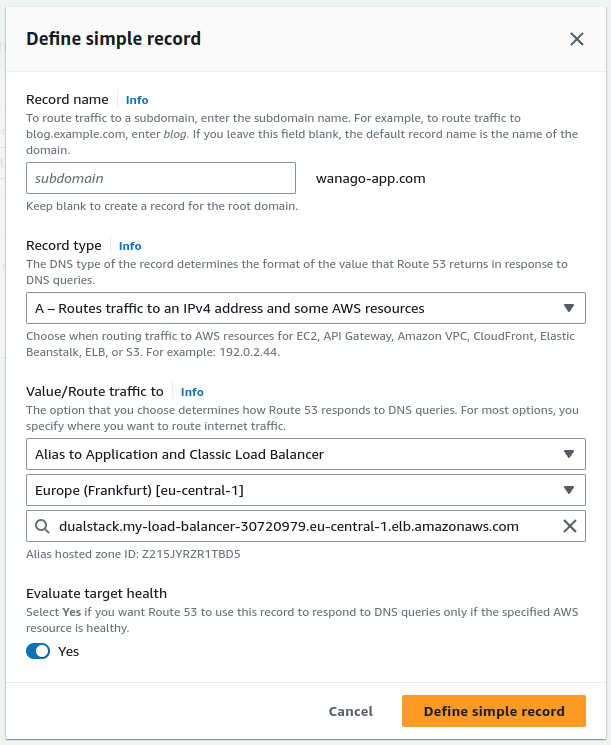
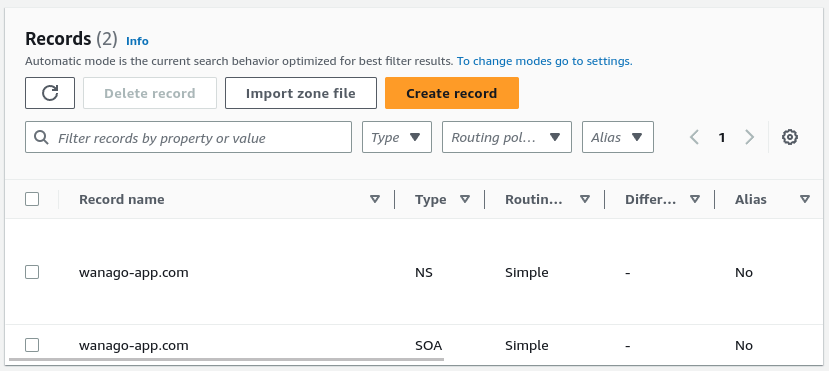
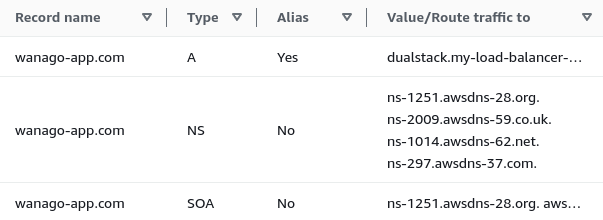
Once we do the above, we can see a new record created for our hosted zone.
To communicate with a particular server, we need to know its exact address. Memorizing the IP addresses of all websites we visit would be very difficult for most people. Fortunately, we can use domain names that are a lot easier to wrap your head around. When we request a website under a particular domain, the Domain Name System (DNS) translates it to a machine-readable IP address.
The DNS servers contain DNS records that serve as various pieces of information about our domain. So far, we have three DNS records:
- A record – holds the IP address of our domain. We created it when we associated our hosted zone with the load balancer.
- NS record – contains the name server for the DNS entry.
- SOA record – holds the admin information about the domain.
Thanks to doing all of the above, our API is now accessible through our custom domain.
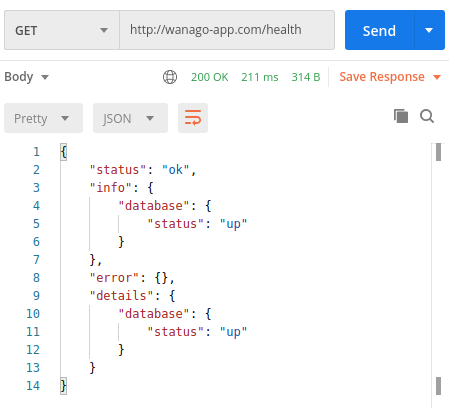
Above, we make a request to our health check endpoint. If you want to know more, check out API with NestJS #98. Health checks with Terminus and Amazon ECS
Getting a certificate with AWS Certificate Manager
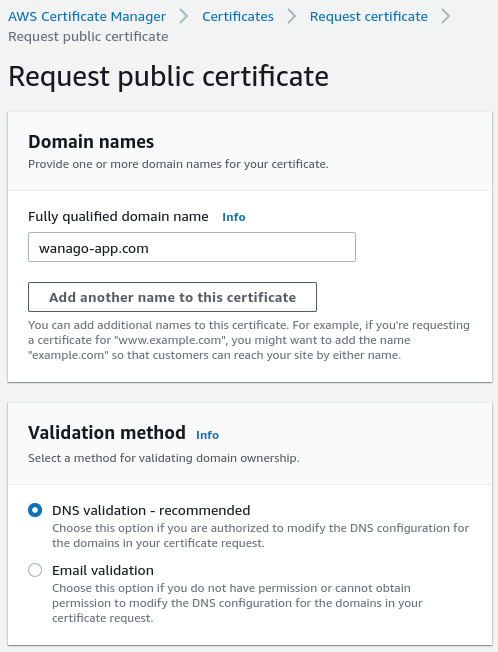
One way to obtain a certificate is to use AWS Certificate Manager. Let’s open it and click the “Request a certificate” button.
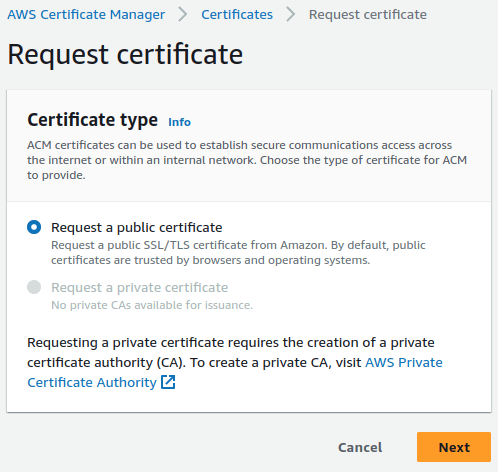
When we do that, we need to provide our domain name. We also need to select how we want to prove that we own our domain.
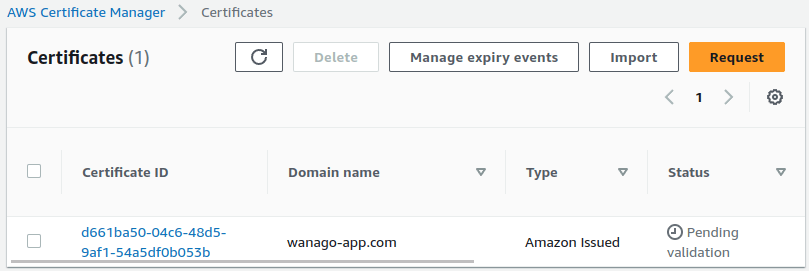
When we do the above, our new certificate is visible on the list.
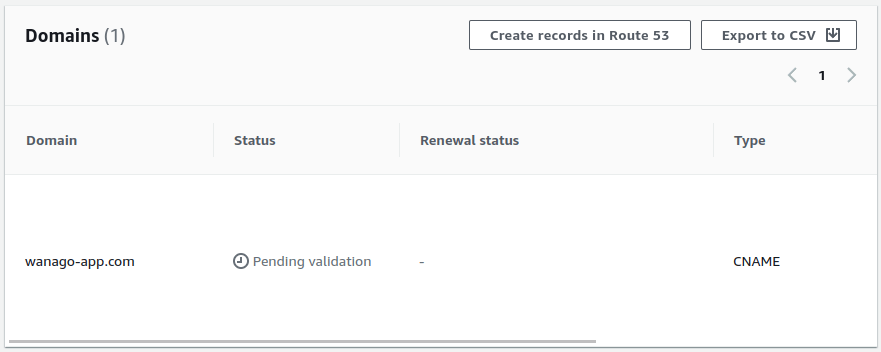
Since we chose the “DNS validation”, we must perform additional actions. Let’s click on the above certificate to open it up.
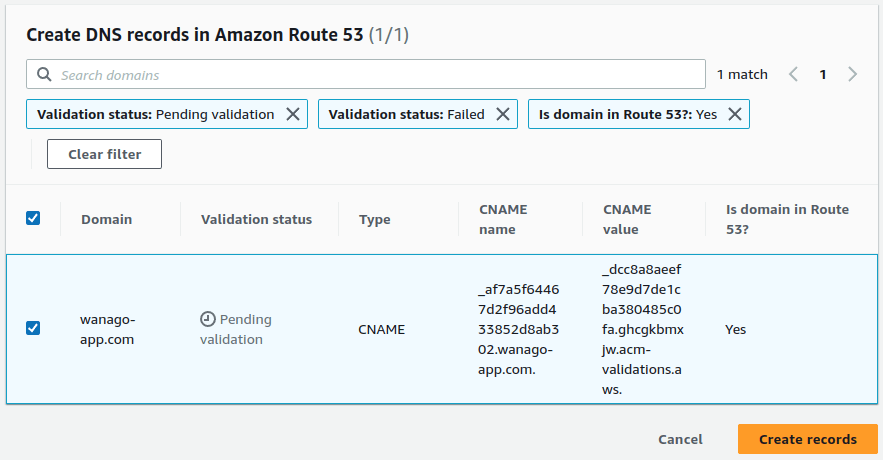
Above, we can see the “Create records in Route 53” button. When we do that, we can add a CNAME DNS record to our domain with the value requested by the AWS Certificate Manager. Doing that proves that we are the owner of the domain.
Modifying our load balancer
The default port for websites accessed through HTTP is 80. Therefore, we’ve set up our load balancer to listen to the incoming traffic on port 80. However, the default port for websites accessed through HTTPS is 443. Therefore, we need to modify our load balancer and listen to the traffic on port 443.
To do that, we need to open the EC2 management console and go to the configuration of our application balancer. Then, we need to click on the “Add listener” button.
The first thing to set up in our listener is the “forward” action, where we select our target group.

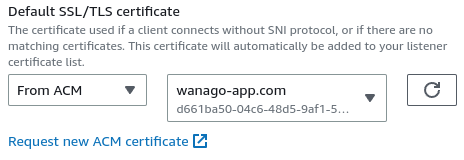
We also need to select the certificate we generated through AWS Certificate Manager.
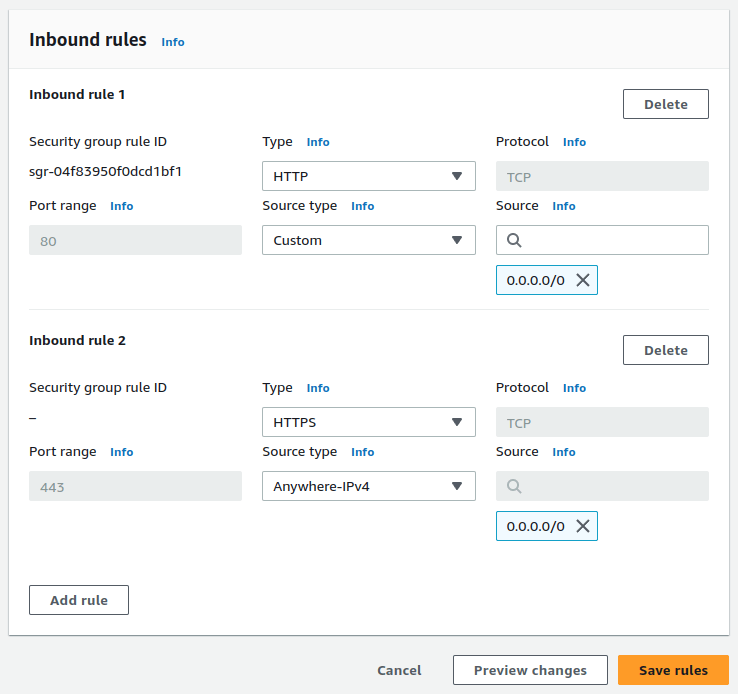
Besides the above, we need to go to the configuration of the security group attached to our Application Load Balancer and add HTTPS to the inbound rules.
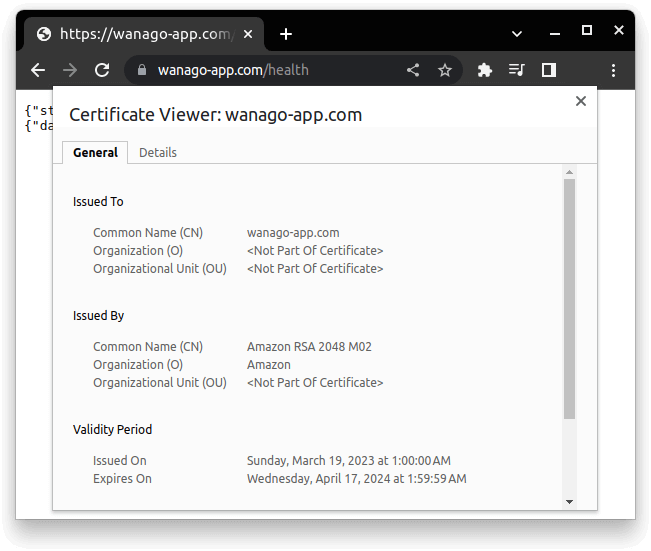
Once we do all of the above, we can access our API through HTTPS.
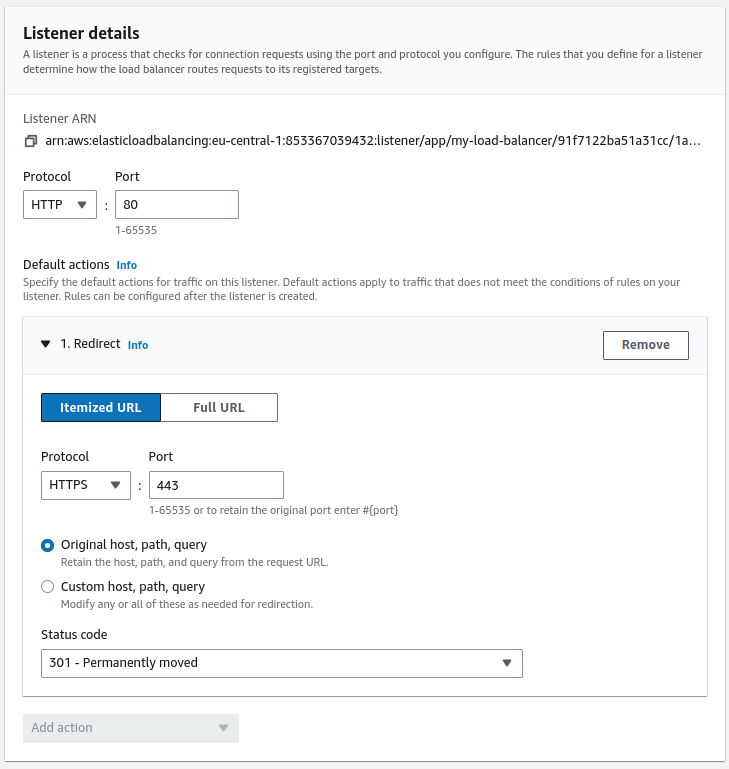
Redirecting the HTTP traffic
So far, our API is accessible both through HTTP and HTTPS. Since accessing our website through HTTPS is much safer, we can enforce that by redirecting the user to the HTTPS version automatically.
To do that, we need to modify the HTTP listener in our load balancer configuration.
Summary
In this article, we’ve bought a new domain using Route 53 and attached it to our REST API made with NestJS. We’ve also generated a new certificate using the AWS Certificate Manager and associated it with our domain. Finally, thanks to making some changes to our load balancer, we’ve achieved a secure HTTPS connection to our API.
There is still more to learn when it comes to deploying NestJS with AWS, so stay tuned for more articles.

Congrats on 100!!!!
This website is a blessing for any backend dev.