
- 1. API with NestJS #1. Controllers, routing and the module structure
- 2. API with NestJS #2. Setting up a PostgreSQL database with TypeORM
- 3. API with NestJS #3. Authenticating users with bcrypt, Passport, JWT, and cookies
- 4. API with NestJS #4. Error handling and data validation
- 5. API with NestJS #5. Serializing the response with interceptors
- 6. API with NestJS #6. Looking into dependency injection and modules
- 7. API with NestJS #7. Creating relationships with Postgres and TypeORM
- 8. API with NestJS #8. Writing unit tests
- 9. API with NestJS #9. Testing services and controllers with integration tests
- 10. API with NestJS #10. Uploading public files to Amazon S3
- 11. API with NestJS #11. Managing private files with Amazon S3
- 12. API with NestJS #12. Introduction to Elasticsearch
- 13. API with NestJS #13. Implementing refresh tokens using JWT
- 14. API with NestJS #14. Improving performance of our Postgres database with indexes
- 15. API with NestJS #15. Defining transactions with PostgreSQL and TypeORM
- 16. API with NestJS #16. Using the array data type with PostgreSQL and TypeORM
- 17. API with NestJS #17. Offset and keyset pagination with PostgreSQL and TypeORM
- 18. API with NestJS #18. Exploring the idea of microservices
- 19. API with NestJS #19. Using RabbitMQ to communicate with microservices
- 20. API with NestJS #20. Communicating with microservices using the gRPC framework
- 21. API with NestJS #21. An introduction to CQRS
- 22. API with NestJS #22. Storing JSON with PostgreSQL and TypeORM
- 23. API with NestJS #23. Implementing in-memory cache to increase the performance
- 24. API with NestJS #24. Cache with Redis. Running the app in a Node.js cluster
- 25. API with NestJS #25. Sending scheduled emails with cron and Nodemailer
- 26. API with NestJS #26. Real-time chat with WebSockets
- 27. API with NestJS #27. Introduction to GraphQL. Queries, mutations, and authentication
- 28. API with NestJS #28. Dealing in the N + 1 problem in GraphQL
- 29. API with NestJS #29. Real-time updates with GraphQL subscriptions
- 30. API with NestJS #30. Scalar types in GraphQL
- 31. API with NestJS #31. Two-factor authentication
- 32. API with NestJS #32. Introduction to Prisma with PostgreSQL
- 33. API with NestJS #33. Managing PostgreSQL relationships with Prisma
- 34. API with NestJS #34. Handling CPU-intensive tasks with queues
- 35. API with NestJS #35. Using server-side sessions instead of JSON Web Tokens
- 36. API with NestJS #36. Introduction to Stripe with React
- 37. API with NestJS #37. Using Stripe to save credit cards for future use
- 38. API with NestJS #38. Setting up recurring payments via subscriptions with Stripe
- 39. API with NestJS #39. Reacting to Stripe events with webhooks
- 40. API with NestJS #40. Confirming the email address
- 41. API with NestJS #41. Verifying phone numbers and sending SMS messages with Twilio
- 42. API with NestJS #42. Authenticating users with Google
- 43. API with NestJS #43. Introduction to MongoDB
- 44. API with NestJS #44. Implementing relationships with MongoDB
- 45. API with NestJS #45. Virtual properties with MongoDB and Mongoose
- 46. API with NestJS #46. Managing transactions with MongoDB and Mongoose
- 47. API with NestJS #47. Implementing pagination with MongoDB and Mongoose
- 48. API with NestJS #48. Definining indexes with MongoDB and Mongoose
- 49. API with NestJS #49. Updating with PUT and PATCH with MongoDB and Mongoose
- 50. API with NestJS #50. Introduction to logging with the built-in logger and TypeORM
- 51. API with NestJS #51. Health checks with Terminus and Datadog
- 52. API with NestJS #52. Generating documentation with Compodoc and JSDoc
- 53. API with NestJS #53. Implementing soft deletes with PostgreSQL and TypeORM
- 54. API with NestJS #54. Storing files inside a PostgreSQL database
- 55. API with NestJS #55. Uploading files to the server
- 56. API with NestJS #56. Authorization with roles and claims
- 57. API with NestJS #57. Composing classes with the mixin pattern
- 58. API with NestJS #58. Using ETag to implement cache and save bandwidth
- 59. API with NestJS #59. Introduction to a monorepo with Lerna and Yarn workspaces
- 60. API with NestJS #60. The OpenAPI specification and Swagger
- 61. API with NestJS #61. Dealing with circular dependencies
- 62. API with NestJS #62. Introduction to MikroORM with PostgreSQL
- 63. API with NestJS #63. Relationships with PostgreSQL and MikroORM
- 64. API with NestJS #64. Transactions with PostgreSQL and MikroORM
- 65. API with NestJS #65. Implementing soft deletes using MikroORM and filters
- 66. API with NestJS #66. Improving PostgreSQL performance with indexes using MikroORM
- 67. API with NestJS #67. Migrating to TypeORM 0.3
- 68. API with NestJS #68. Interacting with the application through REPL
- 69. API with NestJS #69. Database migrations with TypeORM
- 70. API with NestJS #70. Defining dynamic modules
- 71. API with NestJS #71. Introduction to feature flags
- 72. API with NestJS #72. Working with PostgreSQL using raw SQL queries
- 73. API with NestJS #73. One-to-one relationships with raw SQL queries
- 74. API with NestJS #74. Designing many-to-one relationships using raw SQL queries
- 75. API with NestJS #75. Many-to-many relationships using raw SQL queries
- 76. API with NestJS #76. Working with transactions using raw SQL queries
- 77. API with NestJS #77. Offset and keyset pagination with raw SQL queries
- 78. API with NestJS #78. Generating statistics using aggregate functions in raw SQL
- 79. API with NestJS #79. Implementing searching with pattern matching and raw SQL
- 80. API with NestJS #80. Updating entities with PUT and PATCH using raw SQL queries
- 81. API with NestJS #81. Soft deletes with raw SQL queries
- 82. API with NestJS #82. Introduction to indexes with raw SQL queries
- 83. API with NestJS #83. Text search with tsvector and raw SQL
- 84. API with NestJS #84. Implementing filtering using subqueries with raw SQL
- 85. API with NestJS #85. Defining constraints with raw SQL
- 86. API with NestJS #86. Logging with the built-in logger when using raw SQL
- 87. API with NestJS #87. Writing unit tests in a project with raw SQL
- 88. API with NestJS #88. Testing a project with raw SQL using integration tests
- 89. API with NestJS #89. Replacing Express with Fastify
- 90. API with NestJS #90. Using various types of SQL joins
- 91. API with NestJS #91. Dockerizing a NestJS API with Docker Compose
- 92. API with NestJS #92. Increasing the developer experience with Docker Compose
- 93. API with NestJS #93. Deploying a NestJS app with Amazon ECS and RDS
- 94. API with NestJS #94. Deploying multiple instances on AWS with a load balancer
- 95. API with NestJS #95. CI/CD with Amazon ECS and GitHub Actions
- 96. API with NestJS #96. Running unit tests with CI/CD and GitHub Actions
- 97. API with NestJS #97. Introduction to managing logs with Amazon CloudWatch
- 98. API with NestJS #98. Health checks with Terminus and Amazon ECS
- 99. API with NestJS #99. Scaling the number of application instances with Amazon ECS
- 100. API with NestJS #100. The HTTPS protocol with Route 53 and AWS Certificate Manager
- 101. API with NestJS #101. Managing sensitive data using the AWS Secrets Manager
- 102. API with NestJS #102. Writing unit tests with Prisma
- 103. API with NestJS #103. Integration tests with Prisma
- 104. API with NestJS #104. Writing transactions with Prisma
- 105. API with NestJS #105. Implementing soft deletes with Prisma and middleware
- 106. API with NestJS #106. Improving performance through indexes with Prisma
- 107. API with NestJS #107. Offset and keyset pagination with Prisma
- 108. API with NestJS #108. Date and time with Prisma and PostgreSQL
- 109. API with NestJS #109. Arrays with PostgreSQL and Prisma
- 110. API with NestJS #110. Managing JSON data with PostgreSQL and Prisma
- 111. API with NestJS #111. Constraints with PostgreSQL and Prisma
- 112. API with NestJS #112. Serializing the response with Prisma
- 113. API with NestJS #113. Logging with Prisma
- 114. API with NestJS #114. Modifying data using PUT and PATCH methods with Prisma
- 115. API with NestJS #115. Database migrations with Prisma
- 116. API with NestJS #116. REST API versioning
- 117. API with NestJS #117. CORS – Cross-Origin Resource Sharing
- 118. API with NestJS #118. Uploading and streaming videos
- 119. API with NestJS #119. Type-safe SQL queries with Kysely and PostgreSQL
- 120. API with NestJS #120. One-to-one relationships with the Kysely query builder
- 121. API with NestJS #121. Many-to-one relationships with PostgreSQL and Kysely
In recent articles, we’ve learned how to deploy our NestJS application with Docker and AWS. In addition, we’ve managed to deploy multiple instances of our API using a load balancer. Still, it was always a fixed number of instances. In this article, we learn how to adapt to traffic by changing the number of deployed resources.
A single instance of our application might handle the load on most days. However, we must prepare for events that might increase traffic, such as Black Friday. One of the ways to solve this problem is scaling vertically by adding memory or faster CPUs to our existing server. This is not easy to achieve without downtime, though.
An alternative is scaling horizontally by deploying more instances of our application and distributing the traffic between them. Then, if one of the instances malfunctions, we can effortlessly distribute the workload to other instances. Also, it’s easier to accomplish without downtime.
We must watch out for increasing the bill because additional resources cost money. Fortunately, we can scale our resources automatically based on the traffic. Based on various metrics, we can predict if our existing application instances are reaching their limit and act accordingly.
Cluster Auto Scaling
In one of the previous parts of this series, we learned how to deploy multiple instances of our API using a load balancer. When doing so, we defined the Auto Scaling Group for our cluster.
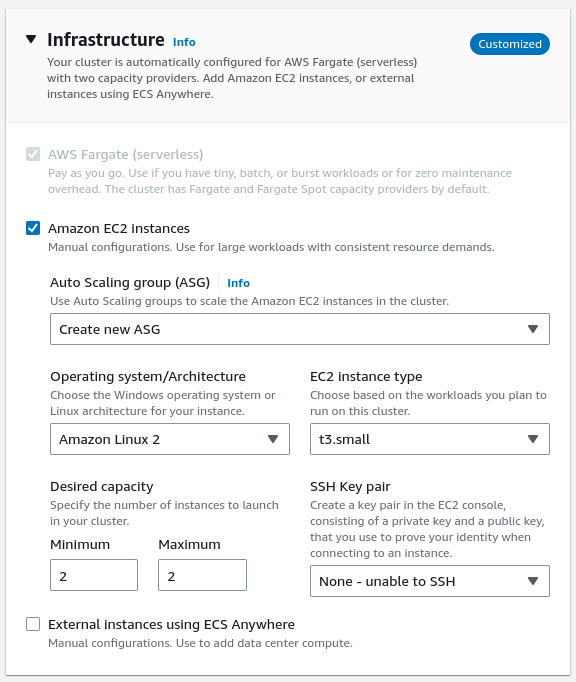
The Auto Scaling Group contains a set of EC2 instances. The number of instances depends on the capacity we set when configuring the group.
In the mentioned article, we set both the minimum and maximum capacity to 2. Because of that, our cluster always launches two EC2 instances. So instead, let’s create a cluster with a broader range of available clusters.
If you want to know moure about the basics of creating clusters with Elastic Container Service, check out the following articles:

Thanks to that, our cluster can:
- scale out by adding EC2 instances to match the increased traffic,
- scale in by removing EC2 instances to match the decreased traffic.
When we want to run our NestJS application in the cluster, we do so by running a task. Thanks to Cluster Auto Scaling, whenever we try running a task that our existing EC2 instances can’t handle, the cluster scales out by adding instances.
If the EC2 instances in our cluster are underutilized, the cluster scales in by removing instances as long as it does not disrupt running tasks.
Creating the ECS service
When we run the specified number of tasks in our ECS cluster, we do that through the ECS service. We have done it multiple times so far in this series, but we need to make a few adjustments for it to scale.
Compute configuration
When creating the ECS service that integrates with the cluster auto scaling, an essential thing is configuring the compute options correctly.
When we configured the cluster auto-scaling for our cluster, we created a capacity provider under the hood. A capacity provider manages the scaling of infrastructure for the tasks in our cluster.
Since we didn’t use cluster auto scaling in the previous parts of this series, we chose the “Launch type” compute options. This time, we need to select the capacity provider strategy.
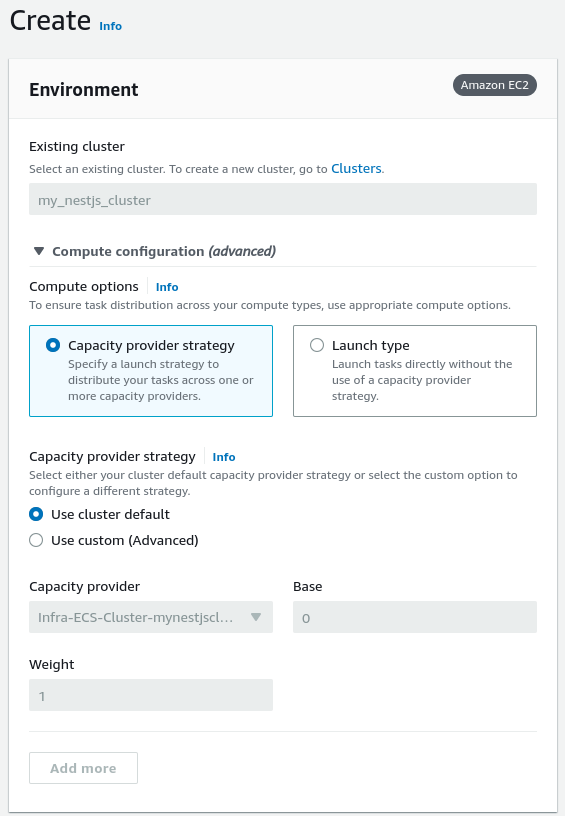
Above, we can see that our capacity provider is chosen by default.
Service auto scaling
When we create the service, we have a chance to set up service auto scaling. Service auto scaling fundamentally differs from the cluster auto scaling we’ve set up before.
When we run one task in our cluster, it deploys one instance of our NestJS application on one of our EC2 instances. Thanks to service auto scaling, we can adjust the number of tasks based on traffic.
When our service tries to run a new task to deploy an additional instance of our NestJS application, there is a chance that we don’t have any free EC2 instances that can handle it. This is where the cluster auto scaling kicks in to run an additional EC2 instance in our cluster.
We can set up the service auto scaling when creating our service. The first thing to do is to set up the minimum and maximum number of tasks that our service handles.
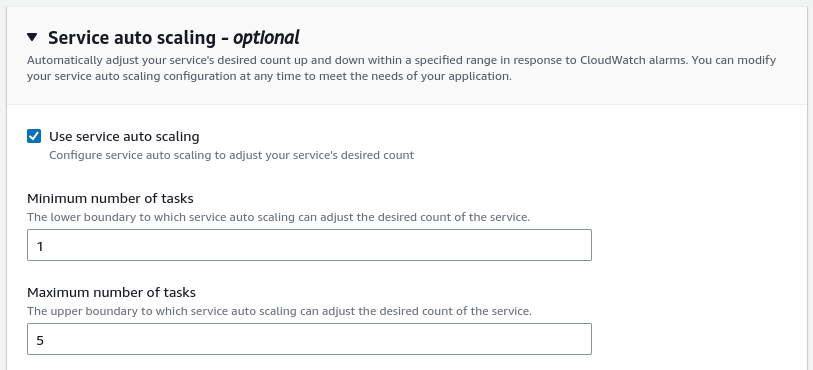
Because of the above configuration, if there is not much traffic, we only run one instance of our NestJS application. However, as the traffic increases, we can run up to five separate instances of our app.
The second thing we need to do is to define a point where our existing NestJS instances are reaching their limit. We do that by defining the scaling policy.
Defining the scaling policy
The new Elastic Container Service interface allows us to set the target tracking policy type. With it, we increase and decrease the number of tasks our service runs based on a specific metric. When we select one of the possible metrics, Amazon ECS creates the CloudWatch alarms. The scaling policy manages the number of tasks to keep the metric close to the specified value. AWS collects metrics in one-minute intervals.
If you want to know more about CloudWatch, check out API with NestJS #97. Introduction to managing logs with Amazon CloudWatch
Let’s go through all three metrics we can choose.
ECSServiceAverageCPUUtilization
The first metric we can choose is ECSServiceAverageCPUUtilization. It measures the average CPU utilization of all the tasks in our service.

ECSServiceAverageMemoryUtilization
Another available metric is ECSServiceAverageMemoryUtilization. It monitors the average memory utilization of tasks in our service.

ALBRequestCountPerTarget
The last possible metric is ALBRequestCountPerTarget. It measures the number of requests completed by each target in our group. If the average number of requests per target during the previous minute is bigger than the specified value, our service can scale out and increase the number of instances.

Target value
After choosing the metric, we must select the value our policy should maintain.
When we choose ECSServiceAverageCPUUtilization or ECSServiceAverageMemoryUtilization, the value represents the utilization in percentage.

Scale-out cooldown period
As mentioned in this article, scaling out means adding more resources to handle the increased traffic.
By specifying the scale-out cooldown period, we can configure the cooldown after adding a new instance to our group. During this time, no new instances will be added.
The above period is measured in seconds.

Scale-in cooldown period
In this article, we’ve mentioned that scaling in means removing resources to match the decreased traffic.
When configuring the scale-in cooldown period, we specify the cooldown after removing instances from our group. During the cooldown period, no instances will be removed.

Optionally, we can disable scale-in to ensure that the number of our instances never decreases.
![]()
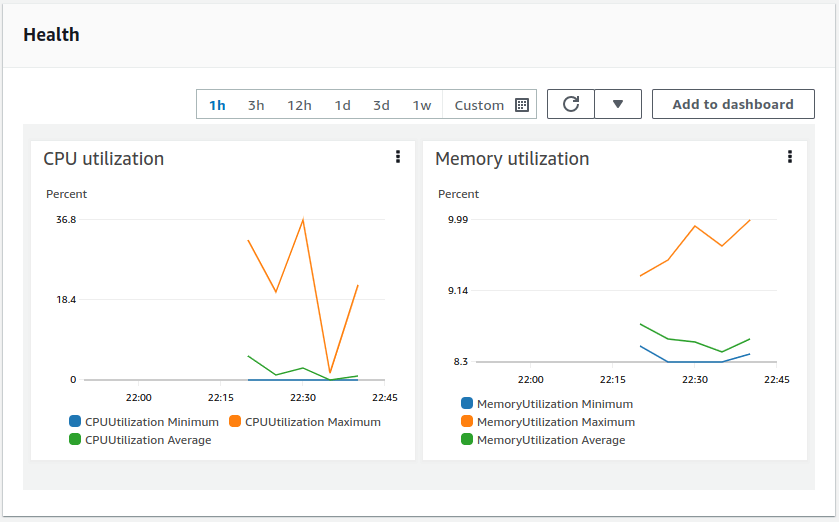
Viewing the metrics
One way to view the metrics is to open the “Health and metrics” tab in the dashboard displaying the details of our service.
To inspect our metric alarms, we can go to the “All alarms” page on the CloudWatch page.
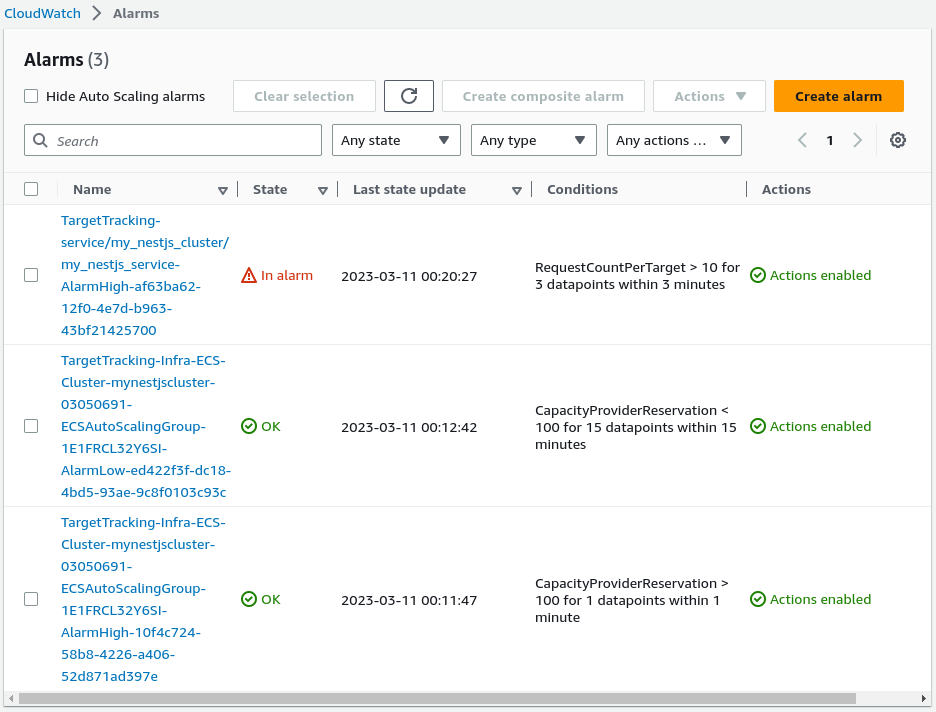
For the sake of demonstration, I’ve set the ALBRequestCountPerTarget policy with a very low target value to observe the auto-scaling. We can see that one of our metrics is in the “in alarm” state. Let’s inspect it closer.
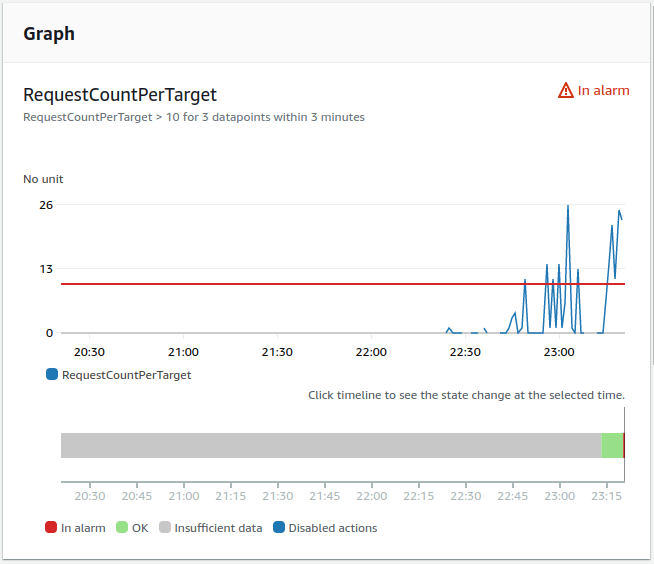
Because I’ve made multiple requests to the API I deployed, the alarm was triggered. Let’s go to the “Deployments and events” tab in our service and see what happened.
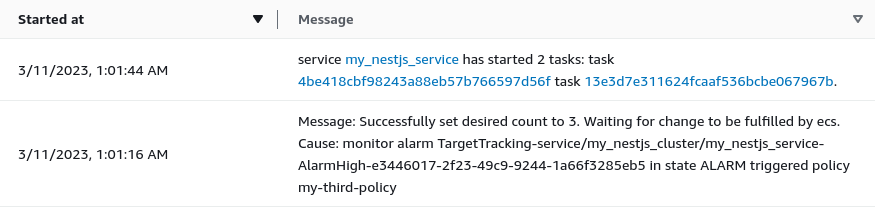
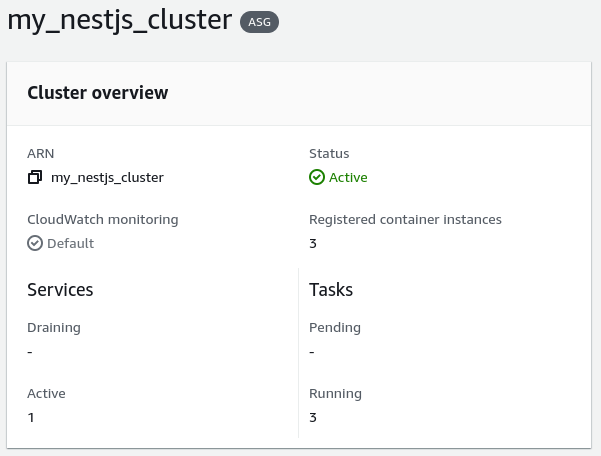
Since we set up the compute configuration of our service correctly, the cluster created additional EC2 instances to be able to run the new tasks. As a result, we can see that the registered container instances have been increased from 1 to 3.
Summary
In this article, we’ve learned about two different types of auto scaling in Amazon AWS. Thanks to cluster auto scaling, we were able to scale the number of EC2 instances based on the running tasks.
By configuring the service auto scaling, we’ve managed to scale the number of tasks running in our service based on the traffic. If the cluster can’t run the increased number of tasks, it runs additional EC2 instances to handle the load thanks to cluster auto scaling.
There is still more to know to master NestJS deployments with AWS, so stay tuned!
