
- 1. API with NestJS #1. Controllers, routing and the module structure
- 2. API with NestJS #2. Setting up a PostgreSQL database with TypeORM
- 3. API with NestJS #3. Authenticating users with bcrypt, Passport, JWT, and cookies
- 4. API with NestJS #4. Error handling and data validation
- 5. API with NestJS #5. Serializing the response with interceptors
- 6. API with NestJS #6. Looking into dependency injection and modules
- 7. API with NestJS #7. Creating relationships with Postgres and TypeORM
- 8. API with NestJS #8. Writing unit tests
- 9. API with NestJS #9. Testing services and controllers with integration tests
- 10. API with NestJS #10. Uploading public files to Amazon S3
- 11. API with NestJS #11. Managing private files with Amazon S3
- 12. API with NestJS #12. Introduction to Elasticsearch
- 13. API with NestJS #13. Implementing refresh tokens using JWT
- 14. API with NestJS #14. Improving performance of our Postgres database with indexes
- 15. API with NestJS #15. Defining transactions with PostgreSQL and TypeORM
- 16. API with NestJS #16. Using the array data type with PostgreSQL and TypeORM
- 17. API with NestJS #17. Offset and keyset pagination with PostgreSQL and TypeORM
- 18. API with NestJS #18. Exploring the idea of microservices
- 19. API with NestJS #19. Using RabbitMQ to communicate with microservices
- 20. API with NestJS #20. Communicating with microservices using the gRPC framework
- 21. API with NestJS #21. An introduction to CQRS
- 22. API with NestJS #22. Storing JSON with PostgreSQL and TypeORM
- 23. API with NestJS #23. Implementing in-memory cache to increase the performance
- 24. API with NestJS #24. Cache with Redis. Running the app in a Node.js cluster
- 25. API with NestJS #25. Sending scheduled emails with cron and Nodemailer
- 26. API with NestJS #26. Real-time chat with WebSockets
- 27. API with NestJS #27. Introduction to GraphQL. Queries, mutations, and authentication
- 28. API with NestJS #28. Dealing in the N + 1 problem in GraphQL
- 29. API with NestJS #29. Real-time updates with GraphQL subscriptions
- 30. API with NestJS #30. Scalar types in GraphQL
- 31. API with NestJS #31. Two-factor authentication
- 32. API with NestJS #32. Introduction to Prisma with PostgreSQL
- 33. API with NestJS #33. Managing PostgreSQL relationships with Prisma
- 34. API with NestJS #34. Handling CPU-intensive tasks with queues
- 35. API with NestJS #35. Using server-side sessions instead of JSON Web Tokens
- 36. API with NestJS #36. Introduction to Stripe with React
- 37. API with NestJS #37. Using Stripe to save credit cards for future use
- 38. API with NestJS #38. Setting up recurring payments via subscriptions with Stripe
- 39. API with NestJS #39. Reacting to Stripe events with webhooks
- 40. API with NestJS #40. Confirming the email address
- 41. API with NestJS #41. Verifying phone numbers and sending SMS messages with Twilio
- 42. API with NestJS #42. Authenticating users with Google
- 43. API with NestJS #43. Introduction to MongoDB
- 44. API with NestJS #44. Implementing relationships with MongoDB
- 45. API with NestJS #45. Virtual properties with MongoDB and Mongoose
- 46. API with NestJS #46. Managing transactions with MongoDB and Mongoose
- 47. API with NestJS #47. Implementing pagination with MongoDB and Mongoose
- 48. API with NestJS #48. Definining indexes with MongoDB and Mongoose
- 49. API with NestJS #49. Updating with PUT and PATCH with MongoDB and Mongoose
- 50. API with NestJS #50. Introduction to logging with the built-in logger and TypeORM
- 51. API with NestJS #51. Health checks with Terminus and Datadog
- 52. API with NestJS #52. Generating documentation with Compodoc and JSDoc
- 53. API with NestJS #53. Implementing soft deletes with PostgreSQL and TypeORM
- 54. API with NestJS #54. Storing files inside a PostgreSQL database
- 55. API with NestJS #55. Uploading files to the server
- 56. API with NestJS #56. Authorization with roles and claims
- 57. API with NestJS #57. Composing classes with the mixin pattern
- 58. API with NestJS #58. Using ETag to implement cache and save bandwidth
- 59. API with NestJS #59. Introduction to a monorepo with Lerna and Yarn workspaces
- 60. API with NestJS #60. The OpenAPI specification and Swagger
- 61. API with NestJS #61. Dealing with circular dependencies
- 62. API with NestJS #62. Introduction to MikroORM with PostgreSQL
- 63. API with NestJS #63. Relationships with PostgreSQL and MikroORM
- 64. API with NestJS #64. Transactions with PostgreSQL and MikroORM
- 65. API with NestJS #65. Implementing soft deletes using MikroORM and filters
- 66. API with NestJS #66. Improving PostgreSQL performance with indexes using MikroORM
- 67. API with NestJS #67. Migrating to TypeORM 0.3
- 68. API with NestJS #68. Interacting with the application through REPL
- 69. API with NestJS #69. Database migrations with TypeORM
- 70. API with NestJS #70. Defining dynamic modules
- 71. API with NestJS #71. Introduction to feature flags
- 72. API with NestJS #72. Working with PostgreSQL using raw SQL queries
- 73. API with NestJS #73. One-to-one relationships with raw SQL queries
- 74. API with NestJS #74. Designing many-to-one relationships using raw SQL queries
- 75. API with NestJS #75. Many-to-many relationships using raw SQL queries
- 76. API with NestJS #76. Working with transactions using raw SQL queries
- 77. API with NestJS #77. Offset and keyset pagination with raw SQL queries
- 78. API with NestJS #78. Generating statistics using aggregate functions in raw SQL
- 79. API with NestJS #79. Implementing searching with pattern matching and raw SQL
- 80. API with NestJS #80. Updating entities with PUT and PATCH using raw SQL queries
- 81. API with NestJS #81. Soft deletes with raw SQL queries
- 82. API with NestJS #82. Introduction to indexes with raw SQL queries
- 83. API with NestJS #83. Text search with tsvector and raw SQL
- 84. API with NestJS #84. Implementing filtering using subqueries with raw SQL
- 85. API with NestJS #85. Defining constraints with raw SQL
- 86. API with NestJS #86. Logging with the built-in logger when using raw SQL
- 87. API with NestJS #87. Writing unit tests in a project with raw SQL
- 88. API with NestJS #88. Testing a project with raw SQL using integration tests
- 89. API with NestJS #89. Replacing Express with Fastify
- 90. API with NestJS #90. Using various types of SQL joins
- 91. API with NestJS #91. Dockerizing a NestJS API with Docker Compose
- 92. API with NestJS #92. Increasing the developer experience with Docker Compose
- 93. API with NestJS #93. Deploying a NestJS app with Amazon ECS and RDS
- 94. API with NestJS #94. Deploying multiple instances on AWS with a load balancer
- 95. API with NestJS #95. CI/CD with Amazon ECS and GitHub Actions
- 96. API with NestJS #96. Running unit tests with CI/CD and GitHub Actions
- 97. API with NestJS #97. Introduction to managing logs with Amazon CloudWatch
- 98. API with NestJS #98. Health checks with Terminus and Amazon ECS
- 99. API with NestJS #99. Scaling the number of application instances with Amazon ECS
- 100. API with NestJS #100. The HTTPS protocol with Route 53 and AWS Certificate Manager
- 101. API with NestJS #101. Managing sensitive data using the AWS Secrets Manager
- 102. API with NestJS #102. Writing unit tests with Prisma
- 103. API with NestJS #103. Integration tests with Prisma
- 104. API with NestJS #104. Writing transactions with Prisma
- 105. API with NestJS #105. Implementing soft deletes with Prisma and middleware
- 106. API with NestJS #106. Improving performance through indexes with Prisma
- 107. API with NestJS #107. Offset and keyset pagination with Prisma
- 108. API with NestJS #108. Date and time with Prisma and PostgreSQL
- 109. API with NestJS #109. Arrays with PostgreSQL and Prisma
- 110. API with NestJS #110. Managing JSON data with PostgreSQL and Prisma
- 111. API with NestJS #111. Constraints with PostgreSQL and Prisma
- 112. API with NestJS #112. Serializing the response with Prisma
- 113. API with NestJS #113. Logging with Prisma
- 114. API with NestJS #114. Modifying data using PUT and PATCH methods with Prisma
- 115. API with NestJS #115. Database migrations with Prisma
- 116. API with NestJS #116. REST API versioning
- 117. API with NestJS #117. CORS – Cross-Origin Resource Sharing
- 118. API with NestJS #118. Uploading and streaming videos
- 119. API with NestJS #119. Type-safe SQL queries with Kysely and PostgreSQL
- 120. API with NestJS #120. One-to-one relationships with the Kysely query builder
- 121. API with NestJS #121. Many-to-one relationships with PostgreSQL and Kysely
In the last two parts of this series, we’ve explained the details of manually deploying our NestJS application with Amazon Elastic Compute Cloud. It’s a great idea to go through the above process by hand to understand it fully. The next step is automating it by implementing Continuous Integration and Continuous Delivery. In this article, we explain each part of the above process and automate our deployments.
To follow this article, check out those parts first:
Integrating AWS with GitHub Actions
GitHub Actions is a CI/CD platform built into GitHub and allows us to automate our deployment. For example, it allows us to run a set of scripts every time someone creates a pull request or merges changes to a particular branch.
We need a way for the GitHub Actions platform to perform actions on AWS on our behalf. One way to do that is to allow GitHub to authenticate to our AWS user.
We probably defined some users in the Identity and Access Management (IAM) interface in AWS, and we could allow GitHub to log in to their accounts. Unfortunately, we need to make sure to give GitHub as few permissions as possible to increase security.
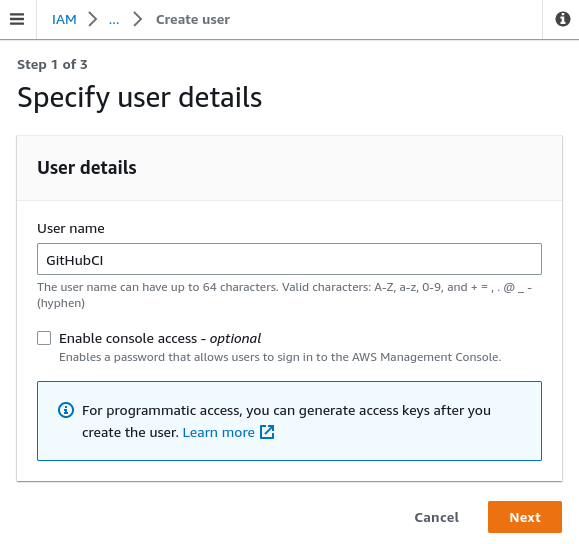
To do that, let’s go to the IAM dashboard and click on the “Add users” button.
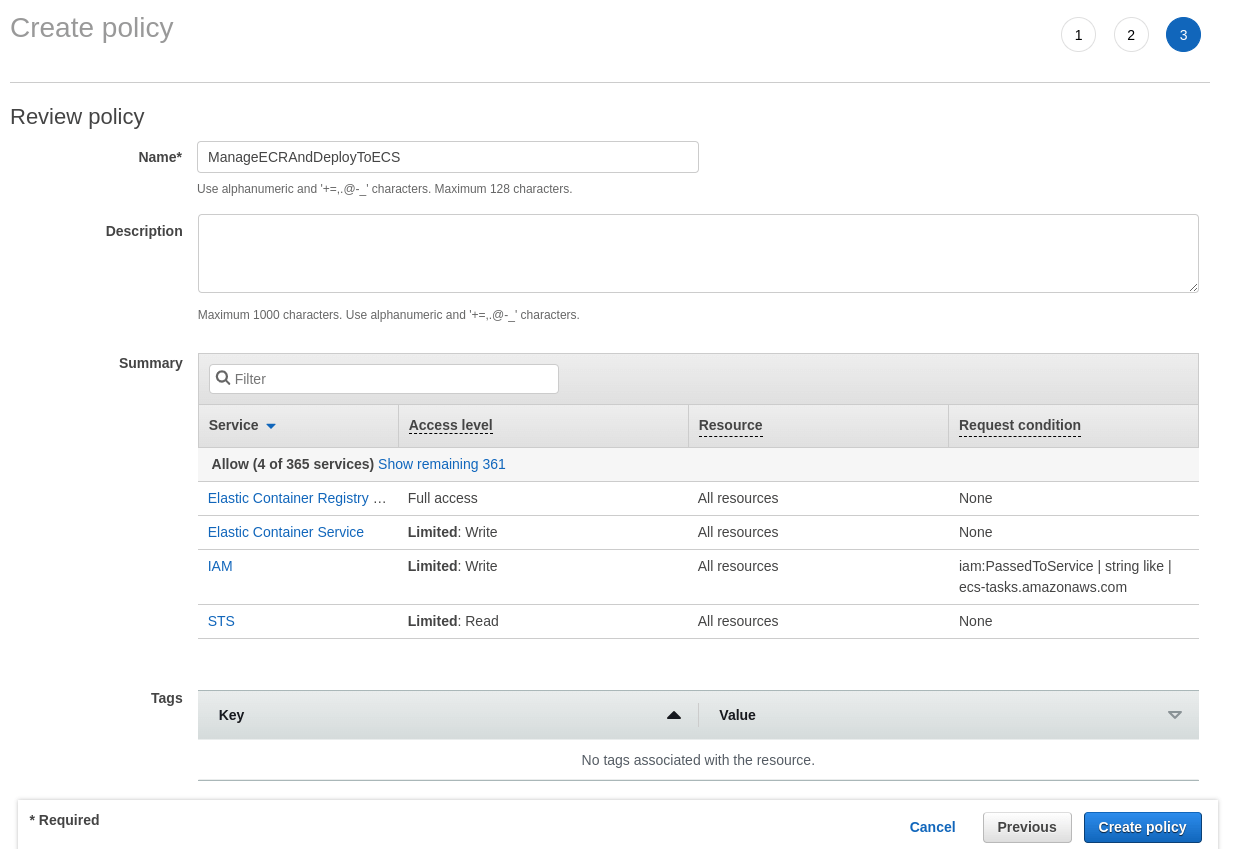
Let’s use the “Attach policies directly” option and create a policy from scratch to maximize our control over the permissions. We want GitHub to be able to perform a few actions on our behalf:
- log in to ECR,
- build the Docker image and push it to the registry,
- update an existing ECS service.
To allow the above, when creating a policy, click on the “JSON” button and use the following JSON:
|
1 2 3 4 5 6 7 8 9 10 11 12 13 14 15 16 17 18 19 20 21 22 23 24 25 26 27 28 |
{ "Version": "2012-10-17", "Statement": [ { "Action": [ "ecr-public:*", "ecs:UpdateService", "sts:GetServiceBearerToken" ], "Resource": "*", "Effect": "Allow" }, { "Action": [ "iam:PassRole" ], "Effect": "Allow", "Resource": "*", "Condition": { "StringLike": { "iam:PassedToService": [ "ecs-tasks.amazonaws.com" ] } } } ] } |
In the previous parts of this series we’ve worked with a public ECR repository, therefore we need to use the appropriate action with the public suffix. We could take it a step further and replace ecr-public:* with the exact actions GitHub needs to push the Docker image to ECR.
Now, we need to name our new policy and finalize it.
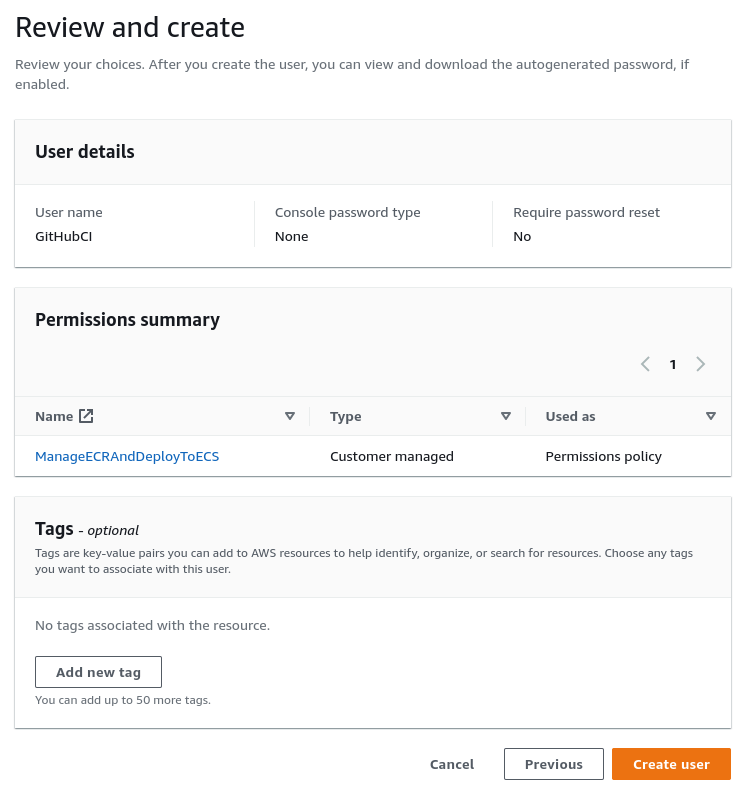
The last step is to use the above policy when creating our new IAM user.
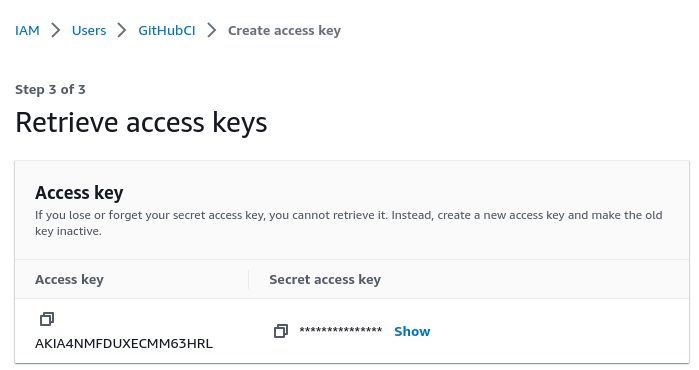
Creating access keys for a user
Once we have our new user, we need to provide a way for GitHub actions to use it. We could achieve that by going to our new user in the IAM dashboard and creating access keys.
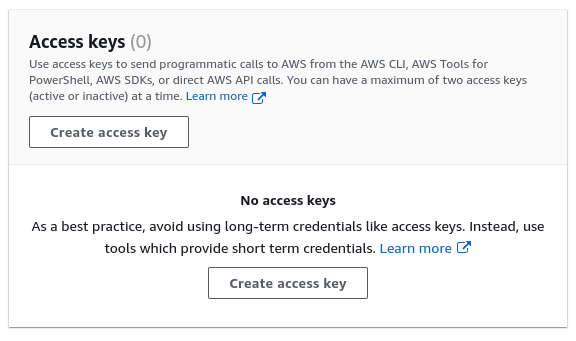
An access key consists of two parts: the access key and the secret access key. Make sure not to share them with anyone, though. Having both of them allows you to authenticate as a given user.
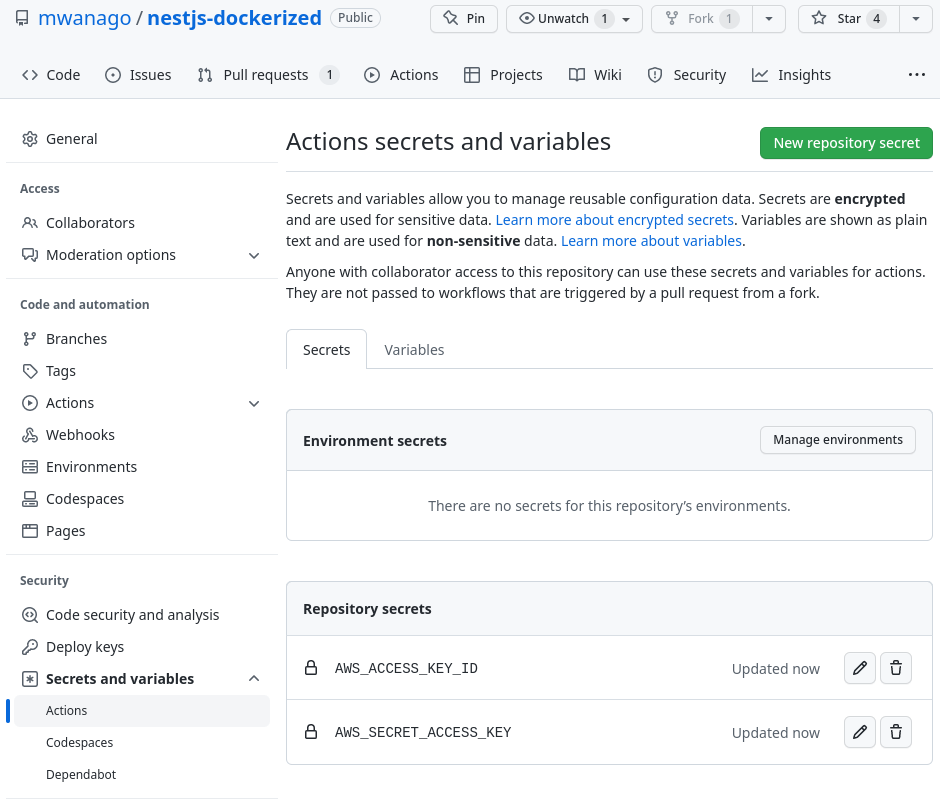
We need to open our GitHub repository and go to Settings -> Secrets and variables -> Actions. On this page, we need to add two repository secrets:
- AWS_ACCESS_KEY_ID
- AWS_SECRET_ACCESS_KEY
Configuring GitHub Actions
A GitHub Actions workflow is an automated process that an event in our repository can trigger. A typical example of an event is pushing new changes to the master branch. Every time that happens, we want a few things to take place:
- create a Docker image and push it to ECR,
- update an existing ECS service.
To configure GitHub actions, we need to create a YAML file in the .github/workflows directory.
.github/workflows/deploy.yml
|
1 2 3 4 5 6 7 8 9 10 11 12 13 14 15 16 17 18 19 20 |
name: Deploy to production on: push: branches: - master jobs: create-docker-image: name: Build and push the Docker image to ECR runs-on: ubuntu-latest steps: # ... deploy: name: Build and deploy the new Docker image to ECS runs-on: ubuntu-latest needs: create-docker-image steps: # ... |
Our workflow consists of two jobs: creating the Docker image and deploying it. It’s triggered every time we push new code to the master branch.
Let’s take a closer look at the create-docker-image job.
|
1 2 3 4 5 6 7 8 9 10 11 12 13 14 15 16 17 18 19 20 21 22 23 24 25 26 27 28 29 30 |
create-docker-image: name: Build and push the Docker image to ECR runs-on: ubuntu-latest steps: - name: Check out the repository uses: actions/checkout@v3 - name: Configure AWS credentials uses: aws-actions/configure-aws-credentials@v1-node16 with: aws-access-key-id: ${{ secrets.AWS_ACCESS_KEY_ID }} aws-secret-access-key: ${{ secrets.AWS_SECRET_ACCESS_KEY }} aws-region: us-east-1 - name: Login to Amazon ECR Public id: login-ecr-public uses: aws-actions/amazon-ecr-login@v1 with: registry-type: public - name: Build, tag, and push docker image to Amazon ECR Public env: REGISTRY: ${{ steps.login-ecr-public.outputs.registry }} REGISTRY_ALIAS: e2b3j8w6 REPOSITORY: nestjs-api IMAGE_TAG: nestjs-api run: | docker build -t $IMAGE_TAG . docker tag $IMAGE_TAG:latest $REGISTRY/$REGISTRY_ALIAS/$IMAGE_TAG:latest docker push $REGISTRY/$REGISTRY_ALIAS/$REPOSITORY:latest |
Our job consists of four steps. Understanding what happens requires us to go through each step one by one.
Checking out the repository
For GitHub action to be able to access our code, we need to check out our repository. Fortunately, GitHub has an action we can use to check out the code for us.
|
1 2 |
- name: Check out the repository uses: actions/checkout@v3 |
Configuring the AWS credentials
The next step is to configure AWS credentials. This is why we had to put the AWS_ACCESS_KEY_ID and AWS_SECRET_ACCESS_KEY as secrets into our GitHub repository.
|
1 2 3 4 5 6 |
- name: Configure AWS credentials uses: aws-actions/configure-aws-credentials@v1-node16 with: aws-access-key-id: ${{ secrets.AWS_ACCESS_KEY_ID }} aws-secret-access-key: ${{ secrets.AWS_SECRET_ACCESS_KEY }} aws-region: us-east-1 |
Please notice that I’m using aws-region: us-east-1 above. Most AWS services are region-specific, but ECR public registry requires authentication in the us-east-1 region.
Logging into ECR
As soon as we have the credentials, we can log into ECR.
|
1 2 3 4 5 |
- name: Log into the Amazon ECR Public id: login-ecr-public uses: aws-actions/amazon-ecr-login@v1 with: registry-type: public |
Building the Docker image and pushing it
The last step of this job is to build the docker image and push it to our ECR repository.
|
1 2 3 4 5 6 7 8 9 10 |
- name: Build, tag, and push docker image to Amazon ECR Public env: REGISTRY: ${{ steps.login-ecr-public.outputs.registry }} REGISTRY_ALIAS: e2b3j8w6 REPOSITORY: nestjs-api IMAGE_TAG: nestjs-api run: | docker build -t $IMAGE_TAG . docker tag $IMAGE_TAG:latest $REGISTRY/$REGISTRY_ALIAS/$IMAGE_TAG:latest docker push $REGISTRY/$REGISTRY_ALIAS/$REPOSITORY:latest |
Above, we use the REGISTRY: ${{ steps.login-ecr-public.outputs.registry }} variable that comes from the previous step of this job. We also need to set up the correct registry alias that we can find on the page of our ECR registry in the AWS dashboard.
Deploying the new Docker image
The other job deploys the image created in the previous job.
|
1 2 3 4 5 6 7 8 9 10 11 12 13 14 15 |
deploy: name: Deploy the new Docker image to ECS runs-on: ubuntu-latest needs: create-docker-image steps: - name: Configure AWS credentials uses: aws-actions/configure-aws-credentials@v1-node16 with: aws-access-key-id: ${{ secrets.AWS_ACCESS_KEY_ID }} aws-secret-access-key: ${{ secrets.AWS_SECRET_ACCESS_KEY }} aws-region: eu-central-1 - name: Update ECS service run: | aws ecs update-service --cluster nest_cluster --service nestjs_service --task-definition nest_task --force-new-deployment |
Please notice that above we use aws-region: eu-central-1, which is the location of my cluster. It depends on which AWS region we are using. We also add needs: create-docker-image to make sure GitHub Actions wait for the previous job to be finished.
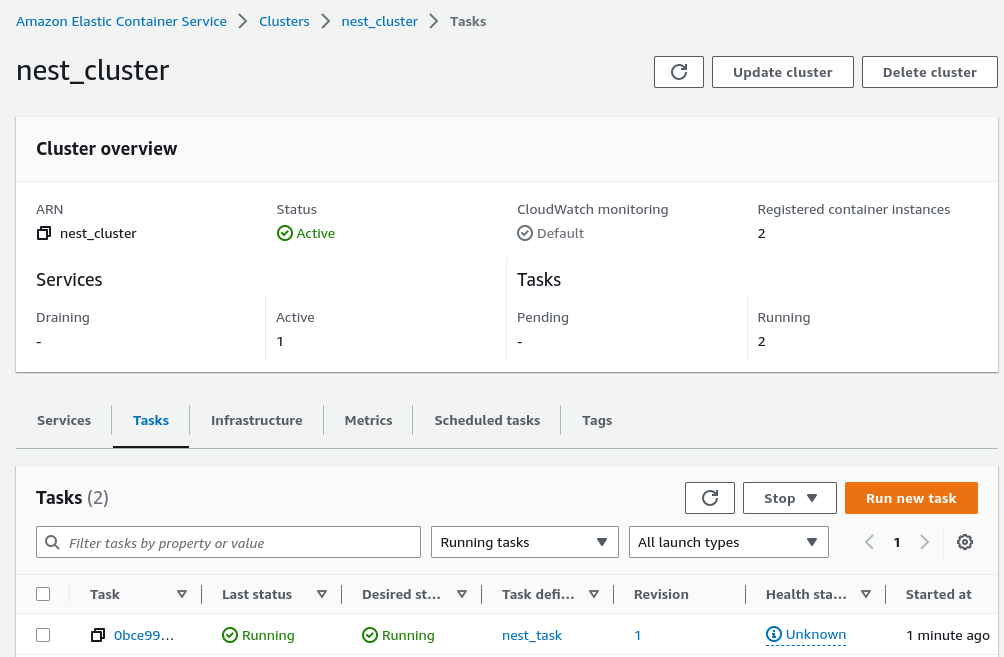
The most crucial part of the above code is using the aws ecs update-service to update the existing ECS service we’ve defined in one of the previous parts of this series. Please make sure to provide the correct details:
- the name of your cluster with the --cluster argument,
- name of your service using --service,
- the proper task definition with the --task-definition argument.
We also use the --force-new-deployment flag to force a new deployment even when the service definition didn’t change. Thanks to the above, we deploy a new version of our service that uses the latest Docker image from our ECR repository.
This is the full content of our .github/workflows/deploy.yml file:
.github/workflows/deploy.yml
|
1 2 3 4 5 6 7 8 9 10 11 12 13 14 15 16 17 18 19 20 21 22 23 24 25 26 27 28 29 30 31 32 33 34 35 36 37 38 39 40 41 42 43 44 45 46 47 48 49 50 51 52 53 54 |
name: Deploy to production on: push: branches: - master jobs: create-docker-image: name: Build and push the Docker image to ECR runs-on: ubuntu-latest steps: - name: Check out the repository uses: actions/checkout@v3 - name: Configure AWS credentials uses: aws-actions/configure-aws-credentials@v1-node16 with: aws-access-key-id: ${{ secrets.AWS_ACCESS_KEY_ID }} aws-secret-access-key: ${{ secrets.AWS_SECRET_ACCESS_KEY }} aws-region: us-east-1 - name: Log into the Amazon ECR Public id: login-ecr-public uses: aws-actions/amazon-ecr-login@v1 with: registry-type: public - name: Build, tag, and push docker image to Amazon ECR Public env: REGISTRY: ${{ steps.login-ecr-public.outputs.registry }} REGISTRY_ALIAS: e2b3j8w6 REPOSITORY: nestjs-api IMAGE_TAG: nestjs-api run: | docker build -t $IMAGE_TAG . docker tag $IMAGE_TAG:latest $REGISTRY/$REGISTRY_ALIAS/$IMAGE_TAG:latest docker push $REGISTRY/$REGISTRY_ALIAS/$REPOSITORY:latest deploy: name: Deploy the new Docker image to ECS runs-on: ubuntu-latest needs: create-docker-image steps: - name: Configure AWS credentials uses: aws-actions/configure-aws-credentials@v1-node16 with: aws-access-key-id: ${{ secrets.AWS_ACCESS_KEY_ID }} aws-secret-access-key: ${{ secrets.AWS_SECRET_ACCESS_KEY }} aws-region: eu-central-1 - name: Update ECS service run: | aws ecs update-service --cluster nest_cluster --service nestjs_service --task-definition nest_task --force-new-deployment |
As soon as we push the above file to the master branch, we can go to the Actions page in our repository to inspect the logs of our workflow.
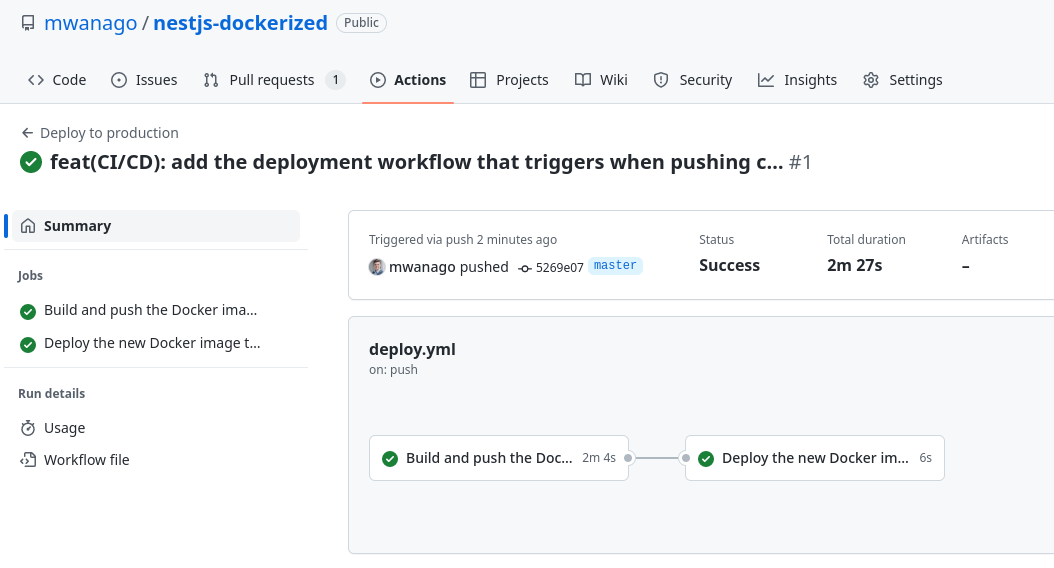
Doing that spawns a new task in our cluster that deploys our NestJS application. As soon as the task finishes, the latest version of our code is up.
Summary
In this article, we’ve learned how to use GitHub Actions with AWS ECS to set up a CI/CD pipeline. Whenever we push new changes to the master branch, GitHub Actions creates a new Docker image and redeploys our ECS service. There is still more to learn when it comes to setting up CI/CD with GitHub Actions, so stay tuned!

Greetings, Thank you for this post. How can I keep only one fixed public IP. Since every time a new task is created, a new IP is assigned to it.
Thank you…