
- 1. API with NestJS #1. Controllers, routing and the module structure
- 2. API with NestJS #2. Setting up a PostgreSQL database with TypeORM
- 3. API with NestJS #3. Authenticating users with bcrypt, Passport, JWT, and cookies
- 4. API with NestJS #4. Error handling and data validation
- 5. API with NestJS #5. Serializing the response with interceptors
- 6. API with NestJS #6. Looking into dependency injection and modules
- 7. API with NestJS #7. Creating relationships with Postgres and TypeORM
- 8. API with NestJS #8. Writing unit tests
- 9. API with NestJS #9. Testing services and controllers with integration tests
- 10. API with NestJS #10. Uploading public files to Amazon S3
- 11. API with NestJS #11. Managing private files with Amazon S3
- 12. API with NestJS #12. Introduction to Elasticsearch
- 13. API with NestJS #13. Implementing refresh tokens using JWT
- 14. API with NestJS #14. Improving performance of our Postgres database with indexes
- 15. API with NestJS #15. Defining transactions with PostgreSQL and TypeORM
- 16. API with NestJS #16. Using the array data type with PostgreSQL and TypeORM
- 17. API with NestJS #17. Offset and keyset pagination with PostgreSQL and TypeORM
- 18. API with NestJS #18. Exploring the idea of microservices
- 19. API with NestJS #19. Using RabbitMQ to communicate with microservices
- 20. API with NestJS #20. Communicating with microservices using the gRPC framework
- 21. API with NestJS #21. An introduction to CQRS
- 22. API with NestJS #22. Storing JSON with PostgreSQL and TypeORM
- 23. API with NestJS #23. Implementing in-memory cache to increase the performance
- 24. API with NestJS #24. Cache with Redis. Running the app in a Node.js cluster
- 25. API with NestJS #25. Sending scheduled emails with cron and Nodemailer
- 26. API with NestJS #26. Real-time chat with WebSockets
- 27. API with NestJS #27. Introduction to GraphQL. Queries, mutations, and authentication
- 28. API with NestJS #28. Dealing in the N + 1 problem in GraphQL
- 29. API with NestJS #29. Real-time updates with GraphQL subscriptions
- 30. API with NestJS #30. Scalar types in GraphQL
- 31. API with NestJS #31. Two-factor authentication
- 32. API with NestJS #32. Introduction to Prisma with PostgreSQL
- 33. API with NestJS #33. Managing PostgreSQL relationships with Prisma
- 34. API with NestJS #34. Handling CPU-intensive tasks with queues
- 35. API with NestJS #35. Using server-side sessions instead of JSON Web Tokens
- 36. API with NestJS #36. Introduction to Stripe with React
- 37. API with NestJS #37. Using Stripe to save credit cards for future use
- 38. API with NestJS #38. Setting up recurring payments via subscriptions with Stripe
- 39. API with NestJS #39. Reacting to Stripe events with webhooks
- 40. API with NestJS #40. Confirming the email address
- 41. API with NestJS #41. Verifying phone numbers and sending SMS messages with Twilio
- 42. API with NestJS #42. Authenticating users with Google
- 43. API with NestJS #43. Introduction to MongoDB
- 44. API with NestJS #44. Implementing relationships with MongoDB
- 45. API with NestJS #45. Virtual properties with MongoDB and Mongoose
- 46. API with NestJS #46. Managing transactions with MongoDB and Mongoose
- 47. API with NestJS #47. Implementing pagination with MongoDB and Mongoose
- 48. API with NestJS #48. Definining indexes with MongoDB and Mongoose
- 49. API with NestJS #49. Updating with PUT and PATCH with MongoDB and Mongoose
- 50. API with NestJS #50. Introduction to logging with the built-in logger and TypeORM
- 51. API with NestJS #51. Health checks with Terminus and Datadog
- 52. API with NestJS #52. Generating documentation with Compodoc and JSDoc
- 53. API with NestJS #53. Implementing soft deletes with PostgreSQL and TypeORM
- 54. API with NestJS #54. Storing files inside a PostgreSQL database
- 55. API with NestJS #55. Uploading files to the server
- 56. API with NestJS #56. Authorization with roles and claims
- 57. API with NestJS #57. Composing classes with the mixin pattern
- 58. API with NestJS #58. Using ETag to implement cache and save bandwidth
- 59. API with NestJS #59. Introduction to a monorepo with Lerna and Yarn workspaces
- 60. API with NestJS #60. The OpenAPI specification and Swagger
- 61. API with NestJS #61. Dealing with circular dependencies
- 62. API with NestJS #62. Introduction to MikroORM with PostgreSQL
- 63. API with NestJS #63. Relationships with PostgreSQL and MikroORM
- 64. API with NestJS #64. Transactions with PostgreSQL and MikroORM
- 65. API with NestJS #65. Implementing soft deletes using MikroORM and filters
- 66. API with NestJS #66. Improving PostgreSQL performance with indexes using MikroORM
- 67. API with NestJS #67. Migrating to TypeORM 0.3
- 68. API with NestJS #68. Interacting with the application through REPL
- 69. API with NestJS #69. Database migrations with TypeORM
- 70. API with NestJS #70. Defining dynamic modules
- 71. API with NestJS #71. Introduction to feature flags
- 72. API with NestJS #72. Working with PostgreSQL using raw SQL queries
- 73. API with NestJS #73. One-to-one relationships with raw SQL queries
- 74. API with NestJS #74. Designing many-to-one relationships using raw SQL queries
- 75. API with NestJS #75. Many-to-many relationships using raw SQL queries
- 76. API with NestJS #76. Working with transactions using raw SQL queries
- 77. API with NestJS #77. Offset and keyset pagination with raw SQL queries
- 78. API with NestJS #78. Generating statistics using aggregate functions in raw SQL
- 79. API with NestJS #79. Implementing searching with pattern matching and raw SQL
- 80. API with NestJS #80. Updating entities with PUT and PATCH using raw SQL queries
- 81. API with NestJS #81. Soft deletes with raw SQL queries
- 82. API with NestJS #82. Introduction to indexes with raw SQL queries
- 83. API with NestJS #83. Text search with tsvector and raw SQL
- 84. API with NestJS #84. Implementing filtering using subqueries with raw SQL
- 85. API with NestJS #85. Defining constraints with raw SQL
- 86. API with NestJS #86. Logging with the built-in logger when using raw SQL
- 87. API with NestJS #87. Writing unit tests in a project with raw SQL
- 88. API with NestJS #88. Testing a project with raw SQL using integration tests
- 89. API with NestJS #89. Replacing Express with Fastify
- 90. API with NestJS #90. Using various types of SQL joins
- 91. API with NestJS #91. Dockerizing a NestJS API with Docker Compose
- 92. API with NestJS #92. Increasing the developer experience with Docker Compose
- 93. API with NestJS #93. Deploying a NestJS app with Amazon ECS and RDS
- 94. API with NestJS #94. Deploying multiple instances on AWS with a load balancer
- 95. API with NestJS #95. CI/CD with Amazon ECS and GitHub Actions
- 96. API with NestJS #96. Running unit tests with CI/CD and GitHub Actions
- 97. API with NestJS #97. Introduction to managing logs with Amazon CloudWatch
- 98. API with NestJS #98. Health checks with Terminus and Amazon ECS
- 99. API with NestJS #99. Scaling the number of application instances with Amazon ECS
- 100. API with NestJS #100. The HTTPS protocol with Route 53 and AWS Certificate Manager
- 101. API with NestJS #101. Managing sensitive data using the AWS Secrets Manager
- 102. API with NestJS #102. Writing unit tests with Prisma
- 103. API with NestJS #103. Integration tests with Prisma
- 104. API with NestJS #104. Writing transactions with Prisma
- 105. API with NestJS #105. Implementing soft deletes with Prisma and middleware
- 106. API with NestJS #106. Improving performance through indexes with Prisma
- 107. API with NestJS #107. Offset and keyset pagination with Prisma
- 108. API with NestJS #108. Date and time with Prisma and PostgreSQL
- 109. API with NestJS #109. Arrays with PostgreSQL and Prisma
- 110. API with NestJS #110. Managing JSON data with PostgreSQL and Prisma
- 111. API with NestJS #111. Constraints with PostgreSQL and Prisma
- 112. API with NestJS #112. Serializing the response with Prisma
- 113. API with NestJS #113. Logging with Prisma
- 114. API with NestJS #114. Modifying data using PUT and PATCH methods with Prisma
- 115. API with NestJS #115. Database migrations with Prisma
- 116. API with NestJS #116. REST API versioning
- 117. API with NestJS #117. CORS – Cross-Origin Resource Sharing
- 118. API with NestJS #118. Uploading and streaming videos
- 119. API with NestJS #119. Type-safe SQL queries with Kysely and PostgreSQL
- 120. API with NestJS #120. One-to-one relationships with the Kysely query builder
- 121. API with NestJS #121. Many-to-one relationships with PostgreSQL and Kysely
The previous article taught us how to use Docker and Docker Compose with NestJS. In this article, we expand our knowledge by applying various tricks and tips on increasing the development experience with Docker and Docker Compose.
Check out this repository if you want to see the full code for this article.
Building the Docker Image automatically
In the previous part of this series, we built our basic Dockerfile.
Dockerfile
|
1 2 3 4 5 6 7 8 9 10 11 12 13 |
FROM node:18-alpine WORKDIR /user/src/app COPY . . RUN npm ci --omit=dev RUN npm run build USER node CMD ["npm", "run", "start:prod"] |
Then, we built the Docker image by running an appropriate command and giving it a tag.
|
1 |
docker build --tag "nestjs-api" . |
Then, we added the above nestjs-api tag to our Docker Compose configuration.
docker-compose.yml
|
1 2 3 4 5 6 7 8 9 10 11 12 13 14 |
version: "3" services: nestjs-api: image: nestjs-api env_file: - .env ports: - "3000:3000" depends_on: - postgres networks: - postgres # ... |
Once we have the above file, we can run docker-compose up to run our application.
Automating the process of building the image
Unfortunately, the above process requires the developers to run two commands instead of one. Also, we must remember to run docker build every time there is a change in our code.
Instead, we can point Docker Compose to our Dockerfile and expect it to build the required Docker image.
docker-compose.yml
|
1 2 3 4 5 6 7 8 9 10 11 12 13 14 15 16 17 18 19 20 21 22 23 24 25 26 27 28 29 30 31 32 33 34 35 36 37 |
version: "3" services: postgres: image: postgres:15.1 networks: - postgres volumes: - /data/postgres:/data/postgres env_file: - docker.env pgadmin: image: dpage/pgadmin4:6.18 networks: - postgres ports: - "8080:80" volumes: - /data/pgadmin:/root/.pgadmin env_file: - docker.env nestjs-api: build: context: . env_file: - .env ports: - "3000:3000" depends_on: - postgres networks: - postgres networks: postgres: driver: bridge |
Thanks to adding the build section to our configuration and pointing to the directory with the Dockerfile, we can expect Docker Compose to build the necessary image.
There is one caveat, though. To ensure that Docker Compose always rebuilds the image even if an old version is available, we need to add the --build flag.
|
1 |
docker-compose up --build |
Dealing with cache
By adding the --build flag, we expect Docker Compose to rebuild our image every time we run docker-compose up. Let’s look at how Docker handles cache to avoid waiting too much time for the build to finish.
Each instruction in our Dockerfile roughly translates to a layer in our image. Therefore, whenever a layer changes, it must be rebuilt together with all the following layers.
Let’s say we made a slight change in our main.ts file. Unfortunately, it affects the COPY . . command since we use it to copy all of our files.
- FROM node:18-alpine
- WORKDIR /user/src/app
- COPY . .
- RUN npm ci –omit=dev
- RUN npm run build
- USER node
- CMD [“npm”, “run”, “start:prod”]
Due to how we structured our Dockerfile, making changes to our source code causes Docker to reinitialize our whole node_modules directory with the npm ci command. Let’s improve that by changing how we use the COPY instruction.
Dockerfile
|
1 2 3 4 5 6 7 8 9 10 11 12 13 14 15 |
FROM node:18-alpine WORKDIR /user/src/app COPY package.json package-lock.json ./ RUN npm ci --omit=dev COPY . . RUN npm run build USER node CMD ["npm", "run", "start:prod"] |
Above, we first copy only the package.json and package-lock.json files. Then, we install all of the dependencies. We can see it as a milestone that Docker reaches and stores in the cache. Now, Docker knows that modifying the main.ts file does not affect the npm ci command and does not reinstall the packages unnecessarily.
- FROM node:18-alpine
- WORKDIR /user/src/app
- COPY package.json package-lock.json ./
- RUN npm ci –omit=dev
- COPY . .
- RUN npm run build
- USER node
- CMD [“npm”, “run”, “start:prod”]
The above approach can drastically decrease the time required for the Docker image to be built.
Restarting the application on changes
Applying changes we made to our source code now takes a bit of work. First, we need to stop all of our Docker containers and then rerun them. It causes the Docker image with the API to be rebuilt.
Instead, when running our application in development, we can do the following:
- install the necessary dependencies,
- run the npm run start:dev command
When using the above approach, NestJS watches for any changes made to the source code and restarts automatically.
Implementing a multi-stage Docker build
The issue is that when we build our Docker image using the Dockerfile, it always creates a production build and ends with npm run start:prod.
The first step to changing the above is to implement a multi-stage build. Thanks to this approach, we don’t need separate Dockerfile for development and production. Instead, we divide our Dockerfile into stages.
Each stage begins with a FROM statement. We can copy files between stages, leaving behind any files we don’t need anymore. Thanks to that, we can achieve a smaller Docker image.
Dockerfile
|
1 2 3 4 5 6 7 8 9 10 11 12 13 14 15 16 17 18 19 20 21 22 23 24 25 26 27 28 29 30 31 32 33 34 35 36 37 |
# Installing dependencies: FROM node:18-alpine AS install-dependencies WORKDIR /user/src/app COPY package.json package-lock.json ./ RUN npm ci --omit=dev COPY . . # Creating a build: FROM node:18-alpine AS create-build WORKDIR /user/src/app COPY --from=install-dependencies /user/src/app ./ RUN npm run build USER node # Running the application: FROM node:18-alpine AS run WORKDIR /user/src/app COPY --from=install-dependencies /user/src/app/node_modules ./node_modules COPY --from=create-build /user/src/app/dist ./dist COPY package.json ./ CMD ["npm", "run", "start:prod"] |
Each of our stages above use the node:18-alpine image as base, but that does not have to be the case.
Please notice above that our final Docker image contains only node_modules, dist, and package.json. Thanks to that, we’ve managed to shave off some unnecessary data by copying only the files necessary to run the application.
Modifying the Docker Compose configuration
Thanks to dividing our Dockerfile into stages, we can tell Docker Compose to target a specific stage.
docker-compose.yml
|
1 2 3 4 5 6 7 8 9 10 11 12 13 14 15 16 17 18 19 |
version: "3" services: nestjs-api: build: context: . target: install-dependencies command: npm run start:dev volumes: - ./src:/user/src/app/src env_file: - .env ports: - "3000:3000" depends_on: - postgres networks: - postgres # ... |
Above, we explicitly tell Docker only to run the install-dependencies stage from our Dockerfile. This means that Docker won’t create a production build.
Since our install-dependencies stage does not contain the CMD instruction, we need some way to tell Docker what to do. We do that by adding command: npm run start:dev to our Docker Compose configuration.
So far, we’ve been using the volumes property to allow our PostgreSQL Docker container to persist the data outside of the container. Thanks to doing that, when we run our PostgreSQL container after it’s been shut down, we don’t end up with an empty database. We can use the same approach to the Docker container with our NestJS application.
Thanks to adding ./src:/user/src/app/src to our volumes, Docker synchronizes the src directory in the Docker container with the src directory on our host machine. Thanks to that, whenever we change our source code, the npm run start:dev process is aware of it and restarts our NestJS application.
Running the debugger
A very big part of the developer experience is to be able to use a debugger. Fortunately, we can connect the debugger to a Node.js application running in a container.
First, let’s add a new script into our package.json file.
package.json
|
1 2 3 4 5 6 7 |
{ "scripts": { "start:inspect": "nest start --debug 0.0.0.0:9229 --watch --exec 'node --inspect-brk'", // ... }, // ... } |
A few important things are happening above. First, we add the --debug 0.0.0.0:9229 to establish a WebSocket connection that our debugger can connect to. Our debugger also might require the --inspect-brk flag, but the NestJS CLI does not support it out of the box anymore. Because of that, we need to use the hack with the --exec flag.
We also need to allow our host machine to establish a connection with our Docker container on port 9229. To do that, we need to slightly alter the ports section in our Docker Compose configuration.
docker-compose.yml
|
1 2 3 4 5 6 7 8 9 10 11 12 13 14 15 16 17 18 19 20 |
version: "3" services: nestjs-api: build: context: . target: install-dependencies command: npm run start:inspect volumes: - ./src:/user/src/app/src env_file: - .env ports: - "3000:3000" - "9229:9229" depends_on: - postgres networks: - postgres # ... |
Please notice that we are running the npm run start:inspect command above.
Debugging through WebStorm
To debug our application running in a Docker container using WebStorm, we first need to run docker-compose up --build in the terminal to run all of our containers. Remember that because we’ve used the --inspect-brk flag, our NestJS application will not run until we connect the debugger.
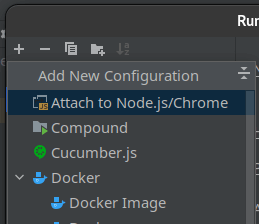
Then, we need to go to “Run -> Edit Configurations” and create the “Attach to Node.js/Chrome” configuration by clicking on the plus icon.
Once we do that, we need to check the “Reconnect automatically” checkbox so that the debugger reconnects when our application restarts after changes.
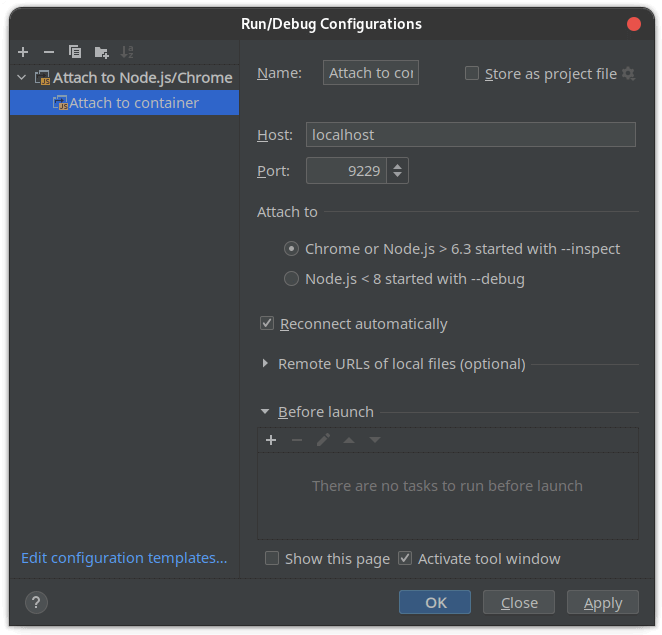
As soon as we choose “Run -> Debug ‘Attach to container’, WebStorm connects the debugger through a WebSocket to our Docker container.
You can also debug using Visual Studio Code in a similar way. Check out the official Visual Studio Code documentation for a step-by-step explanation.
Summary
In this article, we implemented a few significant developer experience improvements that make our work with NestJS and Docker easier. We’ve automated building the Docker image by changing our Docker Compose configuration. When doing the above, we’ve also improved how we handle cache by making subtle changes to our Dockerfile. We also learned how to restart our application on changes and use the debugger with the NestJS app running in the container. All of the above can definitely increase the developer experience and make our job easier.

Thanks for the article, in my projects I have a similar approach but I haven’t used the debugger, I will check this out.
Great article! For debugging in VS Code, I use a launch configuration similar to this in my .code-workspace file:
When I update docker-compose.yaml nest-api bl;ock with
networks:
– postgres
Nest cannot connect to DB but without nest starts ok