
- 1. API with NestJS #1. Controllers, routing and the module structure
- 2. API with NestJS #2. Setting up a PostgreSQL database with TypeORM
- 3. API with NestJS #3. Authenticating users with bcrypt, Passport, JWT, and cookies
- 4. API with NestJS #4. Error handling and data validation
- 5. API with NestJS #5. Serializing the response with interceptors
- 6. API with NestJS #6. Looking into dependency injection and modules
- 7. API with NestJS #7. Creating relationships with Postgres and TypeORM
- 8. API with NestJS #8. Writing unit tests
- 9. API with NestJS #9. Testing services and controllers with integration tests
- 10. API with NestJS #10. Uploading public files to Amazon S3
- 11. API with NestJS #11. Managing private files with Amazon S3
- 12. API with NestJS #12. Introduction to Elasticsearch
- 13. API with NestJS #13. Implementing refresh tokens using JWT
- 14. API with NestJS #14. Improving performance of our Postgres database with indexes
- 15. API with NestJS #15. Defining transactions with PostgreSQL and TypeORM
- 16. API with NestJS #16. Using the array data type with PostgreSQL and TypeORM
- 17. API with NestJS #17. Offset and keyset pagination with PostgreSQL and TypeORM
- 18. API with NestJS #18. Exploring the idea of microservices
- 19. API with NestJS #19. Using RabbitMQ to communicate with microservices
- 20. API with NestJS #20. Communicating with microservices using the gRPC framework
- 21. API with NestJS #21. An introduction to CQRS
- 22. API with NestJS #22. Storing JSON with PostgreSQL and TypeORM
- 23. API with NestJS #23. Implementing in-memory cache to increase the performance
- 24. API with NestJS #24. Cache with Redis. Running the app in a Node.js cluster
- 25. API with NestJS #25. Sending scheduled emails with cron and Nodemailer
- 26. API with NestJS #26. Real-time chat with WebSockets
- 27. API with NestJS #27. Introduction to GraphQL. Queries, mutations, and authentication
- 28. API with NestJS #28. Dealing in the N + 1 problem in GraphQL
- 29. API with NestJS #29. Real-time updates with GraphQL subscriptions
- 30. API with NestJS #30. Scalar types in GraphQL
- 31. API with NestJS #31. Two-factor authentication
- 32. API with NestJS #32. Introduction to Prisma with PostgreSQL
- 33. API with NestJS #33. Managing PostgreSQL relationships with Prisma
- 34. API with NestJS #34. Handling CPU-intensive tasks with queues
- 35. API with NestJS #35. Using server-side sessions instead of JSON Web Tokens
- 36. API with NestJS #36. Introduction to Stripe with React
- 37. API with NestJS #37. Using Stripe to save credit cards for future use
- 38. API with NestJS #38. Setting up recurring payments via subscriptions with Stripe
- 39. API with NestJS #39. Reacting to Stripe events with webhooks
- 40. API with NestJS #40. Confirming the email address
- 41. API with NestJS #41. Verifying phone numbers and sending SMS messages with Twilio
- 42. API with NestJS #42. Authenticating users with Google
- 43. API with NestJS #43. Introduction to MongoDB
- 44. API with NestJS #44. Implementing relationships with MongoDB
- 45. API with NestJS #45. Virtual properties with MongoDB and Mongoose
- 46. API with NestJS #46. Managing transactions with MongoDB and Mongoose
- 47. API with NestJS #47. Implementing pagination with MongoDB and Mongoose
- 48. API with NestJS #48. Definining indexes with MongoDB and Mongoose
- 49. API with NestJS #49. Updating with PUT and PATCH with MongoDB and Mongoose
- 50. API with NestJS #50. Introduction to logging with the built-in logger and TypeORM
- 51. API with NestJS #51. Health checks with Terminus and Datadog
- 52. API with NestJS #52. Generating documentation with Compodoc and JSDoc
- 53. API with NestJS #53. Implementing soft deletes with PostgreSQL and TypeORM
- 54. API with NestJS #54. Storing files inside a PostgreSQL database
- 55. API with NestJS #55. Uploading files to the server
- 56. API with NestJS #56. Authorization with roles and claims
- 57. API with NestJS #57. Composing classes with the mixin pattern
- 58. API with NestJS #58. Using ETag to implement cache and save bandwidth
- 59. API with NestJS #59. Introduction to a monorepo with Lerna and Yarn workspaces
- 60. API with NestJS #60. The OpenAPI specification and Swagger
- 61. API with NestJS #61. Dealing with circular dependencies
- 62. API with NestJS #62. Introduction to MikroORM with PostgreSQL
- 63. API with NestJS #63. Relationships with PostgreSQL and MikroORM
- 64. API with NestJS #64. Transactions with PostgreSQL and MikroORM
- 65. API with NestJS #65. Implementing soft deletes using MikroORM and filters
- 66. API with NestJS #66. Improving PostgreSQL performance with indexes using MikroORM
- 67. API with NestJS #67. Migrating to TypeORM 0.3
- 68. API with NestJS #68. Interacting with the application through REPL
- 69. API with NestJS #69. Database migrations with TypeORM
- 70. API with NestJS #70. Defining dynamic modules
- 71. API with NestJS #71. Introduction to feature flags
- 72. API with NestJS #72. Working with PostgreSQL using raw SQL queries
- 73. API with NestJS #73. One-to-one relationships with raw SQL queries
- 74. API with NestJS #74. Designing many-to-one relationships using raw SQL queries
- 75. API with NestJS #75. Many-to-many relationships using raw SQL queries
- 76. API with NestJS #76. Working with transactions using raw SQL queries
- 77. API with NestJS #77. Offset and keyset pagination with raw SQL queries
- 78. API with NestJS #78. Generating statistics using aggregate functions in raw SQL
- 79. API with NestJS #79. Implementing searching with pattern matching and raw SQL
- 80. API with NestJS #80. Updating entities with PUT and PATCH using raw SQL queries
- 81. API with NestJS #81. Soft deletes with raw SQL queries
- 82. API with NestJS #82. Introduction to indexes with raw SQL queries
- 83. API with NestJS #83. Text search with tsvector and raw SQL
- 84. API with NestJS #84. Implementing filtering using subqueries with raw SQL
- 85. API with NestJS #85. Defining constraints with raw SQL
- 86. API with NestJS #86. Logging with the built-in logger when using raw SQL
- 87. API with NestJS #87. Writing unit tests in a project with raw SQL
- 88. API with NestJS #88. Testing a project with raw SQL using integration tests
- 89. API with NestJS #89. Replacing Express with Fastify
- 90. API with NestJS #90. Using various types of SQL joins
- 91. API with NestJS #91. Dockerizing a NestJS API with Docker Compose
- 92. API with NestJS #92. Increasing the developer experience with Docker Compose
- 93. API with NestJS #93. Deploying a NestJS app with Amazon ECS and RDS
- 94. API with NestJS #94. Deploying multiple instances on AWS with a load balancer
- 95. API with NestJS #95. CI/CD with Amazon ECS and GitHub Actions
- 96. API with NestJS #96. Running unit tests with CI/CD and GitHub Actions
- 97. API with NestJS #97. Introduction to managing logs with Amazon CloudWatch
- 98. API with NestJS #98. Health checks with Terminus and Amazon ECS
- 99. API with NestJS #99. Scaling the number of application instances with Amazon ECS
- 100. API with NestJS #100. The HTTPS protocol with Route 53 and AWS Certificate Manager
- 101. API with NestJS #101. Managing sensitive data using the AWS Secrets Manager
- 102. API with NestJS #102. Writing unit tests with Prisma
- 103. API with NestJS #103. Integration tests with Prisma
- 104. API with NestJS #104. Writing transactions with Prisma
- 105. API with NestJS #105. Implementing soft deletes with Prisma and middleware
- 106. API with NestJS #106. Improving performance through indexes with Prisma
- 107. API with NestJS #107. Offset and keyset pagination with Prisma
- 108. API with NestJS #108. Date and time with Prisma and PostgreSQL
- 109. API with NestJS #109. Arrays with PostgreSQL and Prisma
- 110. API with NestJS #110. Managing JSON data with PostgreSQL and Prisma
- 111. API with NestJS #111. Constraints with PostgreSQL and Prisma
- 112. API with NestJS #112. Serializing the response with Prisma
- 113. API with NestJS #113. Logging with Prisma
- 114. API with NestJS #114. Modifying data using PUT and PATCH methods with Prisma
- 115. API with NestJS #115. Database migrations with Prisma
- 116. API with NestJS #116. REST API versioning
- 117. API with NestJS #117. CORS – Cross-Origin Resource Sharing
- 118. API with NestJS #118. Uploading and streaming videos
- 119. API with NestJS #119. Type-safe SQL queries with Kysely and PostgreSQL
- 120. API with NestJS #120. One-to-one relationships with the Kysely query builder
- 121. API with NestJS #121. Many-to-one relationships with PostgreSQL and Kysely
So far, in this series, we’ve used a few different solutions for managing databases. To work with MongoDB, we’ve used Mongoose. To manage a PostgreSQL database, we’ve utilized TypeORM and Prisma. This article looks into another Object-relational mapping (ORM) library called MikroORM. By having a broad perspective on what’s available, we can choose the library that fits our needs the most.
You can find all of the code from this article in this repository.
Setting up MikroORM and PostgreSQL
The most straightforward way to use PostgreSQL in our project is to use Docker. In the second part of this series, we set up PostgreSQL and TypeORM. Therefore, we can use the same docker-compose.yml file we created back then.
docker-compose.yml
|
1 2 3 4 5 6 7 8 9 10 11 12 13 14 15 16 17 18 19 20 21 22 23 24 25 26 27 28 29 30 31 |
version: "3" services: postgres: container_name: nestjs-postgres image: postgres:latest ports: - "5432:5432" volumes: - /data/postgres:/data/postgres env_file: - docker.env networks: - postgres pgadmin: links: - postgres:postgres container_name: nestjs-pgadmin image: dpage/pgadmin4 ports: - "8080:80" volumes: - /data/pgadmin:/root/.pgadmin env_file: - docker.env networks: - postgres networks: postgres: driver: bridge |
Also, we need to create a file that contains the variables our docker container needs.
docker.env
|
1 2 3 4 5 |
POSTGRES_USER=admin POSTGRES_PASSWORD=admin POSTGRES_DB=nestjs PGADMIN_DEFAULT_EMAIL=admin@admin.com PGADMIN_DEFAULT_PASSWORD=admin |
Connecting to the database
To be able to connect to the database, we need to establish a set of environment variables our NestJS application will use.
app.module.ts
|
1 2 3 4 5 6 7 8 9 10 11 12 13 14 15 16 17 18 19 20 |
import { Module } from '@nestjs/common'; import { ConfigModule } from '@nestjs/config'; import * as Joi from 'joi'; @Module({ imports: [ ConfigModule.forRoot({ validationSchema: Joi.object({ POSTGRES_HOST: Joi.string().required(), POSTGRES_PORT: Joi.number().required(), POSTGRES_USER: Joi.string().required(), POSTGRES_PASSWORD: Joi.string().required(), POSTGRES_DB: Joi.string().required(), }), }), ], controllers: [], providers: [], }) export class AppModule {} |
We also need to create a file that contains the values for the variables we’ve defined above.
.env
|
1 2 3 4 5 |
POSTGRES_HOST=localhost POSTGRES_PORT=5432 POSTGRES_USER=admin POSTGRES_PASSWORD=admin POSTGRES_DB=nestjs |
In this series, we use PostgreSQL. Because of that, we need the @mikroorm/postgresql package, among others.
|
1 |
npm install @mikro-orm/core @mikro-orm/nestjs @mikro-orm/postgresql |
With all of the above, we can create our DatabaseModule that establishes a connection to the database.
DatabaseModule.ts
|
1 2 3 4 5 6 7 8 9 10 11 12 13 14 15 16 17 18 19 20 21 22 |
import { Module } from '@nestjs/common'; import { ConfigModule, ConfigService } from '@nestjs/config'; import { MikroOrmModule } from '@mikro-orm/nestjs'; @Module({ imports: [ MikroOrmModule.forRootAsync({ imports: [ConfigModule], inject: [ConfigService], useFactory: (configService: ConfigService) => ({ dbName: configService.get('POSTGRES_DB'), user: configService.get('POSTGRES_USER'), password: configService.get('POSTGRES_PASSWORD'), host: configService.get('POSTGRES_HOST'), port: configService.get('POSTGRES_PORT'), type: 'postgresql', autoLoadEntities: true, }), }), ], }) export class DatabaseModule {} |
Don’t forget to import the DatabaseModule in the AppModule.
Defining a basic entity
Thanks to using the autoLoadEntities property, MikroORM loads the entities we define. First, let’s create an elementary entity for a post. To do that, we can use a set of decorators provided by the @mikro-orm/core package.
post.entity.ts
|
1 2 3 4 5 6 7 8 9 10 11 12 13 14 15 |
import { Entity, Property, PrimaryKey } from '@mikro-orm/core'; @Entity() class PostEntity { @PrimaryKey() id: number; @Property() title: string; @Property() content: string; } export default PostEntity; |
For MikroORM to detect the above entity, we need to register it in the module.
posts.module.ts
|
1 2 3 4 5 6 7 8 9 10 11 12 |
import { Module } from '@nestjs/common'; import { PostsService } from './posts.service'; import PostsController from './posts.controller'; import { MikroOrmModule } from '@mikro-orm/nestjs'; import PostEntity from './post.entity'; @Module({ imports: [MikroOrmModule.forFeature([PostEntity])], controllers: [PostsController], providers: [PostsService], }) export class PostsModule {} |
Interacting with the entities
The above file mentions the PostsController and PostsService. Let’s start by creating the latter.
posts.service.ts
|
1 2 3 4 5 6 7 8 9 10 11 12 |
import { Injectable } from '@nestjs/common'; import { InjectRepository } from '@mikro-orm/nestjs'; import { EntityRepository } from '@mikro-orm/core'; import PostEntity from './post.entity'; @Injectable() export class PostsService { constructor( @InjectRepository(PostEntity) private readonly postRepository: EntityRepository<PostEntity>, ) {} } |
MikroORM uses a widespread repository pattern. We can easily create, modify, fetch, and delete entities with it.
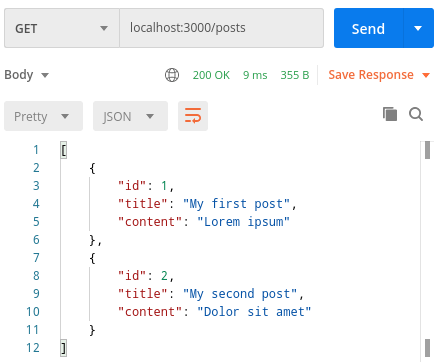
Getting all entities
To get a whole list of entities from our database, we can use the findAll method.
|
1 2 3 |
getPosts() { return this.postRepository.findAll(); } |
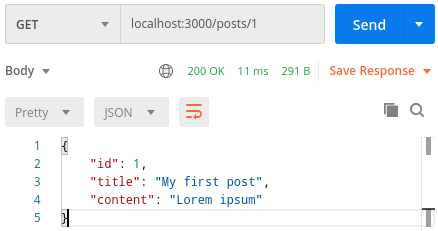
Getting an entity with a given id
Besides the above, we also have the findOne method. If we provide it with the correct argument, we can fetch a post with a given id.
|
1 2 3 4 5 6 7 8 9 |
async getPostById(id: number) { const post = await this.postRepository.findOne({ id, }); if (!post) { throw new PostNotFoundException(id); } return post; } |
We could also use the above method to find a post with a particular title, for example.
We use the PostNotFoundException, which is a custom exception.
postNotFound.exception.ts
|
1 2 3 4 5 6 7 8 9 |
import { NotFoundException } from '@nestjs/common'; class PostNotFoundException extends NotFoundException { constructor(postId: number) { super(`Post with id ${postId} not found`); } } export default PostNotFoundException; |
MikroORM uses the Identity Map pattern to track the data. Whenever we fetch an entity from the database, MikroORM keeps its reference. This allows for a bunch of optimizations. For example, fetching a post with the same id twice returns the same instance and runs only one SELECT query.
|
1 2 3 4 |
const firstPost = await this.postRepository.findOne({ id: 1 }); const secondPost = await this.postRepository.findOne({ id: 1 }); console.log(firstPost === secondPost); // true |
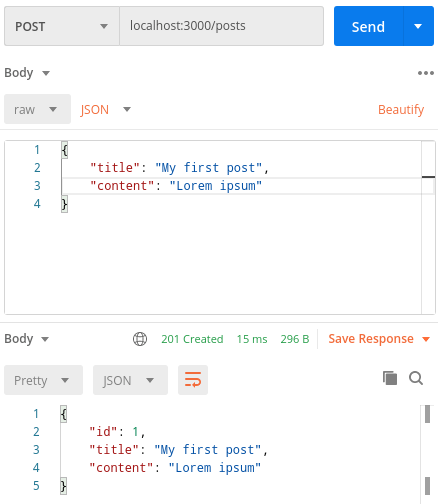
Creating an entity
MikroORM handles transactions automatically and aims to batch as many of our queries as possible. Because of that, we need to tell MikroORM to persist changes to the database explicitly.
If you want to know more about transactions, check out API with NestJS #15. Defining transactions with PostgreSQL and TypeORM
|
1 2 |
const newPost = await this.postRepository.create(post); newPost.persist(); |
We call the persist method to mark the entity as something we want to synchronize with the database.
When we later call the flush() method, MikroORM stores all of the changes we’ve marked with the persist method to the database.
|
1 |
await this.postRepository.flush(); |
We can combine both of the above actions by using the persistAndFlush method.
|
1 2 3 4 5 |
async createPost(post: CreatePostDto) { const newPost = await this.postRepository.create(post); await this.postRepository.persistAndFlush(newPost); return newPost; } |
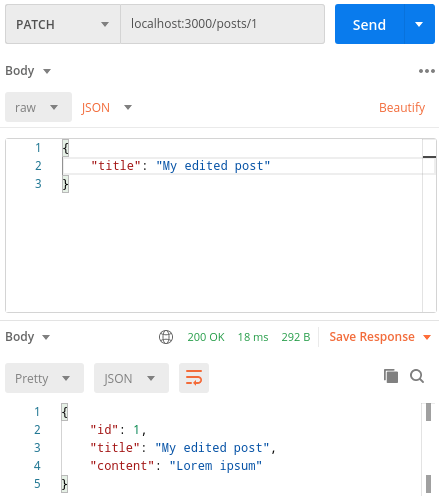
Editing an entity
To modify an entity, we can get it from the database and modify it. Then, when we flush all of the changes, MikroORM persists them in the database.
|
1 2 3 4 5 6 7 8 9 |
async updatePost(id: number, post: UpdatePostDto) { const existingPost = await this.getPostById(id); existingPost.content = post.content; existingPost.title = post.title; await this.postRepository.persistAndFlush(existingPost); return existingPost; } |
We can simplify the above code by using the wrap function provided by MikroORM. It allows us to use various helpers, such as assign.
|
1 2 3 4 5 6 |
async updatePost(id: number, post: UpdatePostDto) { const existingPost = await this.getPostById(id); wrap(existingPost).assign(post); await this.postRepository.persistAndFlush(existingPost); return existingPost; } |
By default, assign does not merge objects recursively. To achieve that, we would need to use wrap(existingPost).assign(post, { mergeObjects: true }) instead.
Please notice that using assign allows us to implement the PATCH method, not PUT. The above is because it won’t remove properties if we don’t explicitly set them as null.
Removing an entity
We need to mark the entity for removal and flush the changes to remove an entity.
|
1 2 3 4 5 |
async deletePost(id: number) { const post = await this.getPostById(id); this.postRepository.remove(post); return this.postRepository.flush(); } |
We can simplify the above function by using the removeAndFlush method.
|
1 2 3 4 |
async deletePost(id: number) { const post = await this.getPostById(id); return this.postRepository.removeAndFlush(post); } |

Putting all of the features together
When we incorporate all of the above features into our service, it looks like that:
posts.service.ts
|
1 2 3 4 5 6 7 8 9 10 11 12 13 14 15 16 17 18 19 20 21 22 23 24 25 26 27 28 29 30 31 32 33 34 35 36 37 38 39 40 41 42 43 44 45 46 47 |
import { Injectable } from '@nestjs/common'; import { InjectRepository } from '@mikro-orm/nestjs'; import { EntityRepository, wrap } from '@mikro-orm/core'; import PostEntity from './post.entity'; import PostNotFoundException from './exceptions/postNotFound.exception'; import CreatePostDto from './dto/createPost.dto'; import UpdatePostDto from './dto/updatePost.dto'; @Injectable() export class PostsService { constructor( @InjectRepository(PostEntity) private readonly postRepository: EntityRepository<PostEntity>, ) {} getPosts() { return this.postRepository.findAll(); } async getPostById(id: number) { const post = await this.postRepository.findOne({ id, }); if (!post) { throw new PostNotFoundException(id); } return post; } async createPost(post: CreatePostDto) { const newPost = await this.postRepository.create(post); await this.postRepository.persistAndFlush(newPost); return newPost; } async updatePost(id: number, post: UpdatePostDto) { const existingPost = await this.getPostById(id); wrap(existingPost).assign(post); await this.postRepository.persistAndFlush(existingPost); return existingPost; } async deletePost(id: number) { const post = await this.getPostById(id); return this.postRepository.removeAndFlush(post); } } |
We also need a controller that uses our service.
posts.controller.ts
|
1 2 3 4 5 6 7 8 9 10 11 12 13 14 15 16 17 18 19 20 21 22 23 24 25 26 27 28 29 30 31 32 33 34 35 36 37 38 39 40 41 42 43 44 45 46 |
import { Body, Controller, Delete, Get, Param, Post, Put, } from '@nestjs/common'; import { PostsService } from './posts.service'; import FindOneParams from '../utils/findOneParams'; import CreatePostDto from './dto/createPost.dto'; import UpdatePostDto from './dto/updatePost.dto'; @Controller('posts') export default class PostsController { constructor(private readonly postsService: PostsService) {} @Get() async getPosts() { return this.postsService.getPosts(); } @Get(':id') getPostById(@Param() { id }: FindOneParams) { return this.postsService.getPostById(id); } @Post() async createPost(@Body() post: CreatePostDto) { return this.postsService.createPost(post); } @Put(':id') async updatePost( @Param() { id }: FindOneParams, @Body() post: UpdatePostDto, ) { return this.postsService.updatePost(id, post); } @Delete(':id') async deletePost(@Param() { id }: FindOneParams) { return this.postsService.deletePost(Number(id)); } } |
Synchronizing our entities schema with the database
Doing all of the above does not create a posts table in our database. To achieve that, we need to create a migration. We will need the MikroORM CLI and a dedicated @mikro-orm/cli package.
|
1 |
npm install @mikro-orm/cli @mikro-orm/migrations |
The CLI needs a separate configuration. To provide it, let’s add the following to the package.json first:
package.json
|
1 2 3 4 5 6 |
"mikro-orm": { "useTsNode": true, "configPaths": [ "./src/mikro-orm.config.ts" ] } |
We also need to create the mikro-orm.config.ts file in the src directory.
mikro-orm.config.ts
|
1 2 3 4 5 6 7 8 9 10 11 12 13 14 15 16 17 |
import PostEntity from './posts/post.entity'; import { Options } from '@mikro-orm/core'; import { ConfigService } from '@nestjs/config'; const configService = new ConfigService(); const MikroOrmConfig: Options = { entities: [PostEntity], type: 'postgresql', dbName: configService.get('POSTGRES_DB'), user: configService.get('POSTGRES_USER'), password: configService.get('POSTGRES_PASSWORD'), host: configService.get('POSTGRES_HOST'), port: configService.get('POSTGRES_PORT'), }; export default MikroOrmConfig; |
Because the mikro-orm.config.ts is not a part of a NestJS application, we initialize the ConfigService manually.
When we run npx mikro-orm migration:create, MikroORM checks the difference between our entity schema definitions and the state of the database. If there is a difference, it generates migration files.
Migration20220522201347.ts
|
1 2 3 4 5 6 7 8 9 10 11 12 13 |
import { Migration } from '@mikro-orm/migrations'; export class Migration20220522201347 extends Migration { async up(): Promise<void> { this.addSql('create table "post_entity" ("id" serial primary key, "title" varchar(255) not null, "content" varchar(255) not null);'); } async down(): Promise<void> { this.addSql('drop table if exists "post_entity" cascade;'); } } |
When we run npx mikro-orm migration:up, MikroORM performs the above migrations to bring our database to the latest state.
MikroORM keeps track of all of the migrations in the mikro_orm_migrations table.

Summary
In this article, we’ve gone through using MikroORM with PostgreSQL and NestJS. It included learning how MikroORM works by implementing all of the Create, Read, Update and Delete (CRUD) operations. To do that, we had to understand how MikroORM works under the hood and how to synchronize changes with the database. We also learned the basics of migrations and created them using the MikroORM CLI.

Very good article! Thank you!
What about error/exception handling?
Thanks for the article. How do we specify ‘schema’ to be used within the MikroOrm config ? TypeOrm used to support field called ‘schema’.