- 1. API with NestJS #1. Controllers, routing and the module structure
- 2. API with NestJS #2. Setting up a PostgreSQL database with TypeORM
- 3. API with NestJS #3. Authenticating users with bcrypt, Passport, JWT, and cookies
- 4. API with NestJS #4. Error handling and data validation
- 5. API with NestJS #5. Serializing the response with interceptors
- 6. API with NestJS #6. Looking into dependency injection and modules
- 7. API with NestJS #7. Creating relationships with Postgres and TypeORM
- 8. API with NestJS #8. Writing unit tests
- 9. API with NestJS #9. Testing services and controllers with integration tests
- 10. API with NestJS #10. Uploading public files to Amazon S3
- 11. API with NestJS #11. Managing private files with Amazon S3
- 12. API with NestJS #12. Introduction to Elasticsearch
- 13. API with NestJS #13. Implementing refresh tokens using JWT
- 14. API with NestJS #14. Improving performance of our Postgres database with indexes
- 15. API with NestJS #15. Defining transactions with PostgreSQL and TypeORM
- 16. API with NestJS #16. Using the array data type with PostgreSQL and TypeORM
- 17. API with NestJS #17. Offset and keyset pagination with PostgreSQL and TypeORM
- 18. API with NestJS #18. Exploring the idea of microservices
- 19. API with NestJS #19. Using RabbitMQ to communicate with microservices
- 20. API with NestJS #20. Communicating with microservices using the gRPC framework
- 21. API with NestJS #21. An introduction to CQRS
- 22. API with NestJS #22. Storing JSON with PostgreSQL and TypeORM
- 23. API with NestJS #23. Implementing in-memory cache to increase the performance
- 24. API with NestJS #24. Cache with Redis. Running the app in a Node.js cluster
- 25. API with NestJS #25. Sending scheduled emails with cron and Nodemailer
- 26. API with NestJS #26. Real-time chat with WebSockets
- 27. API with NestJS #27. Introduction to GraphQL. Queries, mutations, and authentication
- 28. API with NestJS #28. Dealing in the N + 1 problem in GraphQL
- 29. API with NestJS #29. Real-time updates with GraphQL subscriptions
- 30. API with NestJS #30. Scalar types in GraphQL
- 31. API with NestJS #31. Two-factor authentication
- 32. API with NestJS #32. Introduction to Prisma with PostgreSQL
- 33. API with NestJS #33. Managing PostgreSQL relationships with Prisma
- 34. API with NestJS #34. Handling CPU-intensive tasks with queues
- 35. API with NestJS #35. Using server-side sessions instead of JSON Web Tokens
- 36. API with NestJS #36. Introduction to Stripe with React
- 37. API with NestJS #37. Using Stripe to save credit cards for future use
- 38. API with NestJS #38. Setting up recurring payments via subscriptions with Stripe
- 39. API with NestJS #39. Reacting to Stripe events with webhooks
- 40. API with NestJS #40. Confirming the email address
- 41. API with NestJS #41. Verifying phone numbers and sending SMS messages with Twilio
- 42. API with NestJS #42. Authenticating users with Google
- 43. API with NestJS #43. Introduction to MongoDB
- 44. API with NestJS #44. Implementing relationships with MongoDB
- 45. API with NestJS #45. Virtual properties with MongoDB and Mongoose
- 46. API with NestJS #46. Managing transactions with MongoDB and Mongoose
- 47. API with NestJS #47. Implementing pagination with MongoDB and Mongoose
- 48. API with NestJS #48. Definining indexes with MongoDB and Mongoose
- 49. API with NestJS #49. Updating with PUT and PATCH with MongoDB and Mongoose
- 50. API with NestJS #50. Introduction to logging with the built-in logger and TypeORM
- 51. API with NestJS #51. Health checks with Terminus and Datadog
- 52. API with NestJS #52. Generating documentation with Compodoc and JSDoc
- 53. API with NestJS #53. Implementing soft deletes with PostgreSQL and TypeORM
- 54. API with NestJS #54. Storing files inside a PostgreSQL database
- 55. API with NestJS #55. Uploading files to the server
- 56. API with NestJS #56. Authorization with roles and claims
- 57. API with NestJS #57. Composing classes with the mixin pattern
- 58. API with NestJS #58. Using ETag to implement cache and save bandwidth
- 59. API with NestJS #59. Introduction to a monorepo with Lerna and Yarn workspaces
- 60. API with NestJS #60. The OpenAPI specification and Swagger
- 61. API with NestJS #61. Dealing with circular dependencies
- 62. API with NestJS #62. Introduction to MikroORM with PostgreSQL
- 63. API with NestJS #63. Relationships with PostgreSQL and MikroORM
- 64. API with NestJS #64. Transactions with PostgreSQL and MikroORM
- 65. API with NestJS #65. Implementing soft deletes using MikroORM and filters
- 66. API with NestJS #66. Improving PostgreSQL performance with indexes using MikroORM
- 67. API with NestJS #67. Migrating to TypeORM 0.3
- 68. API with NestJS #68. Interacting with the application through REPL
- 69. API with NestJS #69. Database migrations with TypeORM
- 70. API with NestJS #70. Defining dynamic modules
- 71. API with NestJS #71. Introduction to feature flags
- 72. API with NestJS #72. Working with PostgreSQL using raw SQL queries
- 73. API with NestJS #73. One-to-one relationships with raw SQL queries
- 74. API with NestJS #74. Designing many-to-one relationships using raw SQL queries
- 75. API with NestJS #75. Many-to-many relationships using raw SQL queries
- 76. API with NestJS #76. Working with transactions using raw SQL queries
- 77. API with NestJS #77. Offset and keyset pagination with raw SQL queries
- 78. API with NestJS #78. Generating statistics using aggregate functions in raw SQL
- 79. API with NestJS #79. Implementing searching with pattern matching and raw SQL
- 80. API with NestJS #80. Updating entities with PUT and PATCH using raw SQL queries
- 81. API with NestJS #81. Soft deletes with raw SQL queries
- 82. API with NestJS #82. Introduction to indexes with raw SQL queries
- 83. API with NestJS #83. Text search with tsvector and raw SQL
- 84. API with NestJS #84. Implementing filtering using subqueries with raw SQL
- 85. API with NestJS #85. Defining constraints with raw SQL
- 86. API with NestJS #86. Logging with the built-in logger when using raw SQL
- 87. API with NestJS #87. Writing unit tests in a project with raw SQL
- 88. API with NestJS #88. Testing a project with raw SQL using integration tests
- 89. API with NestJS #89. Replacing Express with Fastify
- 90. API with NestJS #90. Using various types of SQL joins
- 91. API with NestJS #91. Dockerizing a NestJS API with Docker Compose
- 92. API with NestJS #92. Increasing the developer experience with Docker Compose
- 93. API with NestJS #93. Deploying a NestJS app with Amazon ECS and RDS
- 94. API with NestJS #94. Deploying multiple instances on AWS with a load balancer
- 95. API with NestJS #95. CI/CD with Amazon ECS and GitHub Actions
- 96. API with NestJS #96. Running unit tests with CI/CD and GitHub Actions
- 97. API with NestJS #97. Introduction to managing logs with Amazon CloudWatch
- 98. API with NestJS #98. Health checks with Terminus and Amazon ECS
- 99. API with NestJS #99. Scaling the number of application instances with Amazon ECS
- 100. API with NestJS #100. The HTTPS protocol with Route 53 and AWS Certificate Manager
- 101. API with NestJS #101. Managing sensitive data using the AWS Secrets Manager
- 102. API with NestJS #102. Writing unit tests with Prisma
- 103. API with NestJS #103. Integration tests with Prisma
- 104. API with NestJS #104. Writing transactions with Prisma
- 105. API with NestJS #105. Implementing soft deletes with Prisma and middleware
- 106. API with NestJS #106. Improving performance through indexes with Prisma
- 107. API with NestJS #107. Offset and keyset pagination with Prisma
- 108. API with NestJS #108. Date and time with Prisma and PostgreSQL
- 109. API with NestJS #109. Arrays with PostgreSQL and Prisma
- 110. API with NestJS #110. Managing JSON data with PostgreSQL and Prisma
- 111. API with NestJS #111. Constraints with PostgreSQL and Prisma
- 112. API with NestJS #112. Serializing the response with Prisma
- 113. API with NestJS #113. Logging with Prisma
- 114. API with NestJS #114. Modifying data using PUT and PATCH methods with Prisma
- 115. API with NestJS #115. Database migrations with Prisma
- 116. API with NestJS #116. REST API versioning
- 117. API with NestJS #117. CORS – Cross-Origin Resource Sharing
- 118. API with NestJS #118. Uploading and streaming videos
- 119. API with NestJS #119. Type-safe SQL queries with Kysely and PostgreSQL
- 120. API with NestJS #120. One-to-one relationships with the Kysely query builder
- 121. API with NestJS #121. Many-to-one relationships with PostgreSQL and Kysely
Across this series, we emphasize code readability and maintainability. In part #52 of this course, we’ve gone through generating documentation with Compodoc and JSDoc. This time we look into the OpenAPI specification and the Swagger tool.
You can check out an interactive demo prepared by the Swagger team.
Introducing OpenAPI and Swagger
With OpenAPI and Swagger, we can create a user interface that serves as interactive API documentation for our project. However, since it might be confusing, it is worth outlining the difference between the OpenAPI and the Swagger.
The OpenAPI is a specification used to describe our API and gives us a way to provide the details of our endpoints. It includes the endpoints and the description of each operation’s inputs and outputs. It also allows us to specify our authentication method, license, and contact information.
Swagger is a set of tools built around the OpenAPI specification. The one that we present in this article is the Swagger UI. It allows us to render the OpenAPI specification we wrote in as the API documentation. The thing that makes it so valuable is that it is interactive. Swagger generates a web page that we can publish so that people can view our API and make HTTP requests. It is a great tool to share knowledge with other people working in our organization. If our API is open to the public, we can also deploy the above page and share it with everyone.
OpenAPI Specification was formerly called the Swagger Specification, which might add more to the confusion.
Adding Swagger to our NestJS project
We need to install two dependencies to add Swagger to our NestJS project.
|
1 |
npm install @nestjs/swagger swagger-ui-express |
If you use Fastify, install fastify-swagger instead of swagger-ui-express.
To generate the basics of our Swagger UI, we need to use the SwaggerModule and DocumentBuilder from @nestjs/swagger.
main.ts
|
1 2 3 4 5 6 7 8 9 10 11 12 13 14 15 16 17 18 19 20 21 22 23 24 25 26 |
import { NestFactory } from '@nestjs/core'; import { AppModule } from './app.module'; import { ConfigService } from '@nestjs/config'; import { SwaggerModule, DocumentBuilder } from '@nestjs/swagger'; async function bootstrap() { const app = await NestFactory.create(AppModule); const configService = app.get(ConfigService); // ... const swaggerConfig = new DocumentBuilder() .setTitle('API with NestJS') .setDescription('API developed throughout the API with NestJS course') .setVersion('1.0') .build(); const document = SwaggerModule.createDocument(app, swaggerConfig); SwaggerModule.setup('api', app, document); const port = configService.get('PORT') ?? 3000; await app.listen(port); } bootstrap(); |
The DocumentBuilder class contains a set of methods we can use to configure our Swagger UI.
Besides the above functions such as the setTitle, we will also go through some of the others in this article.
@nestjs/swagger/dist/document-builder.d.ts
|
1 2 3 4 5 6 7 8 9 10 11 12 13 14 15 16 17 18 19 20 21 22 |
export declare class DocumentBuilder { private readonly logger; private readonly document; setTitle(title: string): this; setDescription(description: string): this; setVersion(version: string): this; setTermsOfService(termsOfService: string): this; setContact(name: string, url: string, email: string): this; setLicense(name: string, url: string): this; addServer(url: string, description?: string, variables?: Record<string, ServerVariableObject>): this; setExternalDoc(description: string, url: string): this; setBasePath(path: string): this; addTag(name: string, description?: string, externalDocs?: ExternalDocumentationObject): this; addSecurity(name: string, options: SecuritySchemeObject): this; addSecurityRequirements(name: string | SecurityRequirementObject, requirements?: string[]): this; addBearerAuth(options?: SecuritySchemeObject, name?: string): this; addOAuth2(options?: SecuritySchemeObject, name?: string): this; addApiKey(options?: SecuritySchemeObject, name?: string): this; addBasicAuth(options?: SecuritySchemeObject, name?: string): this; addCookieAuth(cookieName?: string, options?: SecuritySchemeObject, securityName?: string): this; build(): Omit<OpenAPIObject, 'paths'>; } |
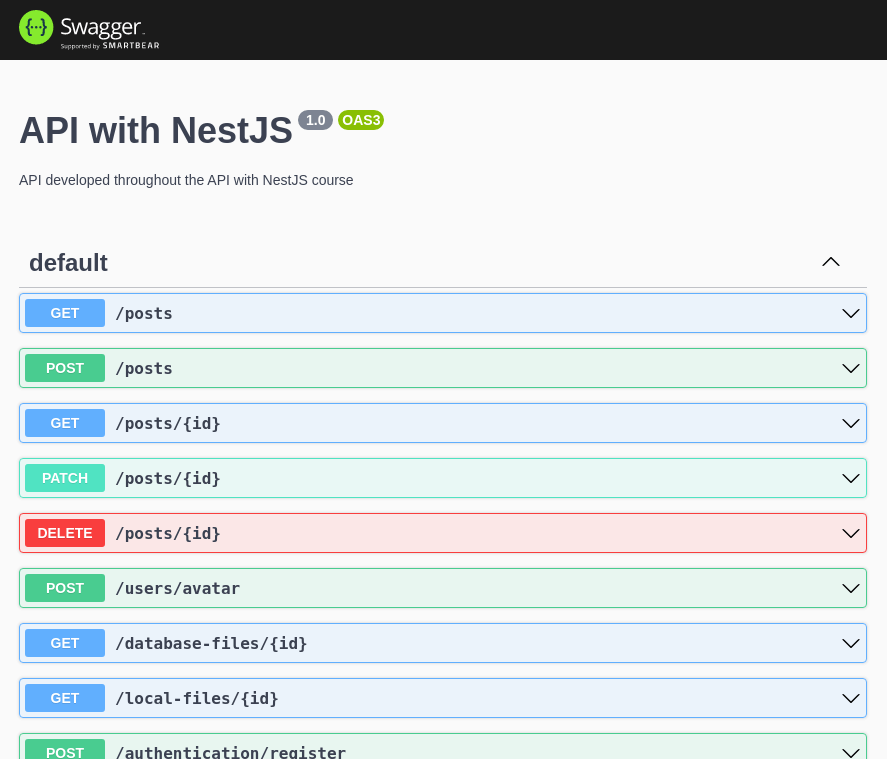
Doing all of the above generates the Swagger UI and serves it under at http://localhost:3000/api.
The above URL might be different based on the port of your NestJS application.
Generating our OpenAPI specification automatically
Unfortunately, the specification we’ve defined so far does not contain much detail.
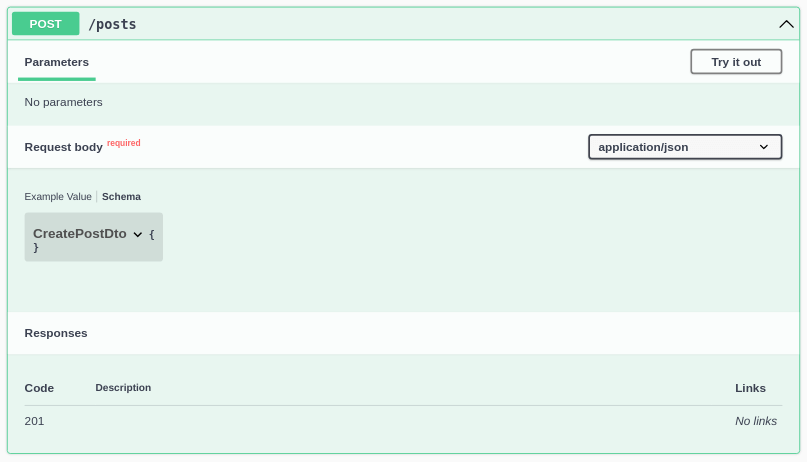
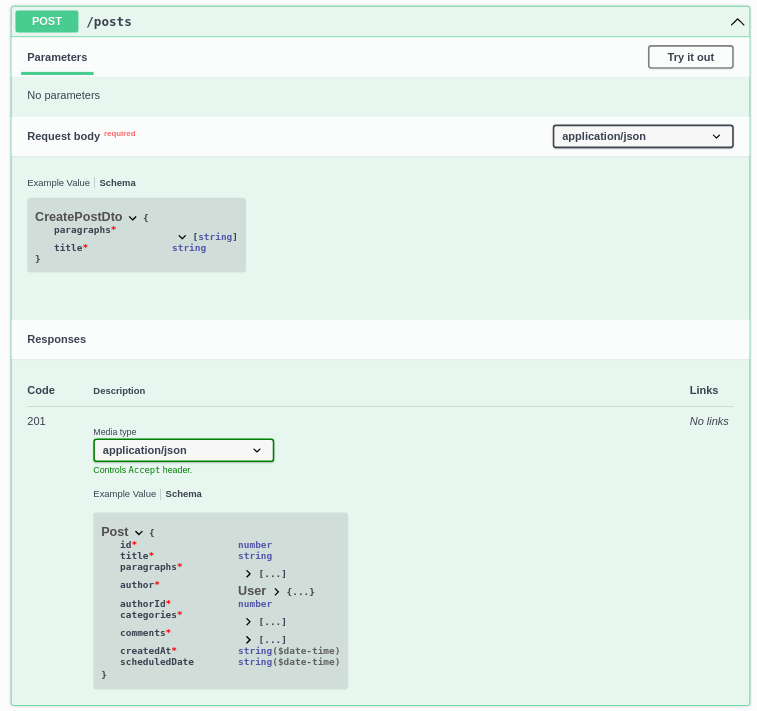
We can help NestJS generate a more detailed OpenAPI specification out of the box. To do that, we need to use the CLI plugin "@nestjs/swagger" gives us. To use it, we need to adjust our nest-cli.json file and run nest start.
nest-cli.json
|
1 2 3 4 5 6 7 |
{ "collection": "@nestjs/schematics", "sourceRoot": "src", "compilerOptions": { "plugins": ["@nestjs/swagger"] } } |
The CLI plugin assumes that our DTOs are suffixed with .dto.ts or .entity.ts. It also assumes that the files that contain controllers end with .controller.ts.
Defining the OpenAPI specification manually
Thanks to using the above solution, we automatically get a significant part of the specification generated. If we want to make some changes, we can use the wide variety of decorators that NestJS gives us.
Models definition
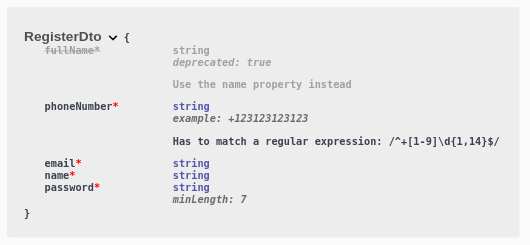
We can use the @ApiProperty() decorator to annotate class properties.
register.dto
|
1 2 3 4 5 6 7 8 9 10 11 12 13 14 15 16 17 18 19 20 21 22 23 24 25 26 27 28 29 30 31 32 33 |
import { IsEmail, IsString, IsNotEmpty, MinLength, Matches } from 'class-validator'; import { ApiProperty } from '@nestjs/swagger'; export class RegisterDto { @IsEmail() email: string; @IsString() @IsNotEmpty() name: string; @ApiProperty({ deprecated: true, description: 'Use the name property instead' }) fullName: string; @IsString() @IsNotEmpty() @MinLength(7) password: string; @ApiProperty({ description: 'Has to match a regular expression: /^\\+[1-9]\\d{1,14}$/', example: '+123123123123' }) @IsString() @IsNotEmpty() @Matches(/^\+[1-9]\d{1,14}$/) phoneNumber: string; } export default RegisterDto; |
The CLI plugin can understand the decorators from the class-validator such as @MinLength()
Grouping endpoints
All of our endpoints go into the “default” group by default. To categorize them better, we can use the @ApiTags() decorator.
posts.controller.ts
|
1 2 3 4 5 6 7 8 9 10 11 12 13 14 15 |
import { Controller, } from '@nestjs/common'; import PostsService from './posts.service'; import { ApiTags } from '@nestjs/swagger'; @Controller('posts') @ApiTags('posts') export default class PostsController { constructor( private readonly postsService: PostsService ) {} // ... } |
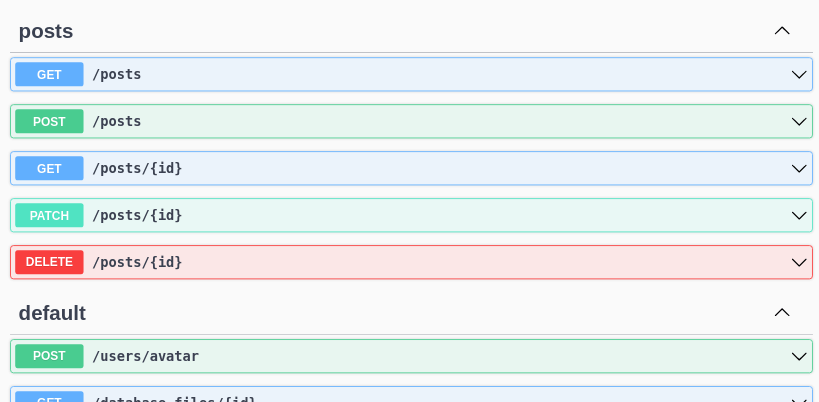
Describing our endpoints with more details
We can use decorators such as @ApiParam() and @ApiResponse() to provide more details about our endpoints.
posts.controller.ts
|
1 2 3 4 5 6 7 8 9 10 11 12 13 14 15 16 17 18 19 |
@Get(':id') @ApiParam({ name: 'id', required: true, description: 'Should be an id of a post that exists in the database', type: Number }) @ApiResponse({ status: 200, description: 'A post has been successfully fetched', type: PostEntity }) @ApiResponse({ status: 404, description: 'A post with given id does not exist.' }) getPostById(@Param() { id }: FindOneParams) { return this.postsService.getPostById(Number(id)); } |
Instead of passing status: 200 and status: 404 we could use the @ApiOkResponse() and @ApiNotFoundResponse() decorators.
Authenticating with cookies
In this series, we use cookie-based authentication. Since many of our endpoints require the user to log in, let’s add this functionality to our OpenAPI specification.
If you want to know more about authentication, check out API with NestJS #3. Authenticating users with bcrypt, Passport, JWT, and cookies
Swagger supports a variety of different types of authentication. Unfortunately, it currently does not support sending cookies when using the “Try it out” button. We can deal with this issue by using the Swagger interface to directly log in to our API.
In our application, we have the /log-in endpoint. A lot of its logic happens in the LocalAuthenticationGuard. Therefore, the CLI plugin does not note that the user needs to provide an email and a password. Let’s fix that using the @ApiBody() decorator.
authentication.controller.ts
|
1 2 3 4 5 6 7 8 9 10 11 12 13 14 15 16 17 18 19 20 21 22 |
@HttpCode(200) @UseGuards(LocalAuthenticationGuard) @Post('log-in') @ApiBody({ type: LogInDto }) async logIn(@Req() request: RequestWithUser) { const { user } = request; const accessTokenCookie = this.authenticationService.getCookieWithJwtAccessToken(user.id); const { cookie: refreshTokenCookie, token: refreshToken } = this.authenticationService.getCookieWithJwtRefreshToken(user.id); await this.usersService.setCurrentRefreshToken(refreshToken, user.id); request.res.setHeader('Set-Cookie', [accessTokenCookie, refreshTokenCookie]); if (user.isTwoFactorAuthenticationEnabled) { return; } return user; } |
We now can use the “Try it out” button to send a request to the /log-in endpoint.

Performing the above request sets the right cookie in our browser. Thanks to that, we will send this cookie when interacting with other endpoints automatically.
Handling file uploads
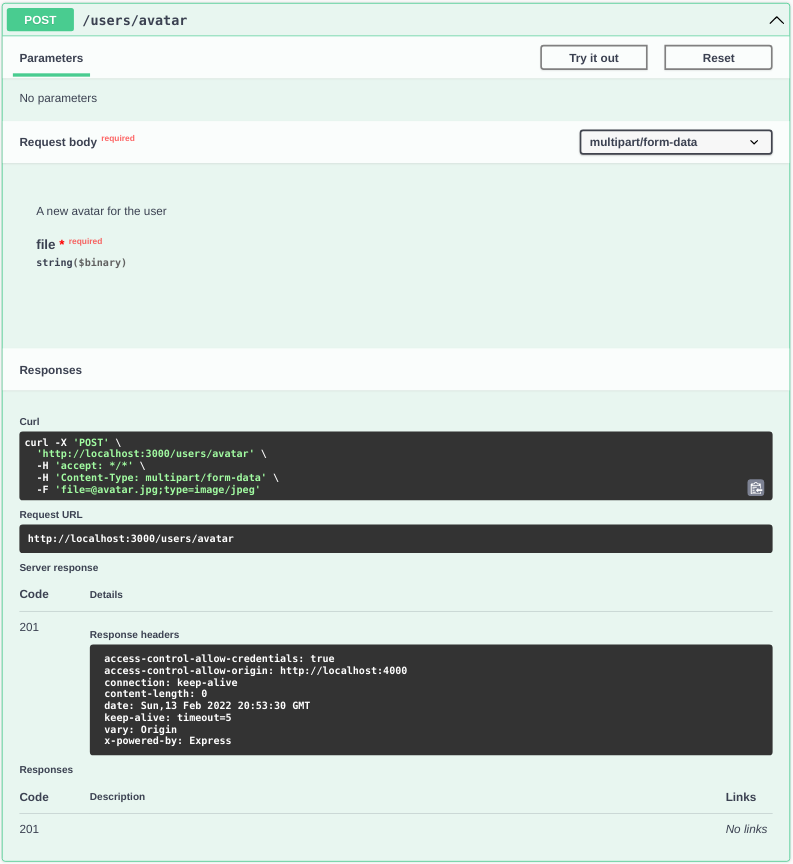
In part #55 of this series, we’ve implemented a way to upload files and store them on our server. To reflect that in Swagger, we can use the @ApiBody() and @ApiConsumes() decorators.
users.controller.ts
|
1 2 3 4 5 6 7 8 9 10 11 12 13 14 15 16 17 18 19 20 21 22 23 24 25 26 27 28 29 30 31 32 33 34 35 36 37 38 39 40 41 42 43 |
import { UsersService } from './users.service'; import { BadRequestException, Controller, Post, Req, UploadedFile, UseGuards, UseInterceptors } from '@nestjs/common'; import JwtAuthenticationGuard from '../authentication/jwt-authentication.guard'; import RequestWithUser from '../authentication/requestWithUser.interface'; import { Express } from 'express'; import LocalFilesInterceptor from '../localFiles/localFiles.interceptor'; import { ApiBody, ApiConsumes } from '@nestjs/swagger'; import FileUploadDto from './dto/fileUpload.dto'; @Controller('users') export class UsersController { constructor( private readonly usersService: UsersService, ) {} @Post('avatar') @UseGuards(JwtAuthenticationGuard) @UseInterceptors(LocalFilesInterceptor({ fieldName: 'file', path: '/avatars', fileFilter: (request, file, callback) => { if (!file.mimetype.includes('image')) { return callback(new BadRequestException('Provide a valid image'), false); } callback(null, true); }, limits: { fileSize: Math.pow(1024, 2) // 1MB } })) @ApiConsumes('multipart/form-data') @ApiBody({ description: 'A new avatar for the user', type: FileUploadDto, }) async addAvatar(@Req() request: RequestWithUser, @UploadedFile() file: Express.Multer.File) { return this.usersService.addAvatar(request.user.id, { path: file.path, filename: file.originalname, mimetype: file.mimetype }); } } |
fileUpload.dto.ts
|
1 2 3 4 5 6 7 8 9 |
import { ApiProperty } from '@nestjs/swagger'; import { Express } from 'express'; class FileUploadDto { @ApiProperty({ type: 'string', format: 'binary' }) file: Express.Multer.File; } export default FileUploadDto; |
Doing the above creates an interface in Swagger UI where we can upload our image.
Summary
We’ve gone through the OpenAPI specification and the Swagger UI tool in this article. We’ve used the CLI plugin to get a lot out of the box. Still, there were some cases that we had to cover manually using different decorators that NestJS gives us. We’ve also dealt with cookie authentication and file uploads. The above gave us the necessary knowledge to create robust, interactive documentation.

Thank you, as always, you provided the information competently!
It would be nice to notice one more thing – Authorization. Swagger provides us with some simple extensions and decorators for authentication. For example, passing JWT tokens – by adding .addBearerAuth() to a swagger-document we are adding an input token input field on Swagger UI, that token will be inserted as auth header(Authorization: Bearer <our-token>) and we also need to add @ApiBearerAuth(), decorator, to our route or controller, we can add multiple Auth strategies, and separate them with a name.
To know more security scenarios I recommend checking those links:
[Security NestJs docs] [SO – Swagger Auth Options question]