
- 1. API with NestJS #1. Controllers, routing and the module structure
- 2. API with NestJS #2. Setting up a PostgreSQL database with TypeORM
- 3. API with NestJS #3. Authenticating users with bcrypt, Passport, JWT, and cookies
- 4. API with NestJS #4. Error handling and data validation
- 5. API with NestJS #5. Serializing the response with interceptors
- 6. API with NestJS #6. Looking into dependency injection and modules
- 7. API with NestJS #7. Creating relationships with Postgres and TypeORM
- 8. API with NestJS #8. Writing unit tests
- 9. API with NestJS #9. Testing services and controllers with integration tests
- 10. API with NestJS #10. Uploading public files to Amazon S3
- 11. API with NestJS #11. Managing private files with Amazon S3
- 12. API with NestJS #12. Introduction to Elasticsearch
- 13. API with NestJS #13. Implementing refresh tokens using JWT
- 14. API with NestJS #14. Improving performance of our Postgres database with indexes
- 15. API with NestJS #15. Defining transactions with PostgreSQL and TypeORM
- 16. API with NestJS #16. Using the array data type with PostgreSQL and TypeORM
- 17. API with NestJS #17. Offset and keyset pagination with PostgreSQL and TypeORM
- 18. API with NestJS #18. Exploring the idea of microservices
- 19. API with NestJS #19. Using RabbitMQ to communicate with microservices
- 20. API with NestJS #20. Communicating with microservices using the gRPC framework
- 21. API with NestJS #21. An introduction to CQRS
- 22. API with NestJS #22. Storing JSON with PostgreSQL and TypeORM
- 23. API with NestJS #23. Implementing in-memory cache to increase the performance
- 24. API with NestJS #24. Cache with Redis. Running the app in a Node.js cluster
- 25. API with NestJS #25. Sending scheduled emails with cron and Nodemailer
- 26. API with NestJS #26. Real-time chat with WebSockets
- 27. API with NestJS #27. Introduction to GraphQL. Queries, mutations, and authentication
- 28. API with NestJS #28. Dealing in the N + 1 problem in GraphQL
- 29. API with NestJS #29. Real-time updates with GraphQL subscriptions
- 30. API with NestJS #30. Scalar types in GraphQL
- 31. API with NestJS #31. Two-factor authentication
- 32. API with NestJS #32. Introduction to Prisma with PostgreSQL
- 33. API with NestJS #33. Managing PostgreSQL relationships with Prisma
- 34. API with NestJS #34. Handling CPU-intensive tasks with queues
- 35. API with NestJS #35. Using server-side sessions instead of JSON Web Tokens
- 36. API with NestJS #36. Introduction to Stripe with React
- 37. API with NestJS #37. Using Stripe to save credit cards for future use
- 38. API with NestJS #38. Setting up recurring payments via subscriptions with Stripe
- 39. API with NestJS #39. Reacting to Stripe events with webhooks
- 40. API with NestJS #40. Confirming the email address
- 41. API with NestJS #41. Verifying phone numbers and sending SMS messages with Twilio
- 42. API with NestJS #42. Authenticating users with Google
- 43. API with NestJS #43. Introduction to MongoDB
- 44. API with NestJS #44. Implementing relationships with MongoDB
- 45. API with NestJS #45. Virtual properties with MongoDB and Mongoose
- 46. API with NestJS #46. Managing transactions with MongoDB and Mongoose
- 47. API with NestJS #47. Implementing pagination with MongoDB and Mongoose
- 48. API with NestJS #48. Definining indexes with MongoDB and Mongoose
- 49. API with NestJS #49. Updating with PUT and PATCH with MongoDB and Mongoose
- 50. API with NestJS #50. Introduction to logging with the built-in logger and TypeORM
- 51. API with NestJS #51. Health checks with Terminus and Datadog
- 52. API with NestJS #52. Generating documentation with Compodoc and JSDoc
- 53. API with NestJS #53. Implementing soft deletes with PostgreSQL and TypeORM
- 54. API with NestJS #54. Storing files inside a PostgreSQL database
- 55. API with NestJS #55. Uploading files to the server
- 56. API with NestJS #56. Authorization with roles and claims
- 57. API with NestJS #57. Composing classes with the mixin pattern
- 58. API with NestJS #58. Using ETag to implement cache and save bandwidth
- 59. API with NestJS #59. Introduction to a monorepo with Lerna and Yarn workspaces
- 60. API with NestJS #60. The OpenAPI specification and Swagger
- 61. API with NestJS #61. Dealing with circular dependencies
- 62. API with NestJS #62. Introduction to MikroORM with PostgreSQL
- 63. API with NestJS #63. Relationships with PostgreSQL and MikroORM
- 64. API with NestJS #64. Transactions with PostgreSQL and MikroORM
- 65. API with NestJS #65. Implementing soft deletes using MikroORM and filters
- 66. API with NestJS #66. Improving PostgreSQL performance with indexes using MikroORM
- 67. API with NestJS #67. Migrating to TypeORM 0.3
- 68. API with NestJS #68. Interacting with the application through REPL
- 69. API with NestJS #69. Database migrations with TypeORM
- 70. API with NestJS #70. Defining dynamic modules
- 71. API with NestJS #71. Introduction to feature flags
- 72. API with NestJS #72. Working with PostgreSQL using raw SQL queries
- 73. API with NestJS #73. One-to-one relationships with raw SQL queries
- 74. API with NestJS #74. Designing many-to-one relationships using raw SQL queries
- 75. API with NestJS #75. Many-to-many relationships using raw SQL queries
- 76. API with NestJS #76. Working with transactions using raw SQL queries
- 77. API with NestJS #77. Offset and keyset pagination with raw SQL queries
- 78. API with NestJS #78. Generating statistics using aggregate functions in raw SQL
- 79. API with NestJS #79. Implementing searching with pattern matching and raw SQL
- 80. API with NestJS #80. Updating entities with PUT and PATCH using raw SQL queries
- 81. API with NestJS #81. Soft deletes with raw SQL queries
- 82. API with NestJS #82. Introduction to indexes with raw SQL queries
- 83. API with NestJS #83. Text search with tsvector and raw SQL
- 84. API with NestJS #84. Implementing filtering using subqueries with raw SQL
- 85. API with NestJS #85. Defining constraints with raw SQL
- 86. API with NestJS #86. Logging with the built-in logger when using raw SQL
- 87. API with NestJS #87. Writing unit tests in a project with raw SQL
- 88. API with NestJS #88. Testing a project with raw SQL using integration tests
- 89. API with NestJS #89. Replacing Express with Fastify
- 90. API with NestJS #90. Using various types of SQL joins
- 91. API with NestJS #91. Dockerizing a NestJS API with Docker Compose
- 92. API with NestJS #92. Increasing the developer experience with Docker Compose
- 93. API with NestJS #93. Deploying a NestJS app with Amazon ECS and RDS
- 94. API with NestJS #94. Deploying multiple instances on AWS with a load balancer
- 95. API with NestJS #95. CI/CD with Amazon ECS and GitHub Actions
- 96. API with NestJS #96. Running unit tests with CI/CD and GitHub Actions
- 97. API with NestJS #97. Introduction to managing logs with Amazon CloudWatch
- 98. API with NestJS #98. Health checks with Terminus and Amazon ECS
- 99. API with NestJS #99. Scaling the number of application instances with Amazon ECS
- 100. API with NestJS #100. The HTTPS protocol with Route 53 and AWS Certificate Manager
- 101. API with NestJS #101. Managing sensitive data using the AWS Secrets Manager
- 102. API with NestJS #102. Writing unit tests with Prisma
- 103. API with NestJS #103. Integration tests with Prisma
- 104. API with NestJS #104. Writing transactions with Prisma
- 105. API with NestJS #105. Implementing soft deletes with Prisma and middleware
- 106. API with NestJS #106. Improving performance through indexes with Prisma
- 107. API with NestJS #107. Offset and keyset pagination with Prisma
- 108. API with NestJS #108. Date and time with Prisma and PostgreSQL
- 109. API with NestJS #109. Arrays with PostgreSQL and Prisma
- 110. API with NestJS #110. Managing JSON data with PostgreSQL and Prisma
- 111. API with NestJS #111. Constraints with PostgreSQL and Prisma
- 112. API with NestJS #112. Serializing the response with Prisma
- 113. API with NestJS #113. Logging with Prisma
- 114. API with NestJS #114. Modifying data using PUT and PATCH methods with Prisma
- 115. API with NestJS #115. Database migrations with Prisma
- 116. API with NestJS #116. REST API versioning
- 117. API with NestJS #117. CORS – Cross-Origin Resource Sharing
- 118. API with NestJS #118. Uploading and streaming videos
- 119. API with NestJS #119. Type-safe SQL queries with Kysely and PostgreSQL
- 120. API with NestJS #120. One-to-one relationships with the Kysely query builder
- 121. API with NestJS #121. Many-to-one relationships with PostgreSQL and Kysely
Authenticating users with emails and passwords is a valid and common approach. However, a convenient alternative is to shift this responsibility to a third party. In this article, we look into adding Google authentication to a NestJS project.
We can achieve the above because Google uses the OAuth (Open Authorization) framework. With it, Google users can grant access to some of their data to an application – in this case, us. In this series, we’ve already implemented a way to register users. Therefore, this article aims to implement an additional way of registering users with Google that can work besides authenticating with a password and an email. Because of that, in this article, we won’t be using the popular passport-google-oauth20 library.
Registering an application
The first step in implementing authentication with Google is registering an application in the Google Cloud Platform dashboard.
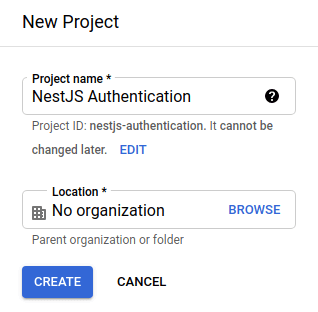
When we have a project, we need to set up the OAuth consent screen.
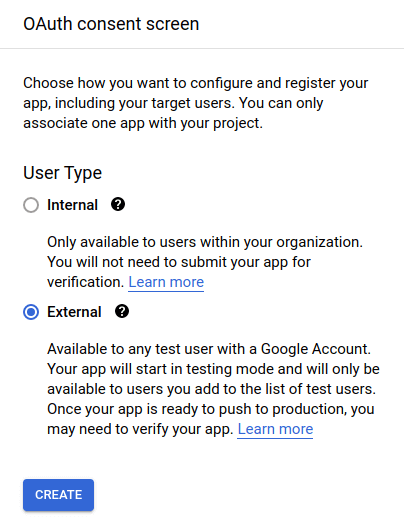
When configuring it, we need to set up some basic information about our application. For example, if we would like to deploy our application and use it outside of localhost, we would need to register our domain.
For testing purposes, we also need to specify a list of users that are allowed to use our application. If we would like our application to be available to any user, we need to submit our app for verification.
After sorting out the above, we need to generate OAuth Client ID credentials for our application in the credentials dashboard.
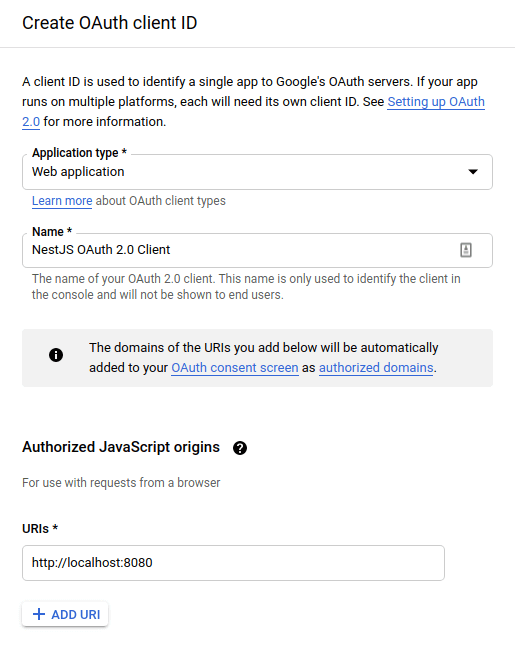
We could also set the redirect URL, but in this article we use a different approach that doesn’t use it.
Above, in the authorized JavaScript origins, we put the URL of our frontend application. We also need to specify the redirect URL. Google will redirect the user to it after successful authentication.
Finalizing the process of creating the credentials gives us the client ID and the client secret. We need to save them in the environment variables.
app.module.ts
|
1 2 3 4 5 6 7 8 9 10 11 12 13 14 15 16 17 18 |
import { Module } from '@nestjs/common'; import { ConfigModule } from '@nestjs/config'; import * as Joi from '@hapi/joi'; @Module({ imports: [ ConfigModule.forRoot({ validationSchema: Joi.object({ GOOGLE_AUTH_CLIENT_ID: Joi.string().required(), GOOGLE_AUTH_CLIENT_SECRET: Joi.string().required(), // ... }) }), // ... ], // ... }) export class AppModule {} |
.env
|
1 2 3 |
GOOGLE_AUTH_CLIENT_ID=... GOOGLE_AUTH_CLIENT_SECRET=... # ... |
The frontend side
To implement authentication with Google in our application, we need to allow the users to type in their Google credentials. A straightforward way to do that in React is to use the react-google-login library.
In this simple example we use Create React App.
First, we need to add some environment variables.
.env
|
1 2 3 |
PORT=8080 REACT_APP_GOOGLE_AUTH_CLIENT_ID=... REACT_APP_API_URL=http://localhost:3000 |
react-app-env.d.ts
|
1 2 3 4 5 6 |
namespace NodeJS { interface ProcessEnv { REACT_APP_GOOGLE_AUTH_CLIENT_ID: string; REACT_APP_API_URL: string; } } |
Once we have the above, we can use the react-google-login library.
GoogleButton.tsx
|
1 2 3 4 5 6 7 8 9 10 11 12 13 14 15 16 17 18 |
import React from 'react'; import GoogleLogin from 'react-google-login'; import useGoogleAuthentication from "./useGoogleAuthentication"; function GoogleButton() { const clientId = process.env.REACT_APP_GOOGLE_AUTH_CLIENT_ID; const { handleSuccess } = useGoogleAuthentication(); return ( <GoogleLogin clientId={clientId} buttonText="Log in" onSuccess={handleSuccess} /> ); } export default GoogleButton; |
Clicking on the above button causes a popup to show.
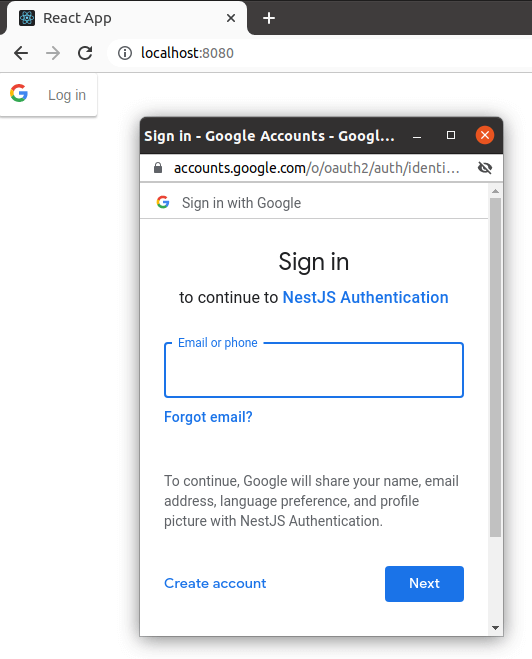
To change the above behavior, we could pass uxMode="redirect" to the GoogleLogin component. This would cause a full redirect instead of opening a popup.
When the user successfully authenticates, the onSuccess callback is invoked.
useGoogleAuthentication.tsx
|
1 2 3 4 5 6 7 8 9 10 11 12 13 14 15 16 17 18 19 20 21 22 23 24 25 |
import { GoogleLoginResponse, GoogleLoginResponseOffline } from 'react-google-login'; function useGoogleAuthentication() { const handleSuccess = (response: GoogleLoginResponse | GoogleLoginResponseOffline) => { if ('accessToken' in response) { const accessToken = response.accessToken; fetch(`${process.env.REACT_APP_API_URL}/google-authentication`, { method: 'POST', body: JSON.stringify({ token: accessToken }), headers: { 'Content-Type': 'application/json' }, }); } } return { handleSuccess, } } export default useGoogleAuthentication; |
Above, we take the accessToken from the response and send it to our NestJS API.
Implementing Google authentication with NestJS
The last step in authenticating our users is receiving the accessToken from Google and logging the user into our system.
googleAuthentication.controller.ts
|
1 2 3 4 5 6 7 8 9 10 11 12 13 14 15 16 17 18 19 20 21 22 23 24 25 26 27 28 29 30 31 32 33 |
import { Controller, Post, ClassSerializerInterceptor, UseInterceptors, Body, Req, } from '@nestjs/common'; import TokenVerificationDto from './tokenVerification.dto'; import { GoogleAuthenticationService } from './googleAuthentication.service'; import { Request } from 'express'; @Controller('google-authentication') @UseInterceptors(ClassSerializerInterceptor) export class GoogleAuthenticationController { constructor( private readonly googleAuthenticationService: GoogleAuthenticationService ) { } @Post() async authenticate(@Body() tokenData: TokenVerificationDto, @Req() request: Request) { const { accessTokenCookie, refreshTokenCookie, user } = await this.googleAuthenticationService.authenticate(tokenData.token); request.res.setHeader('Set-Cookie', [accessTokenCookie, refreshTokenCookie]); return user; } } |
Above, we expect the frontend to call the /google-authentication endpoint with the access token.
tokenVerificationDto.ts
|
1 2 3 4 5 6 7 8 9 |
import { IsString, IsNotEmpty } from 'class-validator'; export class TokenVerificationDto { @IsString() @IsNotEmpty() token: string; } export default TokenVerificationDto; |
The final part of the implementation is the authenticate method.
googleAuthentication.service.ts
|
1 2 3 4 5 6 7 8 9 10 11 12 13 14 15 16 17 18 19 20 21 22 23 24 25 26 27 28 29 30 31 32 33 34 35 36 37 38 39 40 41 42 43 44 |
import { Injectable, UnauthorizedException } from '@nestjs/common'; import { UsersService } from '../users/users.service'; import { ConfigService } from '@nestjs/config'; import { google, Auth } from 'googleapis'; import { AuthenticationService } from '../authentication/authentication.service'; import User from '../users/user.entity'; @Injectable() export class GoogleAuthenticationService { oauthClient: Auth.OAuth2Client; constructor( private readonly usersService: UsersService, private readonly configService: ConfigService, private readonly authenticationService: AuthenticationService ) { const clientID = this.configService.get('GOOGLE_AUTH_CLIENT_ID'); const clientSecret = this.configService.get('GOOGLE_AUTH_CLIENT_SECRET'); this.oauthClient = new google.auth.OAuth2( clientID, clientSecret ); } async authenticate(token: string) { const tokenInfo = await this.oauthClient.getTokenInfo(token); const email = tokenInfo.email; try { const user = await this.usersService.getByEmail(email); return this.handleRegisteredUser(user); } catch (error) { if (error.status !== 404) { throw new error; } return this.registerUser(token, email); } } // ... } |
Registering new users
The crucial part is that the users can be signed up into our system at this point, but they don’t have to be. Therefore, we need to handle both cases. Let’s start with registering the user.
googleAuthentication.service.ts
|
1 2 3 4 5 6 7 8 |
async registerUser(token: string, email: string) { const userData = await this.getUserData(token); const name = userData.name; const user = await this.usersService.createWithGoogle(email, name); return this.handleRegisteredUser(user); } |
In our API, we require the user to provide a name. We can get this data from the Google API. Unfortunately, the googleapis library requires us to do that in a way that is a bit odd.
googleAuthentication.service.ts
|
1 2 3 4 5 6 7 8 9 10 11 12 13 |
async getUserData(token: string) { const userInfoClient = google.oauth2('v2').userinfo; this.oauthClient.setCredentials({ access_token: token }) const userInfoResponse = await userInfoClient.get({ auth: this.oauthClient }); return userInfoResponse.data; } |
When the users are not registered yet, we add them to our database with the createWithGoogle method.
googleAuthentication.service.ts
|
1 2 3 4 5 6 7 8 9 10 11 12 13 14 15 16 17 18 19 20 21 22 23 24 25 26 27 28 29 |
import { Injectable } from '@nestjs/common'; import { InjectRepository } from '@nestjs/typeorm'; import { Repository } from 'typeorm'; import User from './user.entity'; import StripeService from '../stripe/stripe.service'; @Injectable() export class UsersService { constructor( @InjectRepository(User) private usersRepository: Repository<User>, private stripeService: StripeService ) {} async createWithGoogle(email: string, name: string) { const stripeCustomer = await this.stripeService.createCustomer(name, email); const newUser = await this.usersRepository.create({ email, name, isRegisteredWithGoogle: true, stripeCustomerId: stripeCustomer.id }); await this.usersRepository.save(newUser); return newUser; } // ... } |
Above, you can see that we add the user to Stripe. If you want to know more, check out API with NestJS #36. Introduction to Stripe with React
To handle it properly, let’s make some changes to the UserEntity:
user.entity.ts
|
1 2 3 4 5 6 7 8 9 10 11 12 13 14 15 16 17 18 19 20 21 22 23 24 25 |
import { Column, Entity, PrimaryGeneratedColumn } from 'typeorm'; import { Exclude } from 'class-transformer'; @Entity() class User { @PrimaryGeneratedColumn() public id: number; @Column({ unique: true }) public email: string; @Column() public name: string; @Column({ nullable: true }) @Exclude() public password?: string; @Column({ default: false }) public isRegisteredWithGoogle: boolean; // ... } export default User; |
Please notice that the password is now nullable, because we don’t need it for users authenticated with Google. It would be a good idea to modify the existing code usef for verifying the user’s password to account for this change.
Returning the data of the user
When the users are registered, we need to generate cookies for them.
If you want to know more about this approach, check out API with NestJS #3. Authenticating users with bcrypt, Passport, JWT, and cookies
googleAuthentication.service.ts
|
1 2 3 4 5 6 7 8 9 10 11 12 13 14 15 16 17 18 19 20 21 22 23 24 25 26 27 28 29 30 31 |
async getCookiesForUser(user: User) { const accessTokenCookie = this.authenticationService.getCookieWithJwtAccessToken(user.id); const { cookie: refreshTokenCookie, token: refreshToken } = this.authenticationService.getCookieWithJwtRefreshToken(user.id); await this.usersService.setCurrentRefreshToken(refreshToken, user.id); return { accessTokenCookie, refreshTokenCookie } } async handleRegisteredUser(user: User) { if (!user.isRegisteredWithGoogle) { throw new UnauthorizedException(); } const { accessTokenCookie, refreshTokenCookie } = await this.getCookiesForUser(user); return { accessTokenCookie, refreshTokenCookie, user } } |
Above you can see that we generate refresh tokens. To read more about it, check out API with NestJS #13. Implementing refresh tokens using JWT
Thanks to implementing all of the above, the /google-authentication handles both new and returning users.
To see the whole picture more accurately, check out the full code for the GoogleAuthenticationService.
Summary
In this article, we’ve implemented a way for our users to authenticate with Google. Moreover, we’ve done it in a way that integrates with our existing system. To do that, we register users into our own database instead of relying upon Google. Thanks to doing so, we don’t have to make significant changes to the existing code that takes care of registering users with the email and the password.

What is the workflow for checking if the user is authenticated from a request on the frontend after the user logs in?
According to this article: https://stackoverflow.com/questions/33860262/how-to-interact-with-back-end-after-successful-auth-with-oauth-on-front-end
Other helpful answer:
Hi
I followed the above steps, but when I deploy using docker image, getting an error in the AWS server. but it’s working local env.
Hi, great content. I just wanna ask can i ignore the stripe thingy will it run properly. thanks
Here frontend I try Next Auth library will automatically return cookies when login is successful, I save user information in database for management, do I have to return cookies again because Next Auth has set cookies already