
- 1. API with NestJS #1. Controllers, routing and the module structure
- 2. API with NestJS #2. Setting up a PostgreSQL database with TypeORM
- 3. API with NestJS #3. Authenticating users with bcrypt, Passport, JWT, and cookies
- 4. API with NestJS #4. Error handling and data validation
- 5. API with NestJS #5. Serializing the response with interceptors
- 6. API with NestJS #6. Looking into dependency injection and modules
- 7. API with NestJS #7. Creating relationships with Postgres and TypeORM
- 8. API with NestJS #8. Writing unit tests
- 9. API with NestJS #9. Testing services and controllers with integration tests
- 10. API with NestJS #10. Uploading public files to Amazon S3
- 11. API with NestJS #11. Managing private files with Amazon S3
- 12. API with NestJS #12. Introduction to Elasticsearch
- 13. API with NestJS #13. Implementing refresh tokens using JWT
- 14. API with NestJS #14. Improving performance of our Postgres database with indexes
- 15. API with NestJS #15. Defining transactions with PostgreSQL and TypeORM
- 16. API with NestJS #16. Using the array data type with PostgreSQL and TypeORM
- 17. API with NestJS #17. Offset and keyset pagination with PostgreSQL and TypeORM
- 18. API with NestJS #18. Exploring the idea of microservices
- 19. API with NestJS #19. Using RabbitMQ to communicate with microservices
- 20. API with NestJS #20. Communicating with microservices using the gRPC framework
- 21. API with NestJS #21. An introduction to CQRS
- 22. API with NestJS #22. Storing JSON with PostgreSQL and TypeORM
- 23. API with NestJS #23. Implementing in-memory cache to increase the performance
- 24. API with NestJS #24. Cache with Redis. Running the app in a Node.js cluster
- 25. API with NestJS #25. Sending scheduled emails with cron and Nodemailer
- 26. API with NestJS #26. Real-time chat with WebSockets
- 27. API with NestJS #27. Introduction to GraphQL. Queries, mutations, and authentication
- 28. API with NestJS #28. Dealing in the N + 1 problem in GraphQL
- 29. API with NestJS #29. Real-time updates with GraphQL subscriptions
- 30. API with NestJS #30. Scalar types in GraphQL
- 31. API with NestJS #31. Two-factor authentication
- 32. API with NestJS #32. Introduction to Prisma with PostgreSQL
- 33. API with NestJS #33. Managing PostgreSQL relationships with Prisma
- 34. API with NestJS #34. Handling CPU-intensive tasks with queues
- 35. API with NestJS #35. Using server-side sessions instead of JSON Web Tokens
- 36. API with NestJS #36. Introduction to Stripe with React
- 37. API with NestJS #37. Using Stripe to save credit cards for future use
- 38. API with NestJS #38. Setting up recurring payments via subscriptions with Stripe
- 39. API with NestJS #39. Reacting to Stripe events with webhooks
- 40. API with NestJS #40. Confirming the email address
- 41. API with NestJS #41. Verifying phone numbers and sending SMS messages with Twilio
- 42. API with NestJS #42. Authenticating users with Google
- 43. API with NestJS #43. Introduction to MongoDB
- 44. API with NestJS #44. Implementing relationships with MongoDB
- 45. API with NestJS #45. Virtual properties with MongoDB and Mongoose
- 46. API with NestJS #46. Managing transactions with MongoDB and Mongoose
- 47. API with NestJS #47. Implementing pagination with MongoDB and Mongoose
- 48. API with NestJS #48. Definining indexes with MongoDB and Mongoose
- 49. API with NestJS #49. Updating with PUT and PATCH with MongoDB and Mongoose
- 50. API with NestJS #50. Introduction to logging with the built-in logger and TypeORM
- 51. API with NestJS #51. Health checks with Terminus and Datadog
- 52. API with NestJS #52. Generating documentation with Compodoc and JSDoc
- 53. API with NestJS #53. Implementing soft deletes with PostgreSQL and TypeORM
- 54. API with NestJS #54. Storing files inside a PostgreSQL database
- 55. API with NestJS #55. Uploading files to the server
- 56. API with NestJS #56. Authorization with roles and claims
- 57. API with NestJS #57. Composing classes with the mixin pattern
- 58. API with NestJS #58. Using ETag to implement cache and save bandwidth
- 59. API with NestJS #59. Introduction to a monorepo with Lerna and Yarn workspaces
- 60. API with NestJS #60. The OpenAPI specification and Swagger
- 61. API with NestJS #61. Dealing with circular dependencies
- 62. API with NestJS #62. Introduction to MikroORM with PostgreSQL
- 63. API with NestJS #63. Relationships with PostgreSQL and MikroORM
- 64. API with NestJS #64. Transactions with PostgreSQL and MikroORM
- 65. API with NestJS #65. Implementing soft deletes using MikroORM and filters
- 66. API with NestJS #66. Improving PostgreSQL performance with indexes using MikroORM
- 67. API with NestJS #67. Migrating to TypeORM 0.3
- 68. API with NestJS #68. Interacting with the application through REPL
- 69. API with NestJS #69. Database migrations with TypeORM
- 70. API with NestJS #70. Defining dynamic modules
- 71. API with NestJS #71. Introduction to feature flags
- 72. API with NestJS #72. Working with PostgreSQL using raw SQL queries
- 73. API with NestJS #73. One-to-one relationships with raw SQL queries
- 74. API with NestJS #74. Designing many-to-one relationships using raw SQL queries
- 75. API with NestJS #75. Many-to-many relationships using raw SQL queries
- 76. API with NestJS #76. Working with transactions using raw SQL queries
- 77. API with NestJS #77. Offset and keyset pagination with raw SQL queries
- 78. API with NestJS #78. Generating statistics using aggregate functions in raw SQL
- 79. API with NestJS #79. Implementing searching with pattern matching and raw SQL
- 80. API with NestJS #80. Updating entities with PUT and PATCH using raw SQL queries
- 81. API with NestJS #81. Soft deletes with raw SQL queries
- 82. API with NestJS #82. Introduction to indexes with raw SQL queries
- 83. API with NestJS #83. Text search with tsvector and raw SQL
- 84. API with NestJS #84. Implementing filtering using subqueries with raw SQL
- 85. API with NestJS #85. Defining constraints with raw SQL
- 86. API with NestJS #86. Logging with the built-in logger when using raw SQL
- 87. API with NestJS #87. Writing unit tests in a project with raw SQL
- 88. API with NestJS #88. Testing a project with raw SQL using integration tests
- 89. API with NestJS #89. Replacing Express with Fastify
- 90. API with NestJS #90. Using various types of SQL joins
- 91. API with NestJS #91. Dockerizing a NestJS API with Docker Compose
- 92. API with NestJS #92. Increasing the developer experience with Docker Compose
- 93. API with NestJS #93. Deploying a NestJS app with Amazon ECS and RDS
- 94. API with NestJS #94. Deploying multiple instances on AWS with a load balancer
- 95. API with NestJS #95. CI/CD with Amazon ECS and GitHub Actions
- 96. API with NestJS #96. Running unit tests with CI/CD and GitHub Actions
- 97. API with NestJS #97. Introduction to managing logs with Amazon CloudWatch
- 98. API with NestJS #98. Health checks with Terminus and Amazon ECS
- 99. API with NestJS #99. Scaling the number of application instances with Amazon ECS
- 100. API with NestJS #100. The HTTPS protocol with Route 53 and AWS Certificate Manager
- 101. API with NestJS #101. Managing sensitive data using the AWS Secrets Manager
- 102. API with NestJS #102. Writing unit tests with Prisma
- 103. API with NestJS #103. Integration tests with Prisma
- 104. API with NestJS #104. Writing transactions with Prisma
- 105. API with NestJS #105. Implementing soft deletes with Prisma and middleware
- 106. API with NestJS #106. Improving performance through indexes with Prisma
- 107. API with NestJS #107. Offset and keyset pagination with Prisma
- 108. API with NestJS #108. Date and time with Prisma and PostgreSQL
- 109. API with NestJS #109. Arrays with PostgreSQL and Prisma
- 110. API with NestJS #110. Managing JSON data with PostgreSQL and Prisma
- 111. API with NestJS #111. Constraints with PostgreSQL and Prisma
- 112. API with NestJS #112. Serializing the response with Prisma
- 113. API with NestJS #113. Logging with Prisma
- 114. API with NestJS #114. Modifying data using PUT and PATCH methods with Prisma
- 115. API with NestJS #115. Database migrations with Prisma
- 116. API with NestJS #116. REST API versioning
- 117. API with NestJS #117. CORS – Cross-Origin Resource Sharing
- 118. API with NestJS #118. Uploading and streaming videos
- 119. API with NestJS #119. Type-safe SQL queries with Kysely and PostgreSQL
- 120. API with NestJS #120. One-to-one relationships with the Kysely query builder
- 121. API with NestJS #121. Many-to-one relationships with PostgreSQL and Kysely
Nowadays, a lot of web applications accept online payments. Although this is not straightforward to implement, there are some ready-to-use solutions that we can take advantage of. In this article, we look into Stripe. It serves as a payment processing platform that does the heavy lifting for us. To implement it, we use NestJS and React.
Getting up and running with Stripe
To start using Stripe, we first need to sign up. After verifying our email address, we can go straight to the API keys page.
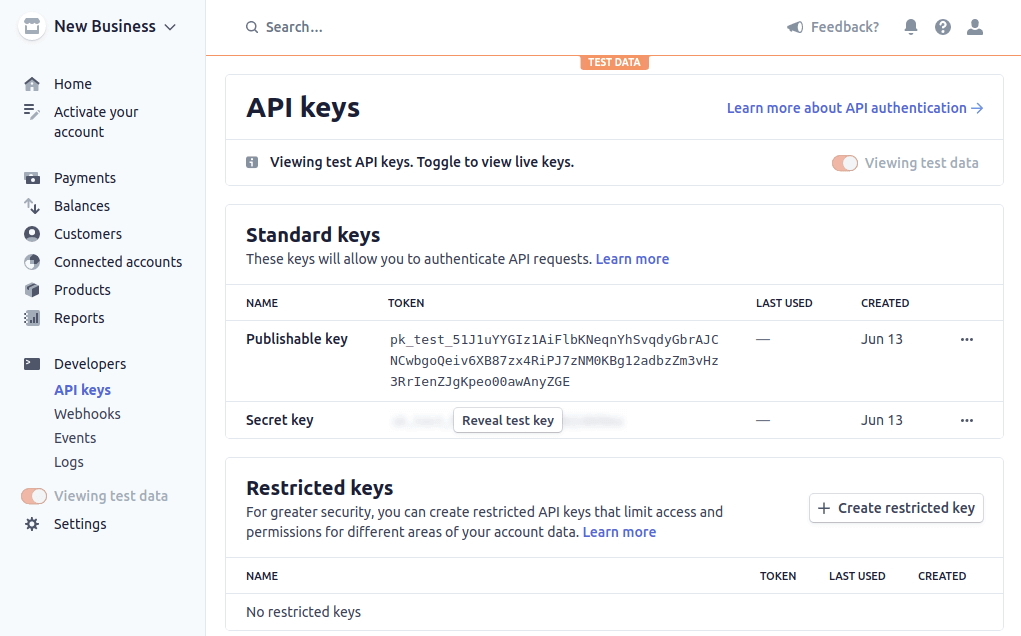
On the above page, there are two important things. The first of them is the publishable key. We use it on the frontend part of our application. We can safely expose it in our JavaScript code.
The second one is the secret key. We keep it on the backend side and use it to perform API requests to Stripe. It can be used to create charges or perform refunds, for example. Therefore, we need to keep it confidential.
As a best practice, we make sure not to commit neither of the above keys to the repository. We keep them in the environment variables.
If we want to start accepting real payments with Stripe, we need to activate our account. To do that, we need to answer some questions about our business and provide bank details. Since this is optional for development and testing purposes, we can skip it for now.
Using Stripe with NestJS
If we would intend only to have simple one-time payments, we could use the prebuilt checkout page. In the upcoming articles, we want to implement features such as saving credit cards for later use. Therefore, we implement a simple custom payment flow:
- A user creates an account through our NestJS API. Under the hood, we create a Stripe customer for the user and save the id for later.
- The user provides the details of the credit card through the React application. We send it straight to the Stripe API.
- Stripe API responds with a payment method id. Our frontend app sends it to our NestJS API.
- Our NestJS API gets the request and charges the user using the Stripe API.
There are various ways to integrate NestJS and Stripe. Although there are some ready-to-use libraries, they don’t have many weekly downloads. Therefore, in this article, we implement Stripe into our NestJS application ourselves. Fortunately, this is a straightforward process.
Let’s start by adding some environment variables we will need.
app.module.ts
|
1 2 3 4 5 6 7 8 9 10 11 12 13 14 15 16 17 18 19 |
import { Module } from '@nestjs/common'; import { ConfigModule } from '@nestjs/config'; import * as Joi from '@hapi/joi'; @Module({ imports: [ ConfigModule.forRoot({ validationSchema: Joi.object({ STRIPE_SECRET_KEY: Joi.string(), STRIPE_CURRENCY: Joi.string(), FRONTEND_URL: Joi.string(), // ... }) }), // ... ], // ... }) export class AppModule {} |
.env
|
1 2 3 4 5 |
STRIPE_SECRET_KEY=sk_test_... STRIPE_CURRENCY=usd FRONTEND_URL=http://localhost:3500 # ... |
The STRIPE_SECRET_KEY is the secret key we copied from our Stripe dashboard. Although we could support payments in various currencies, we store the currency in the STRIPE_CURRENCY variable in this simple example.
We want our React application to send authenticated requests to our API. Therefore, we need to set up Cross-Origin Resource Sharing.
If you want to know more about CORS, check out Cross-Origin Resource Sharing. Avoiding Access-Control-Allow-Origin CORS error
main.ts
|
1 2 3 4 5 6 7 8 9 10 11 12 13 14 15 16 17 18 19 |
import { NestFactory } from '@nestjs/core'; import { AppModule } from './app.module'; import { ConfigService } from '@nestjs/config'; async function bootstrap() { const app = await NestFactory.create(AppModule); const configService = app.get(ConfigService); app.enableCors({ origin: configService.get('FRONTEND_URL'), credentials: true }); // ... await app.listen(3000); } bootstrap(); |
Setting up Stripe
We don’t have to make requests to the Stripe API manually. There is a library that can do that for us.
|
1 |
npm install stripe |
We need to provide the above package with the secret Stripe key. To do that, let’s create a service.
stripe.service.ts
|
1 2 3 4 5 6 7 8 9 10 11 12 13 14 15 16 |
import { Injectable } from '@nestjs/common'; import { ConfigService } from '@nestjs/config'; import Stripe from 'stripe'; @Injectable() export default class StripeService { private stripe: Stripe; constructor( private configService: ConfigService ) { this.stripe = new Stripe(configService.get('STRIPE_SECRET_KEY'), { apiVersion: '2020-08-27', }); } } |
Above, we use the STRIPE_SECRET_KEY variable we’ve defined before. We also need to define the version of the Stripe API.
Stripe sometimes makes changes to their API that isn’t backward-compatible. To avoid issues, we can define the version of the API we want to use. At the time of writing this article, the current API version is 2020-08-27.
If you want to know more about the changes to the API, check out the API changelog
Creating a customer
In our application, we want only the authenticated users to be able to make payments. Because of that, we can create a Stripe customer for each of our users. To do that, let’s add the createCustomer method to our StripeService.
stripe.service.ts
|
1 2 3 4 5 6 7 8 9 10 11 12 13 14 15 16 17 18 19 20 21 22 23 |
import { Injectable } from '@nestjs/common'; import { ConfigService } from '@nestjs/config'; import Stripe from 'stripe'; @Injectable() export default class StripeService { private stripe: Stripe; constructor( private configService: ConfigService ) { this.stripe = new Stripe(configService.get('STRIPE_SECRET_KEY'), { apiVersion: '2020-08-27', }); } public async createCustomer(name: string, email: string) { return this.stripe.customers.create({ name, email }); } } |
The stripe.customers.create function calls the Stripe API and returns the data bout the Stripe customer. We need to save it in our database. To do able to do that, let’s modify our UserEntity.
user.entity.ts
|
1 2 3 4 5 6 7 8 9 10 11 12 13 14 15 16 17 18 19 20 21 22 23 24 25 |
import { Column, Entity, PrimaryGeneratedColumn } from 'typeorm'; import { Exclude } from 'class-transformer'; @Entity() class User { @PrimaryGeneratedColumn() public id: number; @Column({ unique: true }) public email: string; @Column() public name: string; @Column() @Exclude() public password: string; @Column() public stripeCustomerId: string; // ... } export default User; |
Now, we can use all of the above in the UsersService:
users.service.ts
|
1 2 3 4 5 6 7 8 9 10 11 12 13 14 15 16 17 18 19 20 21 22 23 24 25 26 27 28 |
import { Injectable } from '@nestjs/common'; import { InjectRepository } from '@nestjs/typeorm'; import { Repository } from 'typeorm'; import User from './user.entity'; import CreateUserDto from './dto/createUser.dto'; import StripeService from '../stripe/stripe.service'; @Injectable() export class UsersService { constructor( @InjectRepository(User) private usersRepository: Repository<User>, private stripeService: StripeService ) {} async create(userData: CreateUserDto) { const stripeCustomer = await this.stripeService.createCustomer(userData.name, userData.email); const newUser = await this.usersRepository.create({ ...userData, stripeCustomerId: stripeCustomer.id }); await this.usersRepository.save(newUser); return newUser; } // ... } |
If you want to know more about authentication, check out API with NestJS #3. Authenticating users with bcrypt, Passport, JWT, and cookies
In the upcoming articles in this series, we’ll be able to use the stripeCustomerId to, for example, save credit cards for the user and retrieve them.
Charging the user
The last part of our NestJS API is the logic for charging the user. Let’s start with adding the charge method to our StripeService:
stripe.service.ts
|
1 2 3 4 5 6 7 8 9 10 11 12 13 14 15 16 17 18 19 20 21 22 23 24 25 26 27 28 29 30 31 32 33 |
import { Injectable } from '@nestjs/common'; import { ConfigService } from '@nestjs/config'; import Stripe from 'stripe'; @Injectable() export default class StripeService { private stripe: Stripe; constructor( private configService: ConfigService ) { this.stripe = new Stripe(configService.get('STRIPE_SECRET_KEY'), { apiVersion: '2020-08-27', }); } public async createCustomer(name: string, email: string) { return this.stripe.customers.create({ name, email }); } public async charge(amount: number, paymentMethodId: string, customerId: string) { return this.stripe.paymentIntents.create({ amount, customer: customerId, payment_method: paymentMethodId, currency: this.configService.get('STRIPE_CURRENCY'), confirm: true }) } } |
There a few important things happening above:
- the paymentMethodId is an id sent by our frontend app after saving the credit card details,
- the customerId is the Stripe customer id of a user that is making the payment,
- the confirm flag is set to true to indicate that we want to confirm the payment immediately.
Instead of setting the confirm flag to true, we can also confirm the payment separately.
To use the above logic, let’s create the ChargeController:
charge.controller.ts
|
1 2 3 4 5 6 7 8 9 10 11 12 13 14 15 16 17 18 |
import { Body, Controller, Post, Req, UseGuards } from '@nestjs/common'; import JwtAuthenticationGuard from '../authentication/jwt-authentication.guard'; import CreateChargeDto from './dto/createCharge.dto'; import RequestWithUser from '../authentication/requestWithUser.interface'; import StripeService from '../stripe/stripe.service'; @Controller('charge') export default class ChargeController { constructor( private readonly stripeService: StripeService ) {} @Post() @UseGuards(JwtAuthenticationGuard) async createCharge(@Body() charge: CreateChargeDto, @Req() request: RequestWithUser) { await this.stripeService.charge(charge.amount, charge.paymentMethodId, request.user.stripeCustomerId); } } |
createCharge.dto.ts
|
1 2 3 4 5 6 7 8 9 10 11 12 |
import { IsString, IsNotEmpty, IsNumber } from 'class-validator'; export class CreateChargeDto { @IsString() @IsNotEmpty() paymentMethodId: string; @IsNumber() amount: number; } export default CreateChargeDto; |
Using Stripe with React
To take advantage of all of the backend code we wrote above, we need a React application. In this article, we are using Create React App with TypeScript.
In this article, we assume that the user is already authenticated. If you want to know more about authenticating with JWT, check out API with NestJS #3. Authenticating users with bcrypt, Passport, JWT, and cookies
The first step to do is to add the Stripe publishable key to environment variables. While we’re on it, we also add the PORT and the REACT_APP_API_URL variable.
Make sure not to confuse the publishable key with the secret key.
|
1 2 3 |
REACT_APP_STRIPE_PUBLISHABLE_KEY=pk_test_... REACT_APP_API_URL=http://localhost:3000 PORT=3500 |
All custom environment variables need to start with REACT_APP when using Create React App.
Now, we need to install some Stripe-related dependencies.
|
1 |
npm install @stripe/stripe-js @stripe/react-stripe-js |
To integrate Stripe with React, we need to start with providing the publishable key.
App.tsx
|
1 2 3 4 5 6 7 8 9 10 11 12 13 14 15 16 |
import React, {useEffect} from 'react'; import { Elements } from '@stripe/react-stripe-js'; import { loadStripe } from '@stripe/stripe-js'; import PaymentForm from './PaymentForm'; const stripePromise = loadStripe(process.env.REACT_APP_STRIPE_PUBLISHABLE_KEY); function App() { return ( <Elements stripe={stripePromise}> <PaymentForm /> </Elements> ); } export default App; |
Above, you can see that we use the PaymentForm component. Let’s create it:
PaymentForm/index.tsx
|
1 2 3 4 5 6 7 8 9 10 11 12 13 14 15 16 |
import React from 'react'; import { CardElement } from '@stripe/react-stripe-js'; import usePaymentForm from './usePaymentForm'; const PaymentForm = () => { const { handleSubmit } = usePaymentForm(); return ( <form onSubmit={handleSubmit}> <CardElement /> <button>Pay</button> </form> ); }; export default PaymentForm; |
I like to keep my template separate from the logic to maintain the separation of concerns. If you want to know more, check out JavaScript design patterns #3. The Facade pattern and applying it to React Hooks
A significant thing to consider is that the Stripe library renders the credit card form in an iframe.
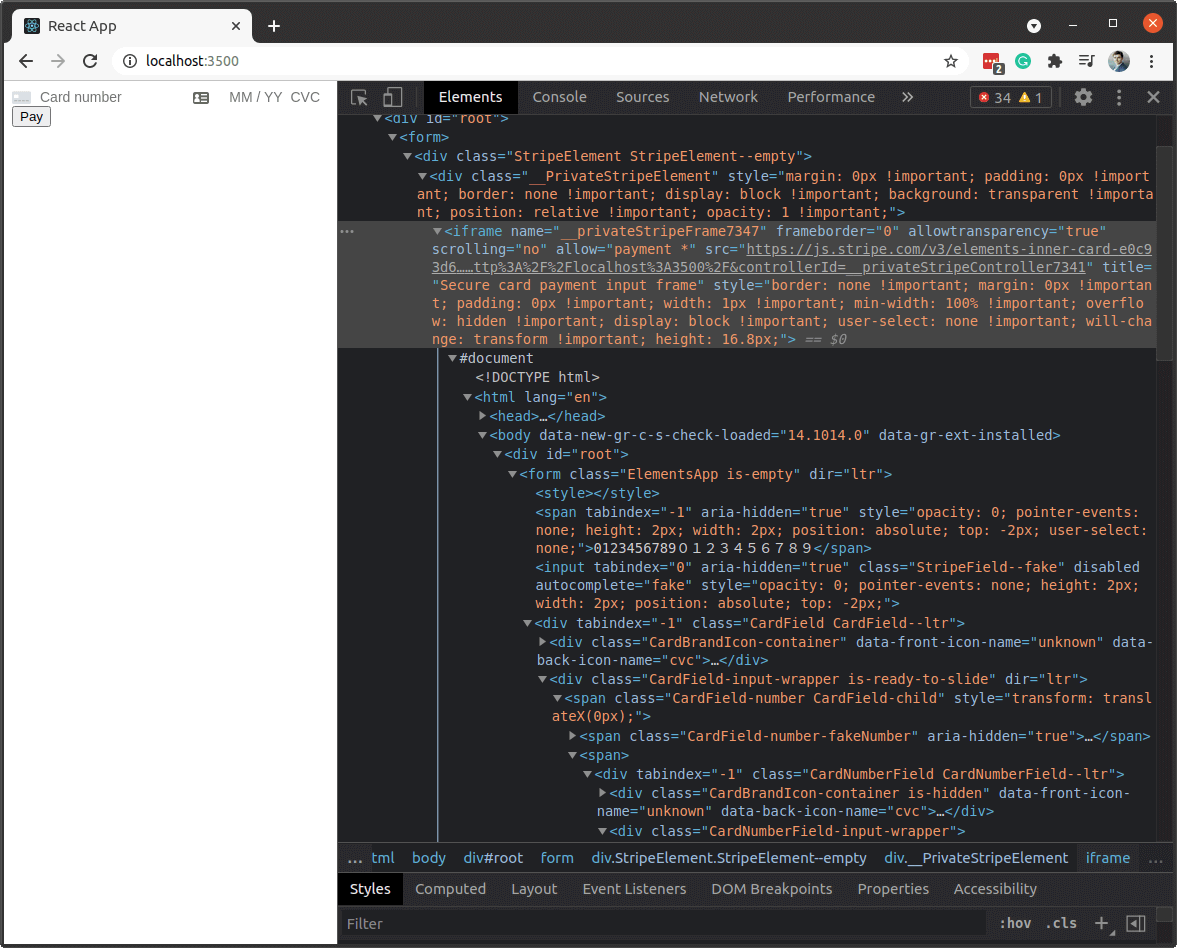
To access the data provided by the user and send it to the Stripe API, we need the useElements hook provided by Stripe. Let’s use it:
|
1 2 3 4 5 6 7 8 9 10 11 12 13 14 15 16 17 18 19 20 21 22 23 24 25 26 27 28 29 30 31 32 33 34 35 36 37 38 39 40 41 42 43 44 45 46 47 48 49 50 51 |
import { CardElement, useStripe, useElements } from '@stripe/react-stripe-js'; import { FormEvent } from 'react'; function usePaymentForm() { const stripe = useStripe(); const elements = useElements(); const handleSubmit = async (event: FormEvent) => { event.preventDefault(); const amountToCharge = 100; const cardElement = elements?.getElement(CardElement); if (!stripe || !elements || !cardElement) { return; } const stripeResponse = await stripe.createPaymentMethod({ type: 'card', card: cardElement }); const { error, paymentMethod } = stripeResponse; if (error || !paymentMethod) { return; } const paymentMethodId = paymentMethod.id; fetch(`${process.env.REACT_APP_API_URL}/charge`, { method: 'POST', body: JSON.stringify(({ paymentMethodId, amount: amountToCharge })), credentials: 'include', headers: { 'Content-Type': 'application/json' }, }) }; return { handleSubmit } } export default usePaymentForm; |
The above code could use some more graceful error handling. We could also add an impoint for the amount to charge. Feel free to implement it.
In our usePaymentForm hook, we get the data provided by the user by calling elements.getElement(CardElement). We then send it to the Stripe API with the createPaymentMethod method:
|
1 2 3 4 |
stripe.createPaymentMethod({ type: 'card', card: cardElement }); |
In response, Stripe sends us the paymentMethod. We send it to our NestJS API to finalize the payment.
We can now go to the payments dashboard to see that our payment is working as intended.

Above you can see that setting 100 as the amount means 100 cents, not 100 dollars.
Summary
In this article, we’ve learned the basics about Stripe. While doing so, we’ve implemented a simple flow where the user provides the credit card details and makes a payment. This included setting up a Stripe account, implementing a NestJS endpoint to charge the user, and creating a simple React application. There is a lot more about Stripe to learn, so stay tuned!

Personally, i am not too comfortable on using your workflow of confirming the payment intent on creation. I prefer to do the one easily found on Stripe’s docs:
“…create a PaymentIntent on the server and pass its client secret to the client instead of passing the entire PaymentIntent object. The client confirms the payment, and your server monitors webhooks to detect when the payment successfully completes or fails”.
Although i am sure that that your workflow also has its place, i prefer to, unless there is a strong reason not to do it, to default to the contracted service advice.
Hey, is there a repository with the frontend code?
Thanks