
- 1. API with NestJS #1. Controllers, routing and the module structure
- 2. API with NestJS #2. Setting up a PostgreSQL database with TypeORM
- 3. API with NestJS #3. Authenticating users with bcrypt, Passport, JWT, and cookies
- 4. API with NestJS #4. Error handling and data validation
- 5. API with NestJS #5. Serializing the response with interceptors
- 6. API with NestJS #6. Looking into dependency injection and modules
- 7. API with NestJS #7. Creating relationships with Postgres and TypeORM
- 8. API with NestJS #8. Writing unit tests
- 9. API with NestJS #9. Testing services and controllers with integration tests
- 10. API with NestJS #10. Uploading public files to Amazon S3
- 11. API with NestJS #11. Managing private files with Amazon S3
- 12. API with NestJS #12. Introduction to Elasticsearch
- 13. API with NestJS #13. Implementing refresh tokens using JWT
- 14. API with NestJS #14. Improving performance of our Postgres database with indexes
- 15. API with NestJS #15. Defining transactions with PostgreSQL and TypeORM
- 16. API with NestJS #16. Using the array data type with PostgreSQL and TypeORM
- 17. API with NestJS #17. Offset and keyset pagination with PostgreSQL and TypeORM
- 18. API with NestJS #18. Exploring the idea of microservices
- 19. API with NestJS #19. Using RabbitMQ to communicate with microservices
- 20. API with NestJS #20. Communicating with microservices using the gRPC framework
- 21. API with NestJS #21. An introduction to CQRS
- 22. API with NestJS #22. Storing JSON with PostgreSQL and TypeORM
- 23. API with NestJS #23. Implementing in-memory cache to increase the performance
- 24. API with NestJS #24. Cache with Redis. Running the app in a Node.js cluster
- 25. API with NestJS #25. Sending scheduled emails with cron and Nodemailer
- 26. API with NestJS #26. Real-time chat with WebSockets
- 27. API with NestJS #27. Introduction to GraphQL. Queries, mutations, and authentication
- 28. API with NestJS #28. Dealing in the N + 1 problem in GraphQL
- 29. API with NestJS #29. Real-time updates with GraphQL subscriptions
- 30. API with NestJS #30. Scalar types in GraphQL
- 31. API with NestJS #31. Two-factor authentication
- 32. API with NestJS #32. Introduction to Prisma with PostgreSQL
- 33. API with NestJS #33. Managing PostgreSQL relationships with Prisma
- 34. API with NestJS #34. Handling CPU-intensive tasks with queues
- 35. API with NestJS #35. Using server-side sessions instead of JSON Web Tokens
- 36. API with NestJS #36. Introduction to Stripe with React
- 37. API with NestJS #37. Using Stripe to save credit cards for future use
- 38. API with NestJS #38. Setting up recurring payments via subscriptions with Stripe
- 39. API with NestJS #39. Reacting to Stripe events with webhooks
- 40. API with NestJS #40. Confirming the email address
- 41. API with NestJS #41. Verifying phone numbers and sending SMS messages with Twilio
- 42. API with NestJS #42. Authenticating users with Google
- 43. API with NestJS #43. Introduction to MongoDB
- 44. API with NestJS #44. Implementing relationships with MongoDB
- 45. API with NestJS #45. Virtual properties with MongoDB and Mongoose
- 46. API with NestJS #46. Managing transactions with MongoDB and Mongoose
- 47. API with NestJS #47. Implementing pagination with MongoDB and Mongoose
- 48. API with NestJS #48. Definining indexes with MongoDB and Mongoose
- 49. API with NestJS #49. Updating with PUT and PATCH with MongoDB and Mongoose
- 50. API with NestJS #50. Introduction to logging with the built-in logger and TypeORM
- 51. API with NestJS #51. Health checks with Terminus and Datadog
- 52. API with NestJS #52. Generating documentation with Compodoc and JSDoc
- 53. API with NestJS #53. Implementing soft deletes with PostgreSQL and TypeORM
- 54. API with NestJS #54. Storing files inside a PostgreSQL database
- 55. API with NestJS #55. Uploading files to the server
- 56. API with NestJS #56. Authorization with roles and claims
- 57. API with NestJS #57. Composing classes with the mixin pattern
- 58. API with NestJS #58. Using ETag to implement cache and save bandwidth
- 59. API with NestJS #59. Introduction to a monorepo with Lerna and Yarn workspaces
- 60. API with NestJS #60. The OpenAPI specification and Swagger
- 61. API with NestJS #61. Dealing with circular dependencies
- 62. API with NestJS #62. Introduction to MikroORM with PostgreSQL
- 63. API with NestJS #63. Relationships with PostgreSQL and MikroORM
- 64. API with NestJS #64. Transactions with PostgreSQL and MikroORM
- 65. API with NestJS #65. Implementing soft deletes using MikroORM and filters
- 66. API with NestJS #66. Improving PostgreSQL performance with indexes using MikroORM
- 67. API with NestJS #67. Migrating to TypeORM 0.3
- 68. API with NestJS #68. Interacting with the application through REPL
- 69. API with NestJS #69. Database migrations with TypeORM
- 70. API with NestJS #70. Defining dynamic modules
- 71. API with NestJS #71. Introduction to feature flags
- 72. API with NestJS #72. Working with PostgreSQL using raw SQL queries
- 73. API with NestJS #73. One-to-one relationships with raw SQL queries
- 74. API with NestJS #74. Designing many-to-one relationships using raw SQL queries
- 75. API with NestJS #75. Many-to-many relationships using raw SQL queries
- 76. API with NestJS #76. Working with transactions using raw SQL queries
- 77. API with NestJS #77. Offset and keyset pagination with raw SQL queries
- 78. API with NestJS #78. Generating statistics using aggregate functions in raw SQL
- 79. API with NestJS #79. Implementing searching with pattern matching and raw SQL
- 80. API with NestJS #80. Updating entities with PUT and PATCH using raw SQL queries
- 81. API with NestJS #81. Soft deletes with raw SQL queries
- 82. API with NestJS #82. Introduction to indexes with raw SQL queries
- 83. API with NestJS #83. Text search with tsvector and raw SQL
- 84. API with NestJS #84. Implementing filtering using subqueries with raw SQL
- 85. API with NestJS #85. Defining constraints with raw SQL
- 86. API with NestJS #86. Logging with the built-in logger when using raw SQL
- 87. API with NestJS #87. Writing unit tests in a project with raw SQL
- 88. API with NestJS #88. Testing a project with raw SQL using integration tests
- 89. API with NestJS #89. Replacing Express with Fastify
- 90. API with NestJS #90. Using various types of SQL joins
- 91. API with NestJS #91. Dockerizing a NestJS API with Docker Compose
- 92. API with NestJS #92. Increasing the developer experience with Docker Compose
- 93. API with NestJS #93. Deploying a NestJS app with Amazon ECS and RDS
- 94. API with NestJS #94. Deploying multiple instances on AWS with a load balancer
- 95. API with NestJS #95. CI/CD with Amazon ECS and GitHub Actions
- 96. API with NestJS #96. Running unit tests with CI/CD and GitHub Actions
- 97. API with NestJS #97. Introduction to managing logs with Amazon CloudWatch
- 98. API with NestJS #98. Health checks with Terminus and Amazon ECS
- 99. API with NestJS #99. Scaling the number of application instances with Amazon ECS
- 100. API with NestJS #100. The HTTPS protocol with Route 53 and AWS Certificate Manager
- 101. API with NestJS #101. Managing sensitive data using the AWS Secrets Manager
- 102. API with NestJS #102. Writing unit tests with Prisma
- 103. API with NestJS #103. Integration tests with Prisma
- 104. API with NestJS #104. Writing transactions with Prisma
- 105. API with NestJS #105. Implementing soft deletes with Prisma and middleware
- 106. API with NestJS #106. Improving performance through indexes with Prisma
- 107. API with NestJS #107. Offset and keyset pagination with Prisma
- 108. API with NestJS #108. Date and time with Prisma and PostgreSQL
- 109. API with NestJS #109. Arrays with PostgreSQL and Prisma
- 110. API with NestJS #110. Managing JSON data with PostgreSQL and Prisma
- 111. API with NestJS #111. Constraints with PostgreSQL and Prisma
- 112. API with NestJS #112. Serializing the response with Prisma
- 113. API with NestJS #113. Logging with Prisma
- 114. API with NestJS #114. Modifying data using PUT and PATCH methods with Prisma
- 115. API with NestJS #115. Database migrations with Prisma
- 116. API with NestJS #116. REST API versioning
- 117. API with NestJS #117. CORS – Cross-Origin Resource Sharing
- 118. API with NestJS #118. Uploading and streaming videos
- 119. API with NestJS #119. Type-safe SQL queries with Kysely and PostgreSQL
- 120. API with NestJS #120. One-to-one relationships with the Kysely query builder
- 121. API with NestJS #121. Many-to-one relationships with PostgreSQL and Kysely
So far, in this series, we’ve used JSON Web Tokens (JWT) to implement authentication. While this is a fitting choice for many applications, this is not the only choice out there. In this article, we look into server-side sessions and implement them with NestJS.
You can find the code from this article in this repository
The idea behind server-side sessions
At its core, HTTP is stateless, and so are the HTTP requests. Even though that’s the case, we need to implement a mechanism to recognize if a person performing the request is authenticated. So far, we’ve been using JSON Web Tokens for that. We send them to the users when they log in and expect them to send them back when making subsequent requests to our API. This encrypted token contains the user’s id, and thanks to that, we can assume that the request is valid.
If you want to know more about JSON Web Tokens, check outAPI with NestJS #3. Authenticating users with bcrypt, Passport, JWT, and cookies
With the above solution, our application is still stateless. We can’t change the JWT token or make it invalid in a straightforward way. The server-side sessions work differently.
We create a session for the users with server-side sessions when they log in and keep this information in the memory. We send the session’s id to the user and expect them to send it back when making further requests. When that happens, we can compare the received id of the session with the data stored in memory.
The advantages and disadvantages
The above change in approach has a set of consequences. Since we are storing the information about the session server-side, it might become tricky to scale. The more users we have logged in, the more significant strain it puts on our server’s memory. Also, if we have multiple instances of our web server, they don’t share memory. When due to load balancing, the user authenticates through the first instance and then accesses resources through the second instance, the server won’t recognize the user. In this article, we solve this issue with Redis.
Keeping the session in memory has its advantages, too. Since we have easy access to the session data, we can quickly invalidate it. If we know that an attacker stole a particular cookie and can impersonate a user, we can easily remove one session from our memory. Also, if we don’t want the user to log in through multiple devices simultaneously, we can easily prevent that. If a user changes a password, we can also remove the old session from memory. All of the above use-cases are not easily achievable with JWT. We could create a blacklist of tokens to make tokens invalid, but unfortunately, it wouldn’t be straightforward.
Defining the user data
The first thing we do to implement authentication is to register our users. To do that, we need to define an entity for our users.
In this article, we use TypeORM. Another suitable alternative is Prisma. If you want to know more, check out API with NestJS #32. Introduction to Prisma with PostgreSQL
user.entity.ts
|
1 2 3 4 5 6 7 8 9 10 11 12 13 14 15 16 17 18 19 20 |
import { Column, Entity, PrimaryGeneratedColumn } from 'typeorm'; import { Exclude } from 'class-transformer'; @Entity() class User { @PrimaryGeneratedColumn() public id?: number; @Column({ unique: true }) public email: string; @Column() public name: string; @Column() @Exclude() public password: string; } export default User; |
Above, we use @Exclude() to make sure that we don’t respond with the user’s password. If you want to dive deeper into this, check out API with NestJS #5. Serializing the response with interceptors
We also need to be able to perform a few operations on the collection of users. To that, we create the UsersService.
users.service.ts
|
1 2 3 4 5 6 7 8 9 10 11 12 13 14 15 16 17 18 19 20 21 22 23 24 25 26 27 28 29 30 31 32 33 34 35 |
import { HttpException, HttpStatus, Injectable } from '@nestjs/common'; import { InjectRepository } from '@nestjs/typeorm'; import { Repository } from 'typeorm'; import User from './user.entity'; import CreateUserDto from './dto/createUser.dto'; @Injectable() export class UsersService { constructor( @InjectRepository(User) private usersRepository: Repository<User>, ) {} async getByEmail(email: string) { const user = await this.usersRepository.findOne({ email }); if (user) { return user; } throw new HttpException('User with this email does not exist', HttpStatus.NOT_FOUND); } async getById(id: number) { const user = await this.usersRepository.findOne({ id }); if (user) { return user; } throw new HttpException('User with this id does not exist', HttpStatus.NOT_FOUND); } async create(userData: CreateUserDto) { const newUser = await this.usersRepository.create(userData); await this.usersRepository.save(newUser); return newUser; } } |
createUser.dto.ts
|
1 2 3 4 5 6 7 |
export class CreateUserDto { email: string; name: string; password: string; } export default CreateUserDto; |
Managing passwords
The crucial thing about the registration process is that we shouldn’t save the passwords in plain text. If a database breach happened, this would expose the passwords of our users.
To deal with the above issue, we hash the passwords. During this process, the hashing algorithm converts one string into another string. Changing just one character in the passwords completely changes the outcome of hashing.
The above process works only one way and, therefore, can’t be reversed straightforwardly. Thanks to that, we don’t know the exact passwords of our users. When they attempt to log in, we need to perform the hashing operation one more time. By comparing the hash of the provided credentials with the one stored in the database, we can determine if the user provided a valid password.
Using the bcrypt algorithm
One of the most popular hashing algorithms is bcrypt, implemented by the bcrypt npm package. It hashes the strings and compares the plain strings with hashes to validate the credentials.
|
1 |
npm install @types/bcrypt bcrypt |
The bcrypt library is rather straightforward to use. We only need the hash and compare functions.
|
1 2 3 4 5 |
const passwordInPlaintext = 'myStrongPassword'; const hash = await bcrypt.hash(passwordInPlaintext, 10); const isPasswordMatching = await bcrypt.compare(passwordInPlaintext, hashedPassword); console.log(isPasswordMatching); // true |
The authentication service
We now have everything we need to implement the feature of registering users and validating their credentials. Let’s put this logic into the AuthenticationService.
authentication.service.ts
|
1 2 3 4 5 6 7 8 9 10 11 12 13 14 15 16 17 18 19 20 21 22 23 24 25 26 27 28 29 30 31 32 33 34 35 36 37 38 39 40 41 42 43 44 45 46 47 |
import { HttpException, HttpStatus, Injectable } from '@nestjs/common'; import { UsersService } from '../users/users.service'; import RegisterDto from './dto/register.dto'; import * as bcrypt from 'bcrypt'; import PostgresErrorCode from '../database/postgresErrorCode.enum'; @Injectable() export class AuthenticationService { constructor( private readonly usersService: UsersService ) {} public async register(registrationData: RegisterDto) { const hashedPassword = await bcrypt.hash(registrationData.password, 10); try { return this.usersService.create({ ...registrationData, password: hashedPassword }); } catch (error) { if (error?.code === PostgresErrorCode.UniqueViolation) { throw new HttpException('User with that email already exists', HttpStatus.BAD_REQUEST); } throw new HttpException('Something went wrong', HttpStatus.INTERNAL_SERVER_ERROR); } } public async getAuthenticatedUser(email: string, plainTextPassword: string) { try { const user = await this.usersService.getByEmail(email); await this.verifyPassword(plainTextPassword, user.password); return user; } catch (error) { throw new HttpException('Wrong credentials provided', HttpStatus.BAD_REQUEST); } } private async verifyPassword(plainTextPassword: string, hashedPassword: string) { const isPasswordMatching = await bcrypt.compare( plainTextPassword, hashedPassword ); if (!isPasswordMatching) { throw new HttpException('Wrong credentials provided', HttpStatus.BAD_REQUEST); } } } |
There are quite a lot of things happening above. We break it down part by part in API with NestJS #3. Authenticating users with bcrypt, Passport, JWT, and cookies
Using server-side sessions with NestJS
To implement authentication with server-side sessions, we need a few libraries. The first of them is express-session.
|
1 |
npm install express-session @types/express-session |
In this article, we also use the passport package. It provides an abstraction over the authentication and does quite a bit of the heavy lifting for us.
Different applications need various approaches to authentication. Passport refers to those mechanisms as strategies. The one we need is called passport-local. It allows us to authenticate with a username and a password.
|
1 |
npm install @nestjs/passport passport @types/passport-local passport-local |
When our users authenticate, we respond with a session ID cookie, and for security reasons, we need to encrypt it. To do that, we need a secret key. It is a string used to encrypt and decrypt the session ID.
Changing the secret invalidates all existing sessions.
We should never hardcode the secret key into our codebase. A fitting solution is to add it to environment variables.
app.module.ts
|
1 2 3 4 5 6 7 8 9 10 11 12 13 14 15 16 17 18 19 20 21 22 |
import { Module } from '@nestjs/common'; import { ConfigModule } from '@nestjs/config'; import * as Joi from '@hapi/joi'; @Module({ imports: [ ConfigModule.forRoot({ validationSchema: Joi.object({ POSTGRES_HOST: Joi.string().required(), POSTGRES_PORT: Joi.number().required(), POSTGRES_USER: Joi.string().required(), POSTGRES_PASSWORD: Joi.string().required(), POSTGRES_DB: Joi.string().required(), SESSION_SECRET: Joi.string().required() }) }) // ... ], controllers: [], providers: [], }) export class AppModule {} |
.env
|
1 2 3 4 5 6 7 |
POSTGRES_HOST=localhost POSTGRES_PORT=5432 POSTGRES_USER=admin POSTGRES_PASSWORD=admin POSTGRES_DB=nestjs SESSION_SECRET=6m1dHJmicq9MfwpD6rra |
When we have all of the above set up, we can apply the appropriate middleware to turn on both express-session and passport.
main.ts
|
1 2 3 4 5 6 7 8 9 10 11 12 13 14 15 16 17 18 19 20 21 22 23 24 25 26 27 28 29 30 |
import { NestFactory } from '@nestjs/core'; import { AppModule } from './app.module'; import * as session from 'express-session'; import * as passport from 'passport'; import { ConfigService } from '@nestjs/config'; import { ValidationPipe } from '@nestjs/common'; async function bootstrap() { const app = await NestFactory.create(AppModule); app.useGlobalPipes(new ValidationPipe({ transform: true })); const configService = app.get(ConfigService); app.use( session({ secret: configService.get('SESSION_SECRET'), resave: false, saveUninitialized: false, }), ); app.use(passport.initialize()); app.use(passport.session()); await app.listen(3000); } bootstrap(); |
A significant thing to understand about the above code is that by default, the express-session library stores the session in the memory of our web server. This approach might not scale very well and will not work properly if we have multiple app instances. We will deal with this issue later in this article with Redis.
The official NestJS documentation sets the resave and saveUninitialized flags to false. We can find a very good explanation of this on stackoverflow.
Using passport to log in and authenticate
Since we aim to authenticate our users with a username and a password, we need to use the passport-local strategy. To configure it, we need to extend the PassportStrategy class.
local.strategy.ts
|
1 2 3 4 5 6 7 8 9 10 11 12 13 14 15 16 17 |
import { Strategy } from 'passport-local'; import { PassportStrategy } from '@nestjs/passport'; import { Injectable } from '@nestjs/common'; import { AuthenticationService } from './authentication.service'; import User from '../users/user.entity'; @Injectable() export class LocalStrategy extends PassportStrategy(Strategy) { constructor(private authenticationService: AuthenticationService) { super({ usernameField: 'email' }); } async validate(email: string, password: string): Promise<User> { return this.authenticationService.getAuthenticatedUser(email, password); } } |
Passport calls the validate function for every strategy. For the local strategy, Passports requires a username and a password. Our application uses email as the username.
The authentication flow begins when the controller intercepts the request sent by the user.
authentication.controller.ts
|
1 2 3 4 5 6 7 8 9 10 11 12 13 14 15 16 17 18 19 20 21 22 23 24 25 26 27 28 29 30 31 32 33 34 35 36 37 38 39 40 41 42 43 |
import { Body, Req, Controller, HttpCode, Post, UseGuards, UseInterceptors, ClassSerializerInterceptor, Get } from '@nestjs/common'; import { AuthenticationService } from './authentication.service'; import RegisterDto from './dto/register.dto'; import RequestWithUser from './requestWithUser.interface'; import { CookieAuthenticationGuard } from './cookieAuthentication.guard'; import { LogInWithCredentialsGuard } from './logInWithCredentials.guard'; @Controller('authentication') @UseInterceptors(ClassSerializerInterceptor) export class AuthenticationController { constructor( private readonly authenticationService: AuthenticationService ) {} @Post('register') async register(@Body() registrationData: RegisterDto) { return this.authenticationService.register(registrationData); } @HttpCode(200) @UseGuards(LogInWithCredentialsGuard) @Post('log-in') async logIn(@Req() request: RequestWithUser) { return request.user; } @HttpCode(200) @UseGuards(CookieAuthenticationGuard) @Get() async authenticate(@Req() request: RequestWithUser) { return request.user; } } |
Quite a few important things are happening there. First, let’s investigate the LogInWithCredentialsGuard.
logInWithCredentialsGuard.ts
|
1 2 3 4 5 6 7 8 9 10 11 12 13 14 15 16 17 |
import { ExecutionContext, Injectable } from '@nestjs/common'; import { AuthGuard } from '@nestjs/passport'; @Injectable() export class LogInWithCredentialsGuard extends AuthGuard('local') { async canActivate(context: ExecutionContext): Promise<boolean> { // check the email and the password await super.canActivate(context); // initialize the session const request = context.switchToHttp().getRequest(); await super.logIn(request); // if no exceptions were thrown, allow the access to the route return true; } } |
Above, we aim to verify the credentials provided by the user. This is something the AuthGuard does out of the box when the canActivate method is called by the user accessing the route.
We also need to call the logIn method to initialize the server-side session. When we look under the hood of NestJS, we can see that this method calls request.logIn. It is a function added to the request object by Passport. It creates the session and saves it in memory. Thanks to that, the Passport middleware can attach the session id cookie to the response.
We need to specify the exact data we want to keep inside the session. To manage it, we need to create a serializer.
local.serializer.ts
|
1 2 3 4 5 6 7 8 9 10 11 12 13 14 15 16 17 18 19 20 21 22 |
import { UsersService } from '../users/users.service'; import User from '../users/user.entity'; import { PassportSerializer } from '@nestjs/passport'; import { Injectable } from '@nestjs/common'; @Injectable() export class LocalSerializer extends PassportSerializer { constructor( private readonly usersService: UsersService, ) { super(); } serializeUser(user: User, done: CallableFunction) { done(null, user.id); } async deserializeUser(userId: string, done: CallableFunction) { const user = await this.usersService.getById(Number(userId)) done(null, user); } } |
The serializeUser function determines the data stored inside of the session. In our case, we only store the id of the user.
The result of the deserializeUser function gets attached to the request object. By calling the usersService.getById function, we get the complete data of the logged-in user, and we can access it through request.user in the controller.
|
1 2 3 4 5 6 |
@HttpCode(200) @UseGuards(LogInWithCredentialsGuard) @Post('log-in') async logIn(@Req() request: RequestWithUser) { return request.user; } |
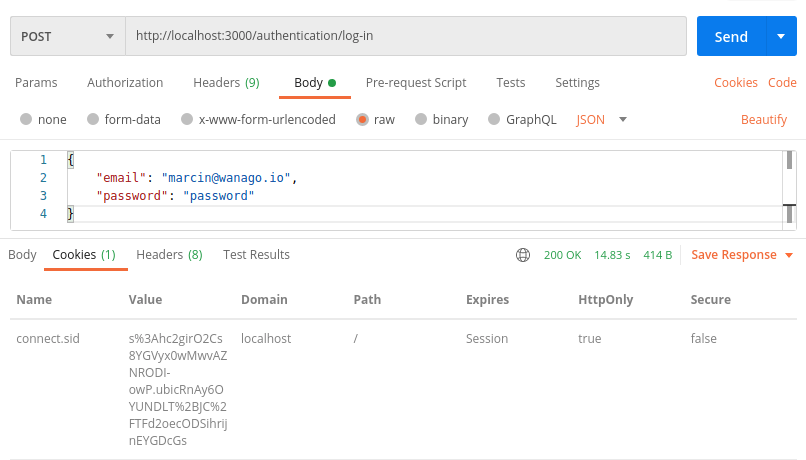
Authenticating with the session id cookie
In the above screenshot, we can see that we respond with the connect.sid cookie when the user logs in, set through the Set-Cookie header. We now expect the user to attach this cookie when performing further requests to our API.
An important thing about the above cookie is the HttpOnly flag set to true. Because of that, the browser can’t access it directly through JavaScript. It makes the cookie more secure and resistant to attacks like cross-site scripting.
If you want to know more about cookies, read Cookies: explaining document.cookie and the Set-Cookie header
We now need to create a NestJS guard that verifies the session id cookie. To define a guard, we need to implement the CanActivate interface.
cookieAuthentication.guard.ts
|
1 2 3 4 5 6 7 8 9 |
import { ExecutionContext, Injectable, CanActivate } from '@nestjs/common'; @Injectable() export class CookieAuthenticationGuard implements CanActivate { async canActivate(context: ExecutionContext) { const request = context.switchToHttp().getRequest(); return request.isAuthenticated(); } } |
The isAuthenticated function is attached to request object by Passport. Therefore, we don’t need to implement it ourselves. The isAuthenticated returns true only if the user is successfully authenticated.
We now can attach the CookieAuthenticationGuard to a route. By doing so, we specify that a valid session is required to access it.
|
1 2 3 4 5 6 |
@HttpCode(200) @UseGuards(CookieAuthenticationGuard) @Get() async authenticate(@Req() request: RequestWithUser) { return request.user; } |
Logging the user out
When we’ve implemented authentication with JWT, our way of logging the user out wasn’t perfect. Back then, we’ve just sent a Set-Cookie header that aimed to remove the token from the browser. Unfortunately, this didn’t make the token invalid.
With server-side sessions, logging out is a lot better.
authentication.controller.ts
|
1 2 3 4 5 6 7 8 9 10 11 12 13 14 15 16 17 18 19 20 21 22 23 24 25 |
import { Req, Controller, HttpCode, UseGuards, UseInterceptors, ClassSerializerInterceptor, Post } from '@nestjs/common'; import RequestWithUser from './requestWithUser.interface'; import { CookieAuthenticationGuard } from './cookieAuthentication.guard'; @Controller('authentication') @UseInterceptors(ClassSerializerInterceptor) export class AuthenticationController { @HttpCode(200) @UseGuards(CookieAuthenticationGuard) @Post('log-out') async logOut(@Req() request: RequestWithUser) { request.logOut(); request.session.cookie.maxAge = 0; } // ... } |
The logOut function is attached to the request object by Passport. Calling it removes the session from the memory of the webserver. Even if someone retrieved the cookie and tried to reuse it, the session is long gone and can’t be accessed. The above provides an additional layer of security compared to JWT.
As an additional step, we can also remove the cookie from the browser of our user. The easiest way to do that is to set request.session.cookie.maxAge to 0.
Improving our sessions with Redis
By default, the express-session library keeps all of the sessions in the memory of the webserver. The more users we’ve got logged in, the more memory our server uses. Restarting the webserver causes all of the sessions to disappear. It might also create issues if we’ve got multiple instances of our app. When the user authenticates the first instance and then accesses the API through the second instance, the server can’t find the session data. We can solve this issue by using Redis instead of storing the sessions directly in the server’s memory.
So far, in this series, we’ve used Docker Compose to set up the architecture for us. This is also a fitting place to set up Redis. By default, it works on port 6379.
docker-compose.yml
|
1 2 3 4 5 6 7 |
version: "3" services: redis: image: "redis:alpine" ports: - "6379:6379" # ... |
To connect to our Redis instance, we need to add a few environment variables.
app.module.ts
|
1 2 3 4 5 6 7 8 9 10 11 12 13 14 15 16 17 18 19 |
import { Module } from '@nestjs/common'; import { ConfigModule } from '@nestjs/config'; import * as Joi from '@hapi/joi'; @Module({ imports: [ ConfigModule.forRoot({ validationSchema: Joi.object({ REDIS_HOST: Joi.string().required(), REDIS_PORT: Joi.number().required(), // ... }) }) // ... ], controllers: [], providers: [], }) export class AppModule {} |
.env
|
1 2 3 |
REDIS_HOST=localhost REDIS_PORT=6379 # ... |
To make the express-session library work with Redies, we need to add a few dependencies.
|
1 |
npm install redis @types/redis connect-redis @types/connect-redis |
The last step is using all of the above in our bootstrap function.
main.ts
|
1 2 3 4 5 6 7 8 9 10 11 12 13 14 15 16 17 18 19 20 21 22 23 24 25 26 27 28 29 30 31 32 33 34 35 36 37 38 39 |
import { NestFactory } from '@nestjs/core'; import { AppModule } from './app.module'; import * as session from 'express-session'; import * as passport from 'passport'; import { ConfigService } from '@nestjs/config'; import { ValidationPipe } from '@nestjs/common'; import { createClient } from 'redis'; import * as createRedisStore from 'connect-redis'; async function bootstrap() { const app = await NestFactory.create(AppModule); app.useGlobalPipes(new ValidationPipe({ transform: true })); const configService = app.get(ConfigService); const RedisStore = createRedisStore(session) const redisClient = createClient({ host: configService.get('REDIS_HOST'), port: configService.get('REDIS_PORT') }) app.use( session({ store: new RedisStore({ client: redisClient }), secret: configService.get('SESSION_SECRET'), resave: false, saveUninitialized: false, }), ); app.use(passport.initialize()); app.use(passport.session()); await app.listen(3000); } bootstrap(); |
Summary
In this article, we’ve gone through the advantages and disadvantages of server-side sessions. We’ve implemented a complete authentication flow using Passport and the express-session library. We’ve also improved it using Redis instead of keeping the sessions directly in the server’s memory. By doing all of the above, we’ve achieved a suitable alternative to JSON Web Tokens.

this is a wonderfully robust and production-ready tutorial, thnx for sharing all the knowledge!!
Thank you for this excellent tutorial. I am trying to adapt this to GraphQL and I haven’t managed to get it working fully yet.
Unfortunately, the above sets a cookie for all requests as well as gives an error message saying “Cannot read property ‘id’ of undefined” when the login is invalid.
Any insight on how to solve this would be appreciated.
I’ve been able to make it work like this (GraphQL only guard):
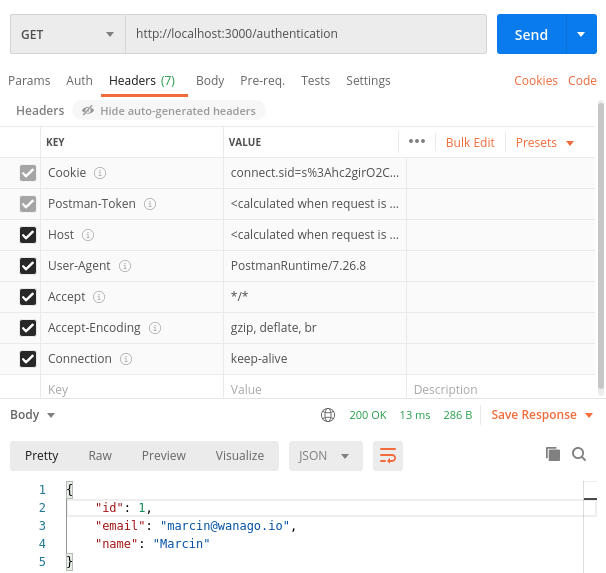
What’s the difference between the /log-in endpoint and the /authentication endpoint? I got a bit lost there.
The /log-in endpoint requires the user to provide the username and password. The /authentication endpoint requires the user to provide a cookie with the session id instead. Thanks to that, the /authentication endpoint can verify if the user is currently logged in.
Can we use these libraries to create many separate sessions, e.g. a session for ordinary users and separate sessions for administrators in one app?
Thanks for the excellent tutorial. All works well except that I get a message on log-in as Error: Failed to serialize user into session. Can you please help
You need to add LocalSerializer in AuthenticationModule Providers
Hey, thanks for a great tutorial. I’ve got a question though – using this authentication strategy, since the cookie is http only and we do not send any tokens or stuff like that to the client, how do we determine if the user is logged in on the frontend?
Hi. Every time we open the application in the browser, our frontend should call the /authentication endpoint. If the browser has a valid cookie and the user is authenticated, it will send the cookie to the /authentication endpoint. Then, the backend will respond with the data of the user.
Thank you for all of your work on these tutorials, Marcin.
Could you please suggest a way to use the session to authenticate the socket connection built in lesson # 26 (maybe reusing CookieAuthenticationGuard)?
When I try to use the guard, I get request.isAuthenticated is not a function
Try to add
to main.ts
If you wanted to set a custom maxAge for the session cookie based on a “remember me” flag while logging in, where would you do that?
Simple. Just don’t save the session if the user doesn’t check “remember me”.
Thanks for the detailed description. I was wondering, replacing JWT with session, how would you handle an API which should be available to a Mobile App too, where cookie sessions are unavailable?
hey thank you so much… i would like to know if there is a way to create a session without logging the user using the sign up controller