- 1. API with NestJS #1. Controllers, routing and the module structure
- 2. API with NestJS #2. Setting up a PostgreSQL database with TypeORM
- 3. API with NestJS #3. Authenticating users with bcrypt, Passport, JWT, and cookies
- 4. API with NestJS #4. Error handling and data validation
- 5. API with NestJS #5. Serializing the response with interceptors
- 6. API with NestJS #6. Looking into dependency injection and modules
- 7. API with NestJS #7. Creating relationships with Postgres and TypeORM
- 8. API with NestJS #8. Writing unit tests
- 9. API with NestJS #9. Testing services and controllers with integration tests
- 10. API with NestJS #10. Uploading public files to Amazon S3
- 11. API with NestJS #11. Managing private files with Amazon S3
- 12. API with NestJS #12. Introduction to Elasticsearch
- 13. API with NestJS #13. Implementing refresh tokens using JWT
- 14. API with NestJS #14. Improving performance of our Postgres database with indexes
- 15. API with NestJS #15. Defining transactions with PostgreSQL and TypeORM
- 16. API with NestJS #16. Using the array data type with PostgreSQL and TypeORM
- 17. API with NestJS #17. Offset and keyset pagination with PostgreSQL and TypeORM
- 18. API with NestJS #18. Exploring the idea of microservices
- 19. API with NestJS #19. Using RabbitMQ to communicate with microservices
- 20. API with NestJS #20. Communicating with microservices using the gRPC framework
- 21. API with NestJS #21. An introduction to CQRS
- 22. API with NestJS #22. Storing JSON with PostgreSQL and TypeORM
- 23. API with NestJS #23. Implementing in-memory cache to increase the performance
- 24. API with NestJS #24. Cache with Redis. Running the app in a Node.js cluster
- 25. API with NestJS #25. Sending scheduled emails with cron and Nodemailer
- 26. API with NestJS #26. Real-time chat with WebSockets
- 27. API with NestJS #27. Introduction to GraphQL. Queries, mutations, and authentication
- 28. API with NestJS #28. Dealing in the N + 1 problem in GraphQL
- 29. API with NestJS #29. Real-time updates with GraphQL subscriptions
- 30. API with NestJS #30. Scalar types in GraphQL
- 31. API with NestJS #31. Two-factor authentication
- 32. API with NestJS #32. Introduction to Prisma with PostgreSQL
- 33. API with NestJS #33. Managing PostgreSQL relationships with Prisma
- 34. API with NestJS #34. Handling CPU-intensive tasks with queues
- 35. API with NestJS #35. Using server-side sessions instead of JSON Web Tokens
- 36. API with NestJS #36. Introduction to Stripe with React
- 37. API with NestJS #37. Using Stripe to save credit cards for future use
- 38. API with NestJS #38. Setting up recurring payments via subscriptions with Stripe
- 39. API with NestJS #39. Reacting to Stripe events with webhooks
- 40. API with NestJS #40. Confirming the email address
- 41. API with NestJS #41. Verifying phone numbers and sending SMS messages with Twilio
- 42. API with NestJS #42. Authenticating users with Google
- 43. API with NestJS #43. Introduction to MongoDB
- 44. API with NestJS #44. Implementing relationships with MongoDB
- 45. API with NestJS #45. Virtual properties with MongoDB and Mongoose
- 46. API with NestJS #46. Managing transactions with MongoDB and Mongoose
- 47. API with NestJS #47. Implementing pagination with MongoDB and Mongoose
- 48. API with NestJS #48. Definining indexes with MongoDB and Mongoose
- 49. API with NestJS #49. Updating with PUT and PATCH with MongoDB and Mongoose
- 50. API with NestJS #50. Introduction to logging with the built-in logger and TypeORM
- 51. API with NestJS #51. Health checks with Terminus and Datadog
- 52. API with NestJS #52. Generating documentation with Compodoc and JSDoc
- 53. API with NestJS #53. Implementing soft deletes with PostgreSQL and TypeORM
- 54. API with NestJS #54. Storing files inside a PostgreSQL database
- 55. API with NestJS #55. Uploading files to the server
- 56. API with NestJS #56. Authorization with roles and claims
- 57. API with NestJS #57. Composing classes with the mixin pattern
- 58. API with NestJS #58. Using ETag to implement cache and save bandwidth
- 59. API with NestJS #59. Introduction to a monorepo with Lerna and Yarn workspaces
- 60. API with NestJS #60. The OpenAPI specification and Swagger
- 61. API with NestJS #61. Dealing with circular dependencies
- 62. API with NestJS #62. Introduction to MikroORM with PostgreSQL
- 63. API with NestJS #63. Relationships with PostgreSQL and MikroORM
- 64. API with NestJS #64. Transactions with PostgreSQL and MikroORM
- 65. API with NestJS #65. Implementing soft deletes using MikroORM and filters
- 66. API with NestJS #66. Improving PostgreSQL performance with indexes using MikroORM
- 67. API with NestJS #67. Migrating to TypeORM 0.3
- 68. API with NestJS #68. Interacting with the application through REPL
- 69. API with NestJS #69. Database migrations with TypeORM
- 70. API with NestJS #70. Defining dynamic modules
- 71. API with NestJS #71. Introduction to feature flags
- 72. API with NestJS #72. Working with PostgreSQL using raw SQL queries
- 73. API with NestJS #73. One-to-one relationships with raw SQL queries
- 74. API with NestJS #74. Designing many-to-one relationships using raw SQL queries
- 75. API with NestJS #75. Many-to-many relationships using raw SQL queries
- 76. API with NestJS #76. Working with transactions using raw SQL queries
- 77. API with NestJS #77. Offset and keyset pagination with raw SQL queries
- 78. API with NestJS #78. Generating statistics using aggregate functions in raw SQL
- 79. API with NestJS #79. Implementing searching with pattern matching and raw SQL
- 80. API with NestJS #80. Updating entities with PUT and PATCH using raw SQL queries
- 81. API with NestJS #81. Soft deletes with raw SQL queries
- 82. API with NestJS #82. Introduction to indexes with raw SQL queries
- 83. API with NestJS #83. Text search with tsvector and raw SQL
- 84. API with NestJS #84. Implementing filtering using subqueries with raw SQL
- 85. API with NestJS #85. Defining constraints with raw SQL
- 86. API with NestJS #86. Logging with the built-in logger when using raw SQL
- 87. API with NestJS #87. Writing unit tests in a project with raw SQL
- 88. API with NestJS #88. Testing a project with raw SQL using integration tests
- 89. API with NestJS #89. Replacing Express with Fastify
- 90. API with NestJS #90. Using various types of SQL joins
- 91. API with NestJS #91. Dockerizing a NestJS API with Docker Compose
- 92. API with NestJS #92. Increasing the developer experience with Docker Compose
- 93. API with NestJS #93. Deploying a NestJS app with Amazon ECS and RDS
- 94. API with NestJS #94. Deploying multiple instances on AWS with a load balancer
- 95. API with NestJS #95. CI/CD with Amazon ECS and GitHub Actions
- 96. API with NestJS #96. Running unit tests with CI/CD and GitHub Actions
- 97. API with NestJS #97. Introduction to managing logs with Amazon CloudWatch
- 98. API with NestJS #98. Health checks with Terminus and Amazon ECS
- 99. API with NestJS #99. Scaling the number of application instances with Amazon ECS
- 100. API with NestJS #100. The HTTPS protocol with Route 53 and AWS Certificate Manager
- 101. API with NestJS #101. Managing sensitive data using the AWS Secrets Manager
- 102. API with NestJS #102. Writing unit tests with Prisma
- 103. API with NestJS #103. Integration tests with Prisma
- 104. API with NestJS #104. Writing transactions with Prisma
- 105. API with NestJS #105. Implementing soft deletes with Prisma and middleware
- 106. API with NestJS #106. Improving performance through indexes with Prisma
- 107. API with NestJS #107. Offset and keyset pagination with Prisma
- 108. API with NestJS #108. Date and time with Prisma and PostgreSQL
- 109. API with NestJS #109. Arrays with PostgreSQL and Prisma
- 110. API with NestJS #110. Managing JSON data with PostgreSQL and Prisma
- 111. API with NestJS #111. Constraints with PostgreSQL and Prisma
- 112. API with NestJS #112. Serializing the response with Prisma
- 113. API with NestJS #113. Logging with Prisma
- 114. API with NestJS #114. Modifying data using PUT and PATCH methods with Prisma
- 115. API with NestJS #115. Database migrations with Prisma
- 116. API with NestJS #116. REST API versioning
- 117. API with NestJS #117. CORS – Cross-Origin Resource Sharing
- 118. API with NestJS #118. Uploading and streaming videos
- 119. API with NestJS #119. Type-safe SQL queries with Kysely and PostgreSQL
- 120. API with NestJS #120. One-to-one relationships with the Kysely query builder
- 121. API with NestJS #121. Many-to-one relationships with PostgreSQL and Kysely
GraphQL has gained quite a lot of popularity lately. And no wonder, because it is an interesting approach to querying data. Therefore, it is definitely worth looking into. At its core, GraphQL is a query language with a runtime that can execute them. Although it is an alternative to REST, it can work alongside it.
Queries
With REST, we have the concept of multiple endpoints. To retrieve the resource, we need to perform a GET request to this specific URL.
GET /posts
|
1 2 3 4 5 6 7 8 9 10 11 12 13 |
{ "items": [ { "id": 10, "title": "Hello world!", "paragraphs": [ "Lorem ipsum", "Dolor sit amet" ] }, // ... ] } |
With GraphQL, we approach the above task differently. First, we need to define a schema. We define it in a file with the .gql extension. Our GraphQL application needs to define a set of possible data our users can query. Our API validates incoming queries and executes them against the schema.
The most fundamental part of a schema is the object type. It represents what objects our users can fetch from our service and what fields they have.
schema.gql
|
1 2 3 4 5 |
type Post { id: Int!, title: String!, paragraphs: [String!]! } |
Above, we define a simple object type that contains three fields. All of them are non-nullable, and we indicate it with the exclamation mark. Because of that, every time our users query posts, each post is guaranteed to contain the id, the title, and the paragraphs.
Instead of calling a specific endpoint that manages posts, we typically have a single endpoint for managing all of our resources. We need to send a query to it to describe what data do we need.
First, we need to define our query in a similar manner that we’ve created our object type.
schema.gql
|
1 2 3 |
type Query { posts(): [Post!]! } |
Once that’s implemented, we can perform a request with the above query.
POST /graphql
|
1 2 3 4 5 6 |
{ posts { id, title } } |
|
1 2 3 4 5 6 7 8 9 |
{ "data": [ { "id": 10, "title": "Hello world!" }, // ... ] } |
An interesting thing above is that we don’t need to request all of the data. In our query above, we omitted the paragraphs field. Thanks to omitting fields that we don’t need, we can reduce the data transferred between our frontend and our backend.
Mutations and inputs
Aside from fetching data, we also need a way to modify it. With REST, we would send a POST request to a specific endpoint. With GraphQL, we use the same single endpoint that we’ve used for querying data.
First, we need to describe the structure of the data we use to create an entity in our database. To do that, we define an input.
schema.gql
|
1 2 3 4 |
input NewPostInput { title: String! paragraphs: [String!]! } |
Once we’ve got the input, we can use it inside our mutation. It should return the created entity.
schema.gql
|
1 2 3 |
type Mutation { createdPost(input: NewPostInput): Post } |
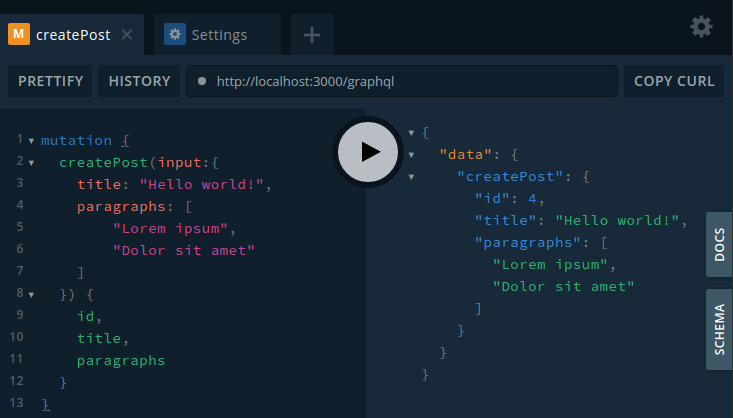
Once we’ve defined both the mutation and the input, we can perform a request that creates an entity.
POST /graphql
|
1 2 3 4 5 6 7 8 9 10 11 12 13 |
mutation { createPost(input: { title: "Hello world!", paragraphs: [ "Lorem ipsum", "Dolor sit amet" ], }) { id title paragraphs } } |
Our server will respond with the created post.
|
1 2 3 4 5 6 7 8 |
{ "data": { "createPost": { "title": "Hello world!", "paragraphs": [ "Lorem ipsum", "Dolor sit amet" ], } } } |
Implementing GraphQL with NestJS
Now let’s implement all of the above in our application. To do that, we need to choose between two approaches.
- With the schema-first method, we describe our API in Schema Definition Language (SDL) files. NestJS analyses them and generates TypeScript definitions.
- When we implement the code-first approach, we use decorators and TypeScript classes instead of creating SDL files. NestJS generates the schema definition file out of our TypeScript code.
Since in the first paragraph we’ve written some SDL code already, we will present the code-first approach in the following example. Let’s start by installing the necessary dependencies.
|
1 |
npm install @nestjs/graphql graphql-tools graphql apollo-server-express |
The first step in using GraphQL with NestJS is initializing it in our AppModule.
app.module.ts
|
1 2 3 4 5 6 7 8 9 10 11 12 13 14 15 16 17 18 19 20 21 22 23 24 25 26 27 |
import { Module } from '@nestjs/common'; import { ConfigModule, ConfigService } from '@nestjs/config'; import * as Joi from '@hapi/joi'; import { GraphQLModule } from '@nestjs/graphql'; @Module({ imports: [ GraphQLModule.forRootAsync({ imports: [ConfigModule], inject: [ConfigService], useFactory: (configService: ConfigService) => ({ playground: Boolean(configService.get('GRAPHQL_PLAYGROUND')), autoSchemaFile: join(process.cwd(), 'src/schema.gql'), }) }), ConfigModule.forRoot({ validationSchema: Joi.object({ GRAPHQL_PLAYGROUND: Joi.number(), // ... }) }), // ... ], controllers: [], providers: [], }) export class AppModule {} |
Above, I use the GRAPHQL_PLAYGROUND environment variable to determine whether a GraphQL playground should be initialized.
.env
|
1 2 |
GRAPHQL_PLAYGROUND=1 #... |
With the playground, we get an interactive, graphical interface that we can use to interact with our server. We can open it on the same URL as the GraphQL server.
Since we use the code-first approach, we need to define the autoSchemaFile to describe the path where our generated schema will be created.
Queries
The first thing to do when we want to query data using the code-first approach is to define a model. NestJS translates it under the hood into the object type.
post.model.ts
|
1 2 3 4 5 6 7 8 9 10 11 12 13 |
import { Field, Int, ObjectType } from '@nestjs/graphql'; @ObjectType() export class Post { @Field(() => Int) id: number; @Field() title: string; @Field(() => [String]) paragraphs: string[]; } |
To provide instructions on how to turn GraphQL operation into data, we need to define a resolver. Thanks to using decorators, NestJS can generate SDL files from our code.
posts.resolver.ts
|
1 2 3 4 5 6 7 8 9 10 11 12 13 14 15 16 |
import { Query, Resolver } from '@nestjs/graphql'; import { Post } from './models/post.model'; import PostsService from './posts.service'; @Resolver(() => Post) export class PostsResolver { constructor( private postsService: PostsService, ) {} @Query(() => [Post]) async posts() { const posts = await this.postsService.getAllPosts(); return posts.items; } } |
We’ve defined the PostsService in the previous parts of this series
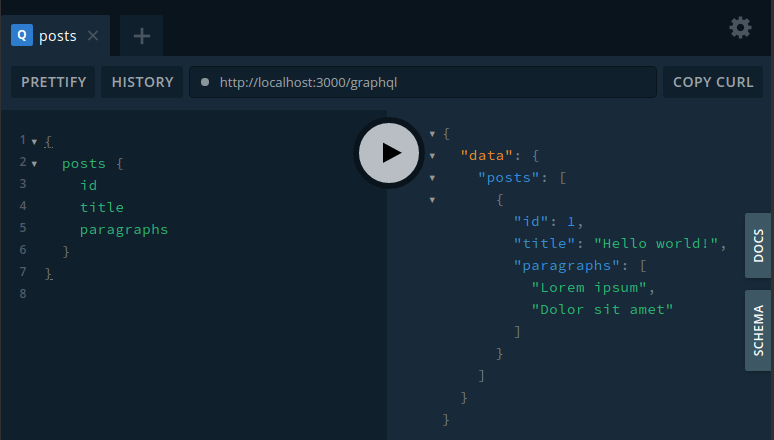
Thanks to creating the above resolver and adding it to our module’s providers array, we can now perform a working query.

Mutation and authentication guards
Aside from querying the data, we also want to be able to create it. To do that, we need migrations with inputs.
In the third part of this series, we’ve implemented authentication with JWT. We require the users to authenticate before creating posts. It will work just fine with GraphQL, given we adjust it a little bit.
First, we need to create a slightly modified guard.
graphql-jwt-auth.guard.ts
|
1 2 3 4 5 6 7 8 9 10 11 |
import { AuthGuard } from '@nestjs/passport'; import { ExecutionContext, Injectable } from '@nestjs/common'; import { GqlExecutionContext } from '@nestjs/graphql'; @Injectable() export class GraphqlJwtAuthGuard extends AuthGuard('jwt') { getRequest(context: ExecutionContext) { const ctx = GqlExecutionContext.create(context); return ctx.getContext().req; } } |
We also need to create the input for our posts.
post.input.ts
|
1 2 3 4 5 6 7 8 9 10 |
import { InputType, Field } from '@nestjs/graphql'; @InputType() export class CreatePostInput { @Field() title: string; @Field(() => [String]) paragraphs: string[]; } |
Once that’s all taken care of, we can add the above to our resolver.
posts.resolver.ts
|
1 2 3 4 5 6 7 8 9 10 11 12 13 14 15 16 17 18 19 20 21 22 23 24 25 26 27 28 29 |
import { Args, Context, Mutation, Query, Resolver } from '@nestjs/graphql'; import { Post } from './models/post.model'; import PostsService from './posts.service'; import { CreatePostInput } from './inputs/post.input'; import { UseGuards } from '@nestjs/common'; import RequestWithUser from '../authentication/requestWithUser.interface'; import { GraphqlJwtAuthGuard } from '../authentication/graphql-jwt-auth.guard'; @Resolver(() => Post) export class PostsResolver { constructor( private postsService: PostsService, ) {} @Query(() => [Post]) async posts() { const posts = await this.postsService.getAllPosts(); return posts.items; } @Mutation(() => Post) @UseGuards(GraphqlJwtAuthGuard) async createPost( @Args('input') createPostInput: CreatePostInput, @Context() context: { req: RequestWithUser }, ) { return this.postsService.createPost(createPostInput, context.req.user); } } |
Doing the above allows us to create posts and assign authors to them.

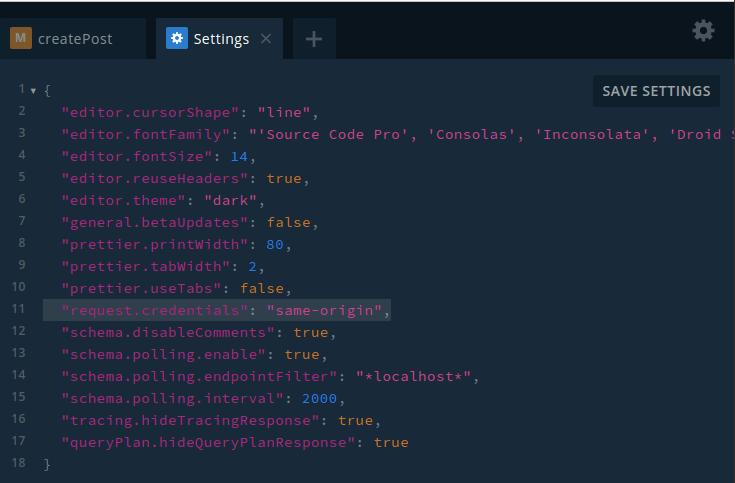
For it to work, we need to set request.credentials to same-origin in the playground settings.

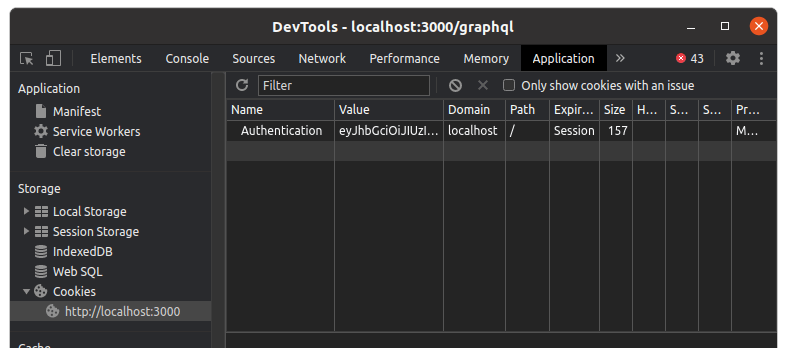
We also need to open up DevTools and save the appropriate cookie.

Summary
In this article, we’ve gone through the very basics of GraphQL. We’ve introduced concepts such as queries and mutations and explained how they look in Schema Definition Language files. Aside from that, we’ve also implemented the code-first approach. By doing that, we let NestJS generate SDL for us.
There is still a lot to cover when it comes to GraphQL, so stay tuned!

So the GrapQL in only interface?
Explained very clearly, good job and thanks.