
- 1. API with NestJS #1. Controllers, routing and the module structure
- 2. API with NestJS #2. Setting up a PostgreSQL database with TypeORM
- 3. API with NestJS #3. Authenticating users with bcrypt, Passport, JWT, and cookies
- 4. API with NestJS #4. Error handling and data validation
- 5. API with NestJS #5. Serializing the response with interceptors
- 6. API with NestJS #6. Looking into dependency injection and modules
- 7. API with NestJS #7. Creating relationships with Postgres and TypeORM
- 8. API with NestJS #8. Writing unit tests
- 9. API with NestJS #9. Testing services and controllers with integration tests
- 10. API with NestJS #10. Uploading public files to Amazon S3
- 11. API with NestJS #11. Managing private files with Amazon S3
- 12. API with NestJS #12. Introduction to Elasticsearch
- 13. API with NestJS #13. Implementing refresh tokens using JWT
- 14. API with NestJS #14. Improving performance of our Postgres database with indexes
- 15. API with NestJS #15. Defining transactions with PostgreSQL and TypeORM
- 16. API with NestJS #16. Using the array data type with PostgreSQL and TypeORM
- 17. API with NestJS #17. Offset and keyset pagination with PostgreSQL and TypeORM
- 18. API with NestJS #18. Exploring the idea of microservices
- 19. API with NestJS #19. Using RabbitMQ to communicate with microservices
- 20. API with NestJS #20. Communicating with microservices using the gRPC framework
- 21. API with NestJS #21. An introduction to CQRS
- 22. API with NestJS #22. Storing JSON with PostgreSQL and TypeORM
- 23. API with NestJS #23. Implementing in-memory cache to increase the performance
- 24. API with NestJS #24. Cache with Redis. Running the app in a Node.js cluster
- 25. API with NestJS #25. Sending scheduled emails with cron and Nodemailer
- 26. API with NestJS #26. Real-time chat with WebSockets
- 27. API with NestJS #27. Introduction to GraphQL. Queries, mutations, and authentication
- 28. API with NestJS #28. Dealing in the N + 1 problem in GraphQL
- 29. API with NestJS #29. Real-time updates with GraphQL subscriptions
- 30. API with NestJS #30. Scalar types in GraphQL
- 31. API with NestJS #31. Two-factor authentication
- 32. API with NestJS #32. Introduction to Prisma with PostgreSQL
- 33. API with NestJS #33. Managing PostgreSQL relationships with Prisma
- 34. API with NestJS #34. Handling CPU-intensive tasks with queues
- 35. API with NestJS #35. Using server-side sessions instead of JSON Web Tokens
- 36. API with NestJS #36. Introduction to Stripe with React
- 37. API with NestJS #37. Using Stripe to save credit cards for future use
- 38. API with NestJS #38. Setting up recurring payments via subscriptions with Stripe
- 39. API with NestJS #39. Reacting to Stripe events with webhooks
- 40. API with NestJS #40. Confirming the email address
- 41. API with NestJS #41. Verifying phone numbers and sending SMS messages with Twilio
- 42. API with NestJS #42. Authenticating users with Google
- 43. API with NestJS #43. Introduction to MongoDB
- 44. API with NestJS #44. Implementing relationships with MongoDB
- 45. API with NestJS #45. Virtual properties with MongoDB and Mongoose
- 46. API with NestJS #46. Managing transactions with MongoDB and Mongoose
- 47. API with NestJS #47. Implementing pagination with MongoDB and Mongoose
- 48. API with NestJS #48. Definining indexes with MongoDB and Mongoose
- 49. API with NestJS #49. Updating with PUT and PATCH with MongoDB and Mongoose
- 50. API with NestJS #50. Introduction to logging with the built-in logger and TypeORM
- 51. API with NestJS #51. Health checks with Terminus and Datadog
- 52. API with NestJS #52. Generating documentation with Compodoc and JSDoc
- 53. API with NestJS #53. Implementing soft deletes with PostgreSQL and TypeORM
- 54. API with NestJS #54. Storing files inside a PostgreSQL database
- 55. API with NestJS #55. Uploading files to the server
- 56. API with NestJS #56. Authorization with roles and claims
- 57. API with NestJS #57. Composing classes with the mixin pattern
- 58. API with NestJS #58. Using ETag to implement cache and save bandwidth
- 59. API with NestJS #59. Introduction to a monorepo with Lerna and Yarn workspaces
- 60. API with NestJS #60. The OpenAPI specification and Swagger
- 61. API with NestJS #61. Dealing with circular dependencies
- 62. API with NestJS #62. Introduction to MikroORM with PostgreSQL
- 63. API with NestJS #63. Relationships with PostgreSQL and MikroORM
- 64. API with NestJS #64. Transactions with PostgreSQL and MikroORM
- 65. API with NestJS #65. Implementing soft deletes using MikroORM and filters
- 66. API with NestJS #66. Improving PostgreSQL performance with indexes using MikroORM
- 67. API with NestJS #67. Migrating to TypeORM 0.3
- 68. API with NestJS #68. Interacting with the application through REPL
- 69. API with NestJS #69. Database migrations with TypeORM
- 70. API with NestJS #70. Defining dynamic modules
- 71. API with NestJS #71. Introduction to feature flags
- 72. API with NestJS #72. Working with PostgreSQL using raw SQL queries
- 73. API with NestJS #73. One-to-one relationships with raw SQL queries
- 74. API with NestJS #74. Designing many-to-one relationships using raw SQL queries
- 75. API with NestJS #75. Many-to-many relationships using raw SQL queries
- 76. API with NestJS #76. Working with transactions using raw SQL queries
- 77. API with NestJS #77. Offset and keyset pagination with raw SQL queries
- 78. API with NestJS #78. Generating statistics using aggregate functions in raw SQL
- 79. API with NestJS #79. Implementing searching with pattern matching and raw SQL
- 80. API with NestJS #80. Updating entities with PUT and PATCH using raw SQL queries
- 81. API with NestJS #81. Soft deletes with raw SQL queries
- 82. API with NestJS #82. Introduction to indexes with raw SQL queries
- 83. API with NestJS #83. Text search with tsvector and raw SQL
- 84. API with NestJS #84. Implementing filtering using subqueries with raw SQL
- 85. API with NestJS #85. Defining constraints with raw SQL
- 86. API with NestJS #86. Logging with the built-in logger when using raw SQL
- 87. API with NestJS #87. Writing unit tests in a project with raw SQL
- 88. API with NestJS #88. Testing a project with raw SQL using integration tests
- 89. API with NestJS #89. Replacing Express with Fastify
- 90. API with NestJS #90. Using various types of SQL joins
- 91. API with NestJS #91. Dockerizing a NestJS API with Docker Compose
- 92. API with NestJS #92. Increasing the developer experience with Docker Compose
- 93. API with NestJS #93. Deploying a NestJS app with Amazon ECS and RDS
- 94. API with NestJS #94. Deploying multiple instances on AWS with a load balancer
- 95. API with NestJS #95. CI/CD with Amazon ECS and GitHub Actions
- 96. API with NestJS #96. Running unit tests with CI/CD and GitHub Actions
- 97. API with NestJS #97. Introduction to managing logs with Amazon CloudWatch
- 98. API with NestJS #98. Health checks with Terminus and Amazon ECS
- 99. API with NestJS #99. Scaling the number of application instances with Amazon ECS
- 100. API with NestJS #100. The HTTPS protocol with Route 53 and AWS Certificate Manager
- 101. API with NestJS #101. Managing sensitive data using the AWS Secrets Manager
- 102. API with NestJS #102. Writing unit tests with Prisma
- 103. API with NestJS #103. Integration tests with Prisma
- 104. API with NestJS #104. Writing transactions with Prisma
- 105. API with NestJS #105. Implementing soft deletes with Prisma and middleware
- 106. API with NestJS #106. Improving performance through indexes with Prisma
- 107. API with NestJS #107. Offset and keyset pagination with Prisma
- 108. API with NestJS #108. Date and time with Prisma and PostgreSQL
- 109. API with NestJS #109. Arrays with PostgreSQL and Prisma
- 110. API with NestJS #110. Managing JSON data with PostgreSQL and Prisma
- 111. API with NestJS #111. Constraints with PostgreSQL and Prisma
- 112. API with NestJS #112. Serializing the response with Prisma
- 113. API with NestJS #113. Logging with Prisma
- 114. API with NestJS #114. Modifying data using PUT and PATCH methods with Prisma
- 115. API with NestJS #115. Database migrations with Prisma
- 116. API with NestJS #116. REST API versioning
- 117. API with NestJS #117. CORS – Cross-Origin Resource Sharing
- 118. API with NestJS #118. Uploading and streaming videos
- 119. API with NestJS #119. Type-safe SQL queries with Kysely and PostgreSQL
- 120. API with NestJS #120. One-to-one relationships with the Kysely query builder
- 121. API with NestJS #121. Many-to-one relationships with PostgreSQL and Kysely
While storing files directly in the database is doable, it might not be the best approach. Files can take a lot of space, and it might impact the performance of the application. Also, it increases the size of the database and, therefore, makes backups bigger and slower. A good alternative is storing files separately using an external provider, such as Google Cloud, Azure, or Amazon AWS.
In this article, we look into uploading files to Amazon Simple Storage Service, also referred to as S3. You can find all the code from this series in this repository.
Connecting to Amazon S3
Amazon S3 provides storage that we can use with any type of file. We organize files into buckets and manage them in our API through an SDK.
Once we create the AWS account, we can log in as a root user. Even though we might authorize as root to use the S3 through our API, this is not the best approach.
Setting up a user
Let’s create a new user that has a restricted set of permissions. To do so, we need to open the Identity and Access Management (IAM) panel and create a user:

Since we want this user to be able to manage everything connected to S3, let’s set up proper access.

After doing that, we are presented with Access key ID and Secret access key. We need those to connect to AWS through our API. We also need to choose one of the available regions.
Let’s add them to our .env file:
.env
|
1 2 3 4 |
# ... AWS_REGION=eu-central-1 AWS_ACCESS_KEY_ID=******* AWS_SECRET_ACCESS_KEY=******* |
Also, let’s add it to our environment variables validation schema in AppModule:
|
1 2 3 4 5 6 7 8 9 10 11 12 13 14 15 |
ConfigModule.forRoot({ validationSchema: Joi.object({ POSTGRES_HOST: Joi.string().required(), POSTGRES_PORT: Joi.number().required(), POSTGRES_USER: Joi.string().required(), POSTGRES_PASSWORD: Joi.string().required(), POSTGRES_DB: Joi.string().required(), JWT_SECRET: Joi.string().required(), JWT_EXPIRATION_TIME: Joi.string().required(), AWS_REGION: Joi.string().required(), AWS_ACCESS_KEY_ID: Joi.string().required(), AWS_SECRET_ACCESS_KEY: Joi.string().required(), PORT: Joi.number(), }) }), |
Connecting to AWS through SDK
Once we have the necessary variables, we can connect to AWS using the official SDK for Node. Let’s install it first.
|
1 |
npm install aws-sdk @types/aws-sdk |
Since we’ve got everything that we need to configure the SDK, let’s use it. One of the ways to do so is to use aws-sdk straight in our main.ts file.
main.ts
|
1 2 3 4 5 6 7 8 9 10 11 12 13 14 15 16 17 18 19 20 21 22 23 24 |
import { NestFactory } from '@nestjs/core'; import { AppModule } from './app.module'; import * as cookieParser from 'cookie-parser'; import { ValidationPipe } from '@nestjs/common'; import { ExcludeNullInterceptor } from './utils/excludeNull.interceptor'; import { ConfigService } from '@nestjs/config'; import { config } from 'aws-sdk'; async function bootstrap() { const app = await NestFactory.create(AppModule); app.useGlobalPipes(new ValidationPipe()); app.useGlobalInterceptors(new ExcludeNullInterceptor()); app.use(cookieParser()); const configService = app.get(ConfigService); config.update({ accessKeyId: configService.get('AWS_ACCESS_KEY_ID'), secretAccessKey: configService.get('AWS_SECRET_ACCESS_KEY'), region: configService.get('AWS_REGION'), }); await app.listen(3000); } bootstrap(); |
Creating our first bucket
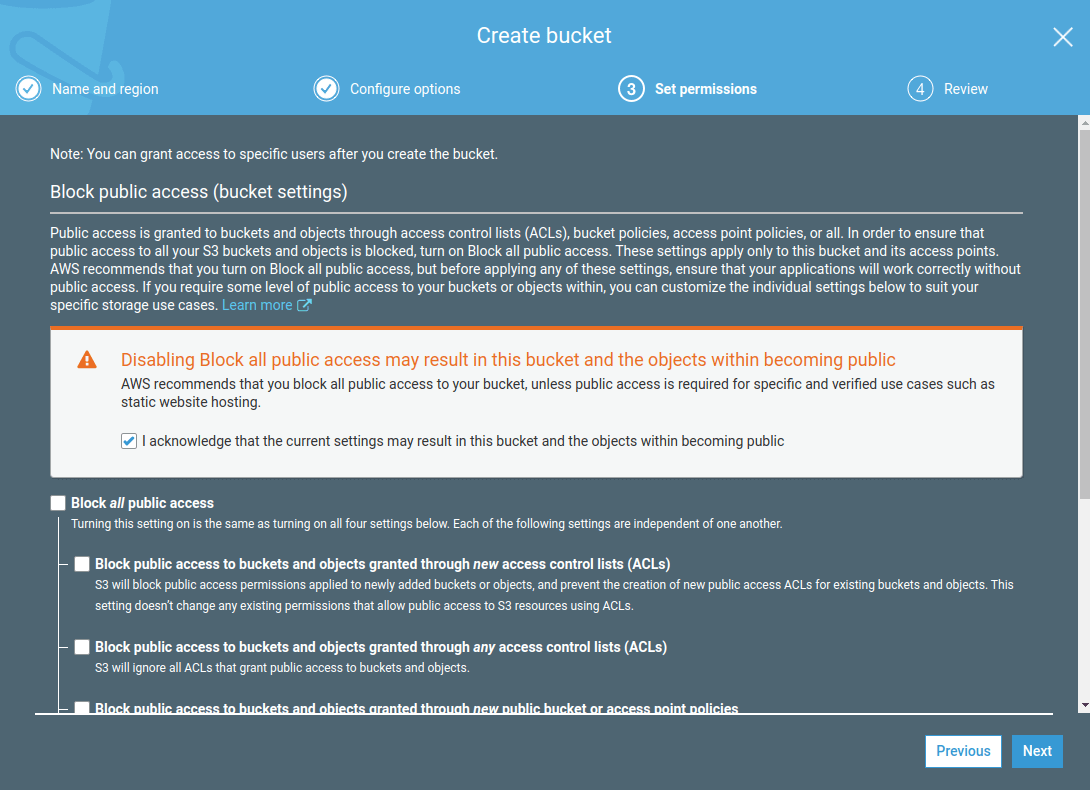
In Amazon S3 data is organized in buckets. We can have multiple buckets with different settings.
Let’s open the Amazon S3 panel and create a bucket. Please note that the name of the bucket must be unique.
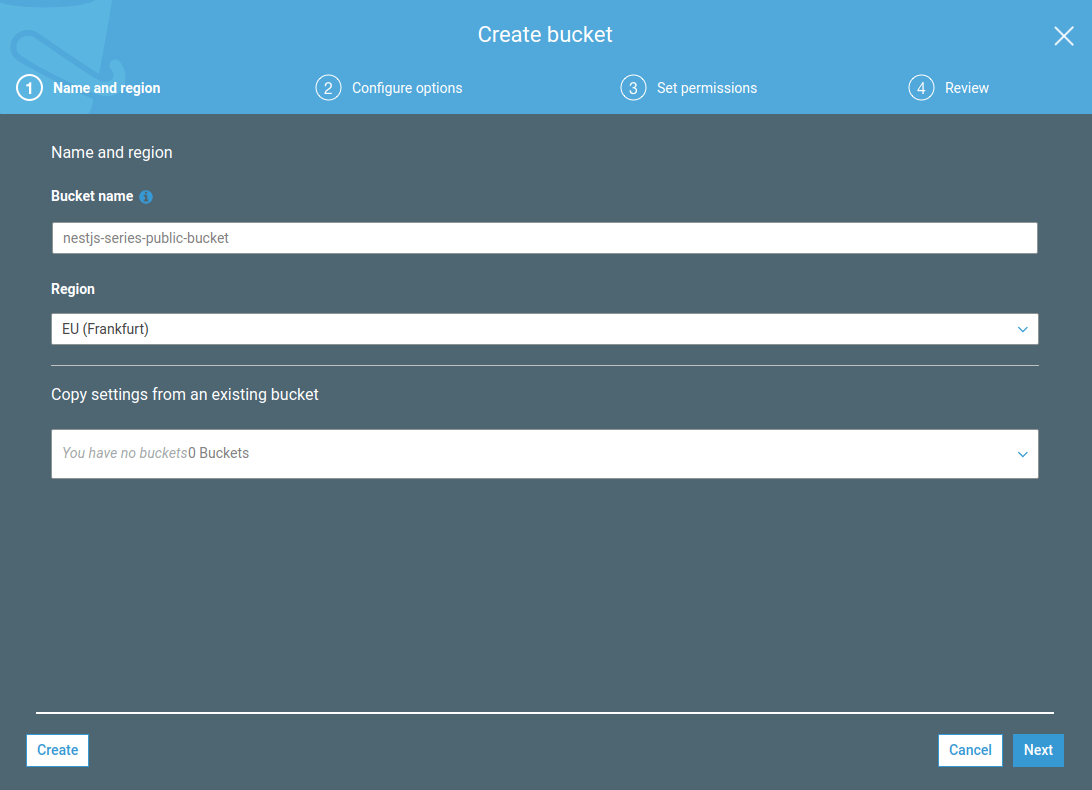
We can set up our bucket to contain public files. All files that we upload to this bucket will be publicly available. We might use it to manage files such as avatars.
The last step here is to add the name of the bucket to our environment variables.
.env
|
1 2 |
# ... AWS_PUBLIC_BUCKET_NAME=nestjs-series-public-bucket |
src/app.module.ts
|
1 2 3 4 5 6 |
ConfigModule.forRoot({ validationSchema: Joi.object({ // ... AWS_PUBLIC_BUCKET_NAME: Joi.string().required(), }) }), |
Uploading images through our API
Since we’ve got the AWS connection set up, we can proceed with uploading our files. For starters, let’s create a PublicFile entity.
src/files/publicFile.entity.ts
|
1 2 3 4 5 6 7 8 9 10 11 12 13 14 15 |
import { Column, Entity, PrimaryGeneratedColumn } from 'typeorm'; @Entity() class PublicFile { @PrimaryGeneratedColumn() public id: number; @Column() public url: string; @Column() public key: string; } export default PublicFile; |
By saving the URL directly in the database, we can access the public file very quickly. The key property uniquely identifies the file in the bucket. We need it to access the file, for example, if we want to delete it.
The next step is creating a service that uploads files to the bucket and saves the data about the file to our Postgres database. Since we want keys to be unique, we use the uuid library:
|
1 |
npm install uuid @types/uuid |
src/files/files.service.ts
|
1 2 3 4 5 6 7 8 9 10 11 12 13 14 15 16 17 18 19 20 21 22 23 24 25 26 27 28 29 30 31 32 33 |
import { Injectable } from '@nestjs/common'; import { InjectRepository } from '@nestjs/typeorm'; import { Repository } from 'typeorm'; import PublicFile from './publicFile.entity'; import { S3 } from 'aws-sdk'; import { ConfigService } from '@nestjs/config'; import { v4 as uuid } from 'uuid'; @Injectable() export class FilesService { constructor( @InjectRepository(PublicFile) private publicFilesRepository: Repository<PublicFile>, private readonly configService: ConfigService ) {} async uploadPublicFile(dataBuffer: Buffer, filename: string) { const s3 = new S3(); const uploadResult = await s3.upload({ Bucket: this.configService.get('AWS_PUBLIC_BUCKET_NAME'), Body: dataBuffer, Key: `${uuid()}-${filename}` }) .promise(); const newFile = this.publicFilesRepository.create({ key: uploadResult.Key, url: uploadResult.Location }); await this.publicFilesRepository.save(newFile); return newFile; } } |
The uploadPublicFile method expects a buffer. It is a chunk of memory that keeps a binary representation of our file. If you want to know more about it, check out Node.js TypeScript #3. Explaining the Buffer.
Creating an endpoint for uploading files
Now we need to create an endpoint for the user to upload the avatar. To link the files with users, we need to modify the UserEntity by adding the avatar column.
src/users/user.entity.ts
|
1 2 3 4 5 6 7 8 9 10 11 12 13 14 15 16 17 18 19 |
import { Entity, JoinColumn, OneToOne } from 'typeorm'; import PublicFile from '../files/publicFile.entity'; @Entity() class User { // ... @JoinColumn() @OneToOne( () => PublicFile, { eager: true, nullable: true } ) public avatar?: PublicFile; } export default User; |
If you wan to know more about relationships with Postgres and TypeORM, check out API with NestJS #7. Creating relationships with Postgres and TypeORM
Let’s add a method to the UsersService that uploads files and links them to the user.
src/users/users.service.ts
|
1 2 3 4 5 6 7 8 9 10 11 12 13 14 15 16 17 18 19 20 21 22 23 24 25 26 27 28 29 30 31 32 33 34 |
import { Injectable } from '@nestjs/common'; import { InjectRepository } from '@nestjs/typeorm'; import { Repository } from 'typeorm'; import User from './user.entity'; import { FilesService } from '../files/files.service'; @Injectable() export class UsersService { constructor( @InjectRepository(User) private usersRepository: Repository<User>, private readonly filesService: FilesService ) {} // ... async getById(id: number) { const user = await this.usersRepository.findOne({ id }); if (user) { return user; } throw new HttpException('User with this id does not exist', HttpStatus.NOT_FOUND); } async addAvatar(userId: number, imageBuffer: Buffer, filename: string) { const avatar = await this.filesService.uploadPublicFile(imageBuffer, filename); const user = await this.getById(userId); await this.usersRepository.update(userId, { ...user, avatar }); return avatar; } } |
This might be a fitting place to include some functionalities like checking the size of the image or compressing it.
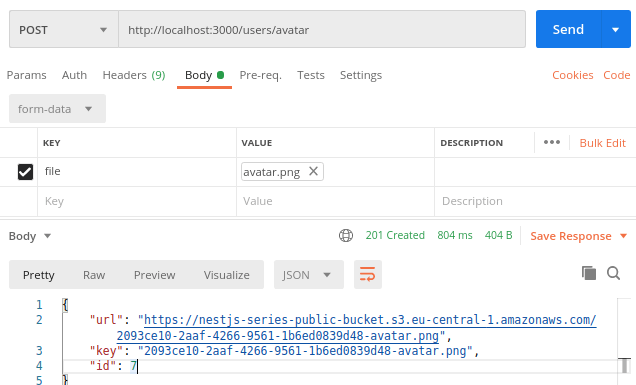
The last piece is adding an endpoint the users can send avatars to. To do that, we follow the NestJS documentation and use the FileInterceptor that utilizes multer under the hood.
src/users/users.controller.ts
|
1 2 3 4 5 6 7 8 9 10 11 12 13 14 15 16 17 18 19 20 |
import { UsersService } from './users.service'; import { Controller, Post, Req, UploadedFile, UseGuards, UseInterceptors } from '@nestjs/common'; import JwtAuthenticationGuard from '../authentication/jwt-authentication.guard'; import RequestWithUser from '../authentication/requestWithUser.interface'; import { FileInterceptor } from '@nestjs/platform-express'; import { Express } from 'express'; @Controller('users') export class UsersController { constructor( private readonly usersService: UsersService, ) {} @Post('avatar') @UseGuards(JwtAuthenticationGuard) @UseInterceptors(FileInterceptor('file')) async addAvatar(@Req() request: RequestWithUser, @UploadedFile() file: Express.Multer.File) { return this.usersService.addAvatar(request.user.id, file.buffer, file.originalname); } } |
The file above has quite a few useful properties such as the mimetype. You can use it if you want some additional validation and disallow certain types of files.
Deleting existing files
Aside from uploading files, we also need a way to remove them. To keep our database consistent with the Amazon S3 storage, we remove the files from both places. First, let’s add the method to the FilesService.
src/files/files.service.ts
|
1 2 3 4 5 6 7 8 9 10 11 12 13 14 15 16 17 18 19 20 21 22 23 24 25 26 27 |
import { Injectable } from '@nestjs/common'; import { InjectRepository } from '@nestjs/typeorm'; import { Repository } from 'typeorm'; import PublicFile from './publicFile.entity'; import { S3 } from 'aws-sdk'; import { ConfigService } from '@nestjs/config'; @Injectable() export class FilesService { constructor( @InjectRepository(PublicFile) private publicFilesRepository: Repository<PublicFile>, private readonly configService: ConfigService ) {} // ... async deletePublicFile(fileId: number) { const file = await this.publicFilesRepository.findOne({ id: fileId }); const s3 = new S3(); await s3.deleteObject({ Bucket: this.configService.get('AWS_PUBLIC_BUCKET_NAME'), Key: file.key, }).promise(); await this.publicFilesRepository.delete(fileId); } } |
Now, we need to use it in our UsersService. Important addition is that when a user uploads an avatar while already having one, we delete the old one.
src/users/users.service.ts
|
1 2 3 4 5 6 7 8 9 10 11 12 13 14 15 16 17 18 19 20 21 22 23 24 25 26 27 28 29 30 31 32 33 34 35 36 37 38 39 40 41 42 43 44 45 |
import { Injectable } from '@nestjs/common'; import { InjectRepository } from '@nestjs/typeorm'; import { Repository } from 'typeorm'; import User from './user.entity'; import { FilesService } from '../files/files.service'; @Injectable() export class UsersService { constructor( @InjectRepository(User) private usersRepository: Repository<User>, private readonly filesService: FilesService ) {} // ... async addAvatar(userId: number, imageBuffer: Buffer, filename: string) { const user = await this.getById(userId); if (user.avatar) { await this.usersRepository.update(userId, { ...user, avatar: null }); await this.filesService.deletePublicFile(user.avatar.id); } const avatar = await this.filesService.uploadPublicFile(imageBuffer, filename); await this.usersRepository.update(userId, { ...user, avatar }); return avatar; } async deleteAvatar(userId: number) { const user = await this.getById(userId); const fileId = user.avatar?.id; if (fileId) { await this.usersRepository.update(userId, { ...user, avatar: null }); await this.filesService.deletePublicFile(fileId) } } } |
Summary
In this article, we’ve learned the basics of how Amazon S3 works and how to use it in our API. To do that, we’ve provided the necessary credentials to AWS SDK. Thanks to that, we were able to upload and delete files to AWS. We’ve also kept our database in sync with Amazon S3, to track our files. To upload files through API we’ve used the FileInterceptor, which uses Multer under the hood.
Since there is more to Amazon S3 than handling public files, there is still quite a bit to cover here, and you might expect it in this series.

does this solution upload files directly to s3 from frontend? or multer saves the file on disk first and then it’s transfered to s3?
upload files directly to s3 from frontend
I made a slight adjustment for code reuse.
I refactored deleteAvatar to be a wrapper to deleteUserAvatar. The second function takes a user object. deleteAvatar now looks up a user and passes it to deleteUserAvatar and addAvatar now passes a user object to deleteUserAvatar. It wasn’t much, but was some code duplication in the existing functionality.
cant update user have this errors:
No entity column “posts” was found
It happens because
return user with this properties:
{
…
posts: undefined
}
what is wrong ?
info is not complete to help u sort, where is id coming from? are u sure it’s not meant to be await this.usersRepository.findOne({ id: userId });
I figure out the main reason of it, it is because I had typescript config esnext but in tutorial it is es2019, so how can I avoid this error? should I delete all undefined properties before update ?
Don’t forget to specify the suitable access control list (ACL), also the folder if you want to organize the files.
There is an UPDATE in S3. After creating a bucket,
Otherwise you will get an error for ACL related.
I’m getting this error when trying to run the application: