
- 1. JavaScript testing #1. Explaining types of tests. Basics of unit testing with Jest
- 2. JavaScript testing #2. Introducing Enzyme and testing React components
- 3. JavaScript testing #3. Testing props, the mount function and snapshot tests.
- 4. JavaScript testing #4. Mocking API calls and simulating React components interactions
- 5. JavaScript testing #5. Testing hooks with react-hooks-testing-library and Redux
- 6. JavaScript testing #6. Introduction to End-to-End testing with Cypress
- 7. JavaScript testing #7. Diving deeper into commands and selectors in Cypress
- 8. JavaScript testing #8. Integrating Cypress with Cucumber and Gherkin
- 9. JavaScript testing #9. Replacing Enzyme with React Testing Library
- 10. JavaScript testing #10. Advanced mocking with Jest and React Testing Library
- 11. JavaScript testing #11. Spying on functions. Pitfalls of not resetting Jest mocks
- 12. JavaScript testing #12. Testing downloaded files and file inputs with Cypress
- 13. JavaScript testing #13. Mocking a REST API with the Mock Service Worker
- 14. JavaScript testing #14. Mocking WebSockets using the mock-socket library
So far, we’ve covered quite a lot of different types of tests. Some of them were unit tests or integration tests, where we tested a specific part of our implementation or components working together. In this article, we look into End-to-End testing and perform it using the Cypress framework.
The principles of the End to End (E2E) testing
The End to End testing is an approach in which we test a fully working application. By doing so, we can test whether our app behaves correctly in a certain scenario from start to finish. By performing tests using many different parts of our application working together, we can test real-life situations. This is very helpful when we want to make sure that our application meets the requirements. It might also act as regression tests, where we make sure that our new features have not broken any previous scenarios. We might also use them as automated smoke tests, where we make sure that our new build is functional and the crucial functionalities are working.
The smoke testing term is an analogy to electronics and refers to the very first moments of powering up the circuit. If there is no smoke rising from your device, it looks promising!
Since End-to-End (E2E) tests aim to check the whole system in a way that is going to be used by users, it means doing so through the user interface. Since we write web applications, it involves the web browser. This makes our E2E tests relatively slow compared to other types of tests.
Introducing Cypress
Some time back, our framework of choice might have been Selenium. Cypress does not use it under the hood, though, since it has a new architecture. If you tried Selenium in the past and had an unpleasant experience, you might want to give Cypress a chance. It specializes in performing End-to-End tests through the browser and is framework-agnostic – we can use it with any JavaScript framework of our choosing.
Let’s learn by implementation! To start using Cypress, we can add it to our project through npm.
|
1 |
npm install cypress |
Cypress has its test runner. To make opening it up to be simple, let’s add a new entry in the scripts in our package.json file.
package.json
|
1 2 3 |
"scripts": { "test:e2e": "cypress open" } |
Running npm run test:e2e for the first time, generates a new directory for us. Let’s look into it.
|
1 2 3 4 5 6 |
├── cypress │ ├── fixtures │ ├── integration │ │ └── examples │ ├── plugins │ └── support |
The fixtures directory holds the data that the tests can make use of. We run automated tests multiple times, and to ensure that the process is deterministic, we might want to run the test in some particular, constant state. Such a state is called a fixture, and we might use it to mock some responses from the back end to ensure their immutability.
The integration directory is a place to put our test files, although we might configure it differently. Cypress recognizes every file in the integration directory with a proper extension as a test.
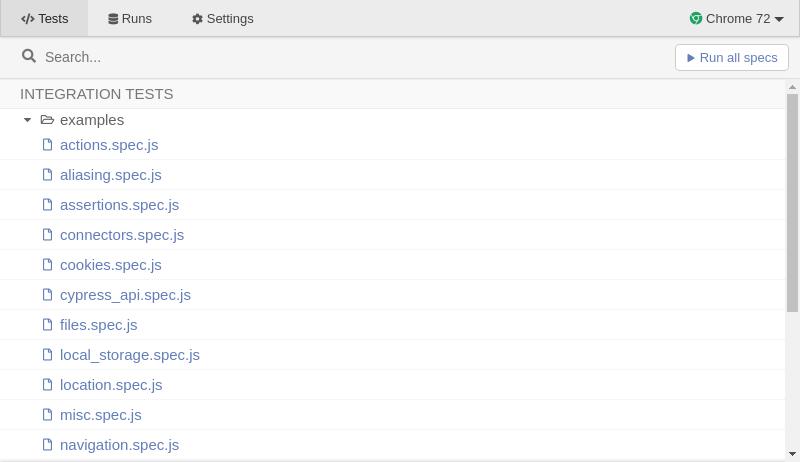
The plugins directory contains files that extend and modify the behavior of Cypress. You can install one of the provided plugins or create your own.
The support directory might be a fitting place to put some reusable logic that we want to apply to every test. It holds the behavior that runs before every single one of our tests.
Writing our first tests
In the previous parts of the series, we use the Jest test runner. Its API is similar to mocha and chai that the Cypress is built on to of. Thanks to that, we might feel at home here.
Let’s create our first test.
/cypress/integration/homepage.spec.js
|
1 2 3 4 5 6 7 |
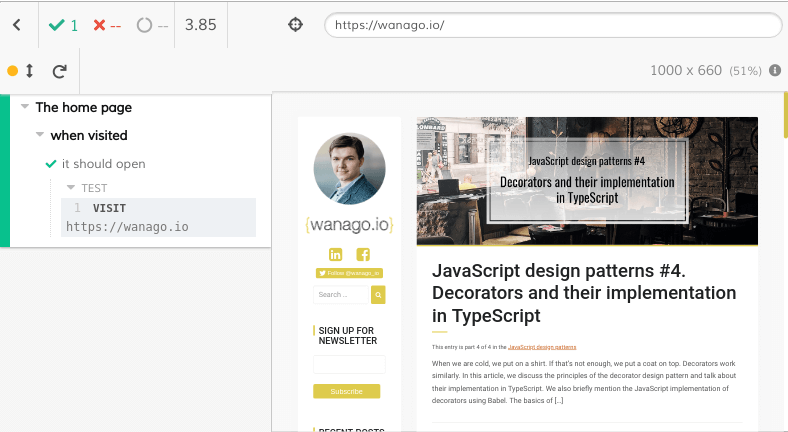
describe('The home page', () => { describe('when visited', () => { it('it should open', () => { cy.visit('https://dev.wanago.io'); }) }) }) |
When we open the test runner, the above test is available. Running it results in success!
We can improve the above test by utilizing the cypress.json file generated at the very top of our file structure. Among other properties, we can use the baseUrl to set a URL as a default.
|
1 2 3 |
{ "baseUrl": "https://dev.wanago.io" } |
Now, when we use the cy.visit function, it uses the baseUrl as a prefix.
Interacting with elements
Cypress has a lot of functionalities built to enable us to interact with the DOM tree. The most basic one is the cy.get function that can find an element using a selector. It is designed in a way that matches the behavior of $(...) from jQuery.
Once we find the desired element, we can interact with it using a set of functions like click and type.
For more possible commands, check out this page in the documentation.
/cypress/integration/search.spec.js
|
1 2 3 4 5 6 7 8 9 10 11 12 13 14 15 |
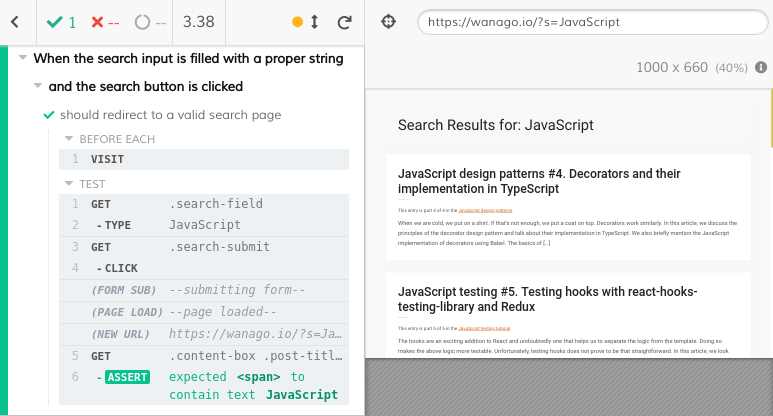
beforeEach(() => { cy.visit(''); }); describe('When the search input is filled with a proper string', () => { describe('and the search button is clicked', () => { it('should redirect to a valid search page', () => { const term = 'JavaScript'; cy.get('.search-field').type(term); cy.get('.search-submit').click(); cy.get('.content-box .post-title--archive span').should('contain.text', term); }) }) }) |
The essential thing is that the cy.get function automatically retries until all the elements exist in the DOM tree, and all of our assertions have passed. It simplifies our code greatly because we don’t have to worry about it. Cypress treats our assertions as a description of how the application should look like and automatically waits, blocks, and retries until the state is reached.
We can configure the timeout of the above operations through cypress.json
Our test results in success!
The assertions describe the desired state that we expect. An important note is that some functions have a built-in assertion. This also concerns some of the functions that we’ve used above in this article. For example, if the cy.get function does not find the desired element eventually, the assertion fails.
Also, cy.visit expects the page to load with the 200 status code and the text/html content type. This is why our first code that contains just cy.visit('https://dev.wanago.io') works as a test! With Cypress, we don’t necessarily have to assert to have a useful test.
Often used assertions
The assertions in cypress are designed to resemble the English language. They come from the Chai library, and we can look up the full list there. In the upcoming parts of this series, there will inevitably be more examples of different assertions. If you need a good reference point of what assertions are possible, you can check out this page in the documentation.
Value
|
1 |
cy.get('input').should('have.value', 'myStrongPassword123') |
Text
|
1 |
cy.get('.content-box').should('contain.text', 'Hello world!'); |
State
|
1 |
cy.get('.radio-button').should('be.checked') |
Length
|
1 |
cy.get('.users-table li').should('have.length', expectedUsers.length) |
Class
|
1 |
cy.get('#modal').should('have.class', 'visible') |
CSS
|
1 |
cy.get('.important').should('have.css', 'text-decoration', 'underline') |
The crucial thing to remember is the Cypress framework retries the above assertions until the requirements are met.
Also, an important note is that you can also reverse any assertion. Writing should('not.contain.text', 'JavaScript') makes the Cypress expect that the text won’t appear. We can also apply the above rule to default assertions, such as the one built into the cy.get function. To do so, we need to use the existence assertion.
|
1 |
cy.get('.search-field').should('not.exist') |
Summary
In this article, we’ve learned the very basics of the Cypress framework. We’ve written some first tests and understood how they work. With the basics of how to visit pages, interact with them, and assert, we can write a lot of meaningful tests. I encourage you to do so before the next part of the series. The Cypress framework has a lot of functionalities, so we’ve still got quite a bit to cover. Also, we will look into implementing Cucumber and Gherkin into our E2E tests, so stay tuned!
