
- 1. TypeScript Express tutorial #1. Middleware, routing, and controllers
- 2. TypeScript Express tutorial #2. MongoDB, models and environment variables
- 3. TypeScript Express tutorial #3. Error handling and validating incoming data
- 4. TypeScript Express tutorial #4. Registering users and authenticating with JWT
- 5. TypeScript Express tutorial #5. MongoDB relationships between documents
- 6. TypeScript Express tutorial #6. Basic data processing with MongoDB aggregation
- 7. TypeScript Express tutorial #7. Relational databases with Postgres and TypeORM
- 8. TypeScript Express tutorial #8. Types of relationships with Postgres and TypeORM
- 9. TypeScript Express tutorial #9. The basics of migrations using TypeORM and Postgres
- 10. TypeScript Express tutorial #10. Testing Express applications
- 11. TypeScript Express tutorial #11. Node.js Two-Factor Authentication
- 12. TypeScript Express tutorial #12. Creating a CI/CD pipeline with Travis and Heroku
- 13. TypeScript Express tutorial #13. Using Mongoose virtuals to populate documents
- 14. TypeScript Express tutorial #14. Code optimization with Mongoose Lean Queries
- 15. TypeScript Express tutorial #15. Using PUT vs PATCH in MongoDB with Mongoose
Identity theft is a serious issue nowadays. With so many accidents happening on the web, it is a great time to learn about providing an additional layer of security for our users. In this article, we go through the principles and implementation of Node.js Two-Factor Authentication (2FA). We do that by using Google Authenticator and a Node.js server.
The source code is available in the GitHub repository in the part-11 branch. Feel free to give it a star.
Implementing Node.js Two-Factor Authentication
With Two-Factor Authentication, the user needs to prove his identity in two ways. A straightforward example of that is using an ATM. You need a bank card – something you possess – and the PIN code – something you know. Another example is combining your regular password with a one-time code that your smartphone generates.
Generating a secret key
First, we need to create a secret key, unique for every user.
For effortless Node.js Two-Factor Authentication handling, we use the speakeasy library. Its first job is to generate a secret key for us.
|
1 |
npm install speakeasy @types/speakeasy |
authentication.service.ts
|
1 2 3 4 5 6 7 8 9 10 11 |
import * as speakeasy from 'speakeasy'; function getTwoFactorAuthenticationCode() { const secretCode = speakeasy.generateSecret({ name: process.env.TWO_FACTOR_AUTHENTICATION_APP_NAME, }); return { otpauthUrl : secretCode.otpauth_url, base32: secretCode.base32, }; } |
Here we add a new environment variable – it determines the name that will be visible in the Google Authenticator application.
There are two essential things that our getTwoFactorAuthenticationCode returns. One of them is the secret code in the base32 format. We use it to validate the identity of the user later.
The second thing is otpauth_url. It is a One Time Password Authentication (OTPA) compatible with Google Authenticator. We can use it to generate a Quick Response (QR) code that we display for the user.
Creating a QR image
Applications like the Google Authenticator allow users to add a page that they authenticate to either by manually entering a key, or scanning a QR code. The latter is way faster and is a standard right now. To generate QR images, we use a library called qrcode.
|
1 |
npm install qrcode @types/qrcode |
The most suitable function for us that it has is called toFileStream. It writes the QR code to a writable stream. An example of such is the response object!
If you want to dive deeper, check out Writable streams, pipes, and the process streams
authentication.service.ts
|
1 2 3 4 5 |
import * as QRCode from 'qrcode'; function respondWithQRCode(data: string, response: Response) { QRCode.toFileStream(response, data); } |
Once we have all of the above, we can create our new endpoint in the authentication controller.
authentication.controller.ts
|
1 2 3 4 5 6 7 8 9 10 11 12 13 14 15 16 17 18 |
private generateTwoFactorAuthenticationCode = async ( request: RequestWithUser, response: express.Response, ) => { const user = request.user; const { otpauthUrl, base32, } = this.authenticationService.getTwoFactorAuthenticationCode(); await this.user.findByIdAndUpdate(user._id, { twoFactorAuthenticationCode: base32, }); this.authenticationService.respondWithQRCode(otpauthUrl, response); } private initializeRoutes() { this.router.post(`${this.path}/2fa/generate`, authMiddleware(), this.generateTwoFactorAuthenticationCode); } |
As you can see, we also save the generated code in the database. It later comes in handy when turning on Two-Factor Authentication. Please note that a user needs to be logged in for it to work.

Since we have the generated code, we can use the Google Authenticator now:
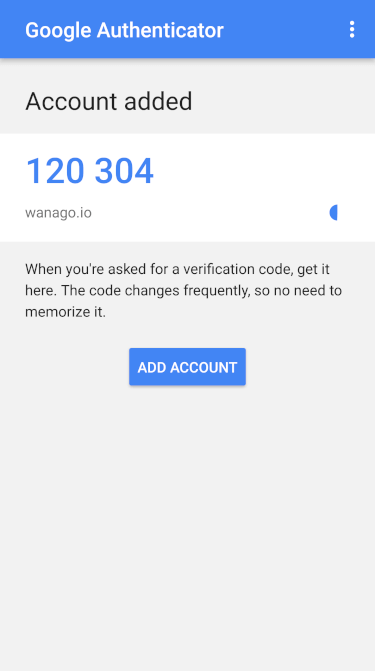
We now have a fully functional workflow of generating a secret code and presenting it to the user!
Turning on Node.js Two-Factor Authentication
Currently, we only generate secret codes, but we haven’t yet turned on the Node.js Two-Factor Authentication for a user. For it to happen, we need a separate endpoint that the user sends his first verification code to. To begin, we need a function that validates the upcoming verification code.
authentication.service.ts
|
1 2 3 4 5 6 7 |
public verifyTwoFactorAuthenticationCode(twoFactorAuthenticationCode: string, user: User) { return speakeasy.totp.verify({ secret: user.twoFactorAuthenticationCode, encoding: 'base32', token: twoFactorAuthenticationCode, }); } |
The speakeasy.totp.verify method verifies our Time-based One-time Password (TOTP) that user got from the Google Authenticator app against the secret code that we generated and saved in the database previously. Once we got that, we can create an endpoint that turns on the Two-Factor Authentication.
authentication.controller.ts
|
1 2 3 4 5 6 7 8 9 10 11 12 13 14 15 16 17 18 19 20 21 22 23 24 25 26 27 28 |
private turnOnTwoFactorAuthentication = async ( request: RequestWithUser, response: express.Response, next: express.NextFunction, ) => { const { twoFactorAuthenticationCode } = request.body; const user = request.user; const isCodeValid = await this.authenticationService.verifyTwoFactorAuthenticationCode( twoFactorAuthenticationCode, user, ); if (isCodeValid) { await this.user.findByIdAndUpdate(user._id, { isTwoFactorAuthenticationEnabled: true, }); response.send(200); } else { next(new WrongAuthenticationTokenException()); } } private initializeRoutes() { this.router.post( `${this.path}/2fa/turn-on`, validationMiddleware(TwoFactorAuthenticationDto), authMiddleware(), this.turnOnTwoFactorAuthentication, ); } |
If you want to know how the validationMiddleware works, check out Error handling and validating incoming data
In the turnOnTwoFactorAuthentication function, we check if the provided code is valid. If that’s the case, we enable the Two-Factor Authentication by setting the isTwoFactorAuthenticationEnabled flag to true.
In this part of the series, we’ve made some minor change to the User model. You can look it up in the repository.
Logging in using our Node.js Two-Factor Authentication
The last part is logging in and authenticating using the Node.js Two-Factor Authentication. To implement it, we use the verifyTwoFactorAuthenticationCode function again. To make it more clear, let’s review the whole flow of authentication:
- The user attempts to log in using his email and a valid password, and we give him a JWT token.
- If he doesn’t have the 2FA turned on, this gives him full access.
- If he does have the 2FA turned on, we provide him with access just to the /2fa/authenticate endpoint.
- The user sends a valid code to the /2fa/authenticate endpoint and is given a new JWT token with full access
That being said, let’s create a new route that allows the user to authenticate using a JWT token.
authentication.controller.ts
|
1 2 3 4 5 6 7 8 9 10 11 12 13 14 15 16 17 18 19 20 21 22 |
private secondFactorAuthentication = async ( request: RequestWithUser, response: express.Response, next: express.NextFunction, ) => { const { twoFactorAuthenticationCode } = request.body; const user = request.user; const isCodeValid = await this.authenticationService.verifyTwoFactorAuthenticationCode( twoFactorAuthenticationCode, user, ); if (isCodeValid) { const tokenData = this.authenticationService.createToken(user, true); response.setHeader('Set-Cookie', [this.createCookie(tokenData)]); response.send({ ...user.toObject(), password: undefined, twoFactorAuthenticationCode: undefined }); } else { next(new WrongAuthenticationTokenException()); } } |
In the code above, we validate the upcoming twoFactorAuthenticationCode. If it is valid, we create and send back a new token. We respond with the user details, excluding the password and the Two-Factor Authentication code. To do this, we modify the createToken function:
authentication.service.ts
|
1 2 3 4 5 6 7 8 9 10 11 12 |
public createToken(user: User, isSecondFactorAuthenticated = false): TokenData { const expiresIn = 60 * 60; // an hour const secret = process.env.JWT_SECRET; const dataStoredInToken: DataStoredInToken = { isSecondFactorAuthenticated, _id: user._id, }; return { expiresIn, token: jwt.sign(dataStoredInToken, secret, { expiresIn }), }; } |
Now the JWT token also carries the information about the Two-Factor Authentication. The only thing left to do is to alter the authMiddleware.
The authMiddleware
We need the authMiddleware to check the isSecondFactorAuthenticated flag and throw an error if it is set to false when the user has 2FA turned on. Also, since there is one endpoint that should work even with the 2FA turned off, we need an option to omit it.
auth.middleware.ts
|
1 2 3 4 5 6 7 8 9 10 11 12 13 14 15 16 17 18 19 20 21 22 23 24 25 26 27 |
function authMiddleware(omitSecondFactor = false): RequestHandler { return async (request: RequestWithUser, response: Response, next: NextFunction) => { const cookies = request.cookies; if (cookies && cookies.Authorization) { const secret = process.env.JWT_SECRET; try { const verificationResponse = jwt.verify(cookies.Authorization, secret) as DataStoredInToken; const { _id: id, isSecondFactorAuthenticated } = verificationResponse; const user = await userModel.findById(id); if (user) { if (!omitSecondFactor && user.isTwoFactorAuthenticationEnabled && !isSecondFactorAuthenticated) { next(new WrongAuthenticationTokenException()); } else { request.user = user; next(); } } else { next(new WrongAuthenticationTokenException()); } } catch (error) { next(new WrongAuthenticationTokenException()); } } else { next(new AuthenticationTokenMissingException()); } }; } |
For a step-by-step explanation of authentication with the email and the password, check out Registering users and authenticating with JWT
In the code above, we demand the isSecondFactorAuthenticated to be true, if the user has the Two-Factor Authentication enabled and the omitSecondFactor flag isn’t set to false.
Now we can use the authMiddleware with the omitSecondFactor flag for the /auth/2fa/authenticate endpoint.
authentication.controller.ts
|
1 2 3 4 5 6 7 8 |
private initializeRoutes() { this.router.post( `${this.path}/2fa/authenticate`, validationMiddleware(TwoFactorAuthenticationDto), authMiddleware(true), this.secondFactorAuthentication, ); } |
Modify the basic logging in logic
So far, the /auth/login acts the same way regardless of the 2FA being turned on or not. Let’s modify it by responding just with the isTwoFactorAuthenticationEnabled flag if it is turned on. Thanks to that, we don’t give the details of a user just yet. We also avoid sending the twoFactorAuthenticationCode.
|
1 2 3 4 5 6 7 8 9 10 11 12 13 14 15 16 17 18 19 20 21 22 23 24 |
private loggingIn = async (request: express.Request, response: express.Response, next: express.NextFunction) => { const logInData: LogInDto = request.body; const user = await this.user.findOne({ email: logInData.email }); if (user) { const isPasswordMatching = await bcrypt.compare(logInData.password, user.password); if (isPasswordMatching) { user.password = undefined; user.twoFactorAuthenticationCode = undefined; const tokenData = this.authenticationService.createToken(user); response.setHeader('Set-Cookie', [this.createCookie(tokenData)]); if (user.isTwoFactorAuthenticationEnabled) { response.send({ isTwoFactorAuthenticationEnabled: true, }); } else { response.send(user); } } else { next(new WrongCredentialsException()); } } else { next(new WrongCredentialsException()); } } |
Summary
By doing all of the above, we set up a basic flow for the Node.js Two-Factor Authentication. We implement a way to generate a secret key and a QR image, turn on the Two-Factor Authentication, and validate upcoming requests. It might use some tweaks, like additional error handling, and a way for the users to deal with a lost device. This article covers just one way to implement Node.js 2FA. Feel free to change the flow and implement additional features, if needed.

Really good job Man!
I’d consider increasing width of scrollbar because it’s not useful 🙂
And one more thing!
More like a suggestion for future 🙂
That would be great if You could show to dockerize this kind of app, altogether with postgres and mongo 🙂
Already noticed that it’s done 😀
Sr you can write tutorial about GraphQl ? thanks
Thanks you so much Bro, There are all great blogs! <3
Thanks you