In this article, we cover another feature that we can implement with the help of Service Workers – Push Notifications. They come in handy if we need a fast channel of communicating with our users. We not only learn how to implement them in terms of code, but we also explore the User Experience side of it.
Introducing Push Notifications
The history of web development contains a lot of different ways of displaying popup messages for the users of our page. We came a long way from using the window.alert() and we have many new possibilities. With Push Notifications, we can push them locally when our application is opened. We can also do it from the server, even if our application closes. To do that, in this article, we use Service Workers and a simple server written in Node.js.
If you want to check out the essentials of the Service Workers, check out The basics of Service Workers: how should our application behave when offline?
When and how to ask for permission
Before showing any notifications, we need to ask for permission first. We do it outside of any Service Worker, in our regular JavaScript code.
|
1 2 3 4 5 |
if (window.Notification) { Notification.requestPermission((status) => { console.log('Status of the request:', status); }); } |
The Notification.requestPermission now also returns a promise in browsers like Chrome and Firefox, but Safari uses only a callback
The code above opens a popup asking for permission. The choice of a user is stored so that he is not asked again. You can check out his decision in the Notification.permission parameter.
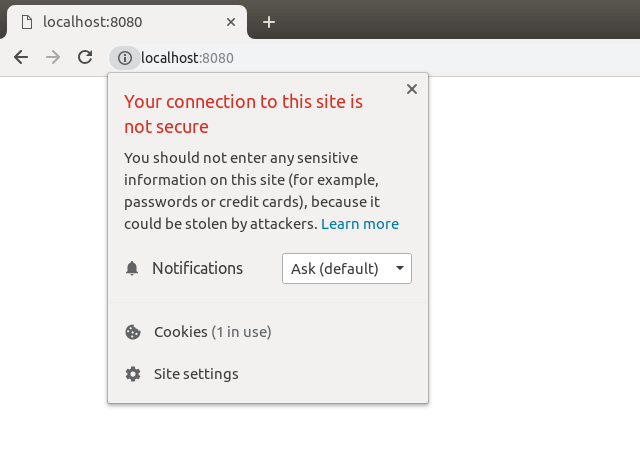
If the user changes his mind about notifications, he can easily change the settings by clicking an icon next to the address bar:

In the screenshot above you can see a piece of information stating that our connection is not secure. To improve on that, we would need to use HTTPS. If you would like to know more on that topic, check out Implementing HTTPS with our own OpenSSL certificate
The big question in terms of User Experience is: should we ask our users for permissions right away? The chances are that when you find yourself in a situation like that, you instantly deny it. The above happens if we lack the context. Let the user know, why would you like to display some notifications for him.
Sometimes it might be obvious: for example when you are visiting some messaging application. Then, the user can safely guess that we want to notify him of any messages that he might receive.
Another example is an e-commerce application. Many users would consider notifications from a site like that to be just noise and spam if asked right away. On the other hand, if you display a permission popup when somebody makes a bid on an auction, the user might see some value in it and would want to be notified if he is not the highest bidder anymore. Remember that once someone denies permission to be presented with notifications, he needs to change it in the settings later explicitly: we can’t ask him again until then.
Sending Push Notifications locally
Once we got our permission, we can start displaying notifications. To do that, we need an active service worker.
index.js
|
1 2 3 4 5 6 7 8 9 10 |
if (window.Notification) { Notification.requestPermission(() => { if (Notification.permission === 'granted') { navigator.serviceWorker.register('./worker.js') .then((worker) => { worker.showNotification('Hello world!'); }); } }); } |
For now, the worker.js file can be blank.
The navigator.serviceWorker.register('./worker.js') does not register a new worker, if it already exits.
And just like that, we’ve got our first notification! By default, the showNotification function displays a basic notification. You can pass some more arguments to it, for example, to display an icon. It can also make some sounds or vibrations, depending on the platform.
We can also do some more fancy things with our notifications, for example, we can attach click events to the notifications.
worker.js
|
1 2 3 |
self.addEventListener('notificationclick', () => { console.log('Clicked!'); }); |
Please note that this is inside of the worker.js file
One of the more interesting things that we can do is that we can define what buttons do we want on our notification popup. To do this, we use the actions property:
|
1 2 3 4 5 6 7 8 9 10 11 12 13 14 |
worker.showNotification('A new message!', { actions: [ { action: 'show', title: 'Show it', icon: '/check.png' }, { action: 'ignore', title: 'Ignore it', icon: '/delete.png' } ] }) |

The design of the notification popup depends on the platform
We can check which button is clicked in the notificationclick event and react accordingly.
worker.js
|
1 2 3 4 5 6 7 8 9 10 11 12 13 14 15 16 17 |
self.addEventListener('notificationclick', (event) => { if (!event.action) { console.log('No button clicked'); return; } switch (event.action) { case 'show': console.log('User wants to see more'); break; case 'ignore': console.log('User wants to ignore the notification'); break; default: console.log(`The ${event.action} action is unknown`); break; } }); |
Sending Push Notifications from the server
In this article, to send push notifications, we use a Node.js server.
An essential thing to keep in mind is that the data needs to be encrypted. An excellent tool for that is the web-push library. To authenticate we need a public and a private VAPID key: the web-push library can generate it for us. Let’s make a separate application that is going to serve as our backend.
|
1 |
npm install web-push |
|
1 |
./node_modules/web-push/src/cli.js generate-vapid-keys |
You can also install the web-push library globall instead of running it from the node_modules
After running the commands above, we are presented with both the private and the public key. To place them in the env variables, we use the dotenv library.
If you would like to know more about env variables in Node.js, check out MongoDB, models and environment variables, that is a part of my Node.js Express series
|
1 2 3 4 5 6 7 |
require('dotenv/config'); const webpush = require('web-push'); const publicVapidKey = process.env.PUBLIC_VAPID_KEY; const privateVapidKey = process.env.PRIVATE_VAPID_KEY; webpush.setVapidDetails('mailto:marcin@wanago.io', publicVapidKey, privateVapidKey); |
The first argument of the setVapidDetails function is called a subject. It provides a point of contact in case the push service needs to contact the sender.
Subscribing to the notifications
For our frontend to subscribe to the notifications, I’ll create an endpoint using Express.
|
1 2 3 4 5 6 7 8 9 10 11 12 13 14 15 16 17 18 19 20 21 22 23 |
const express = require('express'); const cors = require('cors'); const bodyParser = require('body-parser'); const webpush = require('web-push'); const app = express(); app.use(bodyParser.json()); app.use(cors({ origin: 'http://localhost:8080' })); app.post('/subscribe', (req, res) => { const subscription = req.body; res.send(200); let i = 0; setInterval(() => { const payload = JSON.stringify({ title: `Hello!`, body: i++ }); webpush.sendNotification(subscription, payload); }, 500); }); app.listen(5000); |
In this elementary example, I start spamming the user with multiple notifications for the sake of presentation.
If you would like to know how to create a REST API, check out my Express Typescript series
Once the endpoint is ready, we can use it on the frontend.
index.js
|
1 |
const publicVapidKey = 'BEp878ZAJNHopeGksuSt5CtLL2iysV_uSskw7rvgbQIuqOC_UAlPEbbMLUtqfOdDi7ugqfeplwS7Is2dWJA7boc'; |
|
1 2 3 4 5 6 7 8 |
if (window.Notification) { Notification.requestPermission(() => { if (Notification.permission === 'granted') { getSubscriptionObject() .then(subscribe) } }); } |
|
1 2 3 4 5 6 7 8 9 |
function getSubscriptionObject() { return navigator.serviceWorker.register('./worker.js') .then((worker) => { return worker.pushManager .subscribe({ applicationServerKey: urlBase64ToUint8Array(publicVapidKey) }); }); } |
In the function above we create a subscription object. We now need to send it to our endpoint.
The urlBase64ToUint8Array is taken from the example from the web-push documentation
|
1 2 3 4 5 6 7 8 9 |
function subscribe(subscription) { return fetch('http://localhost:5000/subscribe', { method: 'POST', body: JSON.stringify(subscription), headers: { 'content-type': 'application/json' } }); } |
Now the only thing left to do is to create the worker:
worker.js
|
1 2 3 4 5 6 |
self.addEventListener('push', event => { const data = event.data.json(); self.registration.showNotification(data.title, { body: data.body, }); }); |
Every time we get the notification from the backend, the push event triggers. When that happens, we display the notifications.
The result
All of the code from above results in displaying multiple notifications, because the backend keeps sending them to us.

Even if we close the tab, the notifications keep coming, because they are independent.
Summary
In this article, we’ve covered Push Notifications. It included how and when to ask for permissions and how to display popups with notifications. Aside from that, we’ve also implemented a simple Node.js server that we can connect to and get notifications from. Thanks to that, we’ve learned yet another feature that Service Workers make possible.

If worker.js is blank the console reports: Unhandled Promise Rejection: TypeError: worker.showNotification is not a function. (In ‘worker.showNotification(‘Hello world!’)’, ‘worker.showNotification’ is undefined) otherwise I would know what to put into it.
The issue with chrome was due to the directory ownership.
self.addEventListener(‘notificationclick’, (event) => {
in worker.js is never called.