- 1. TypeScript Express tutorial #1. Middleware, routing, and controllers
- 2. TypeScript Express tutorial #2. MongoDB, models and environment variables
- 3. TypeScript Express tutorial #3. Error handling and validating incoming data
- 4. TypeScript Express tutorial #4. Registering users and authenticating with JWT
- 5. TypeScript Express tutorial #5. MongoDB relationships between documents
- 6. TypeScript Express tutorial #6. Basic data processing with MongoDB aggregation
- 7. TypeScript Express tutorial #7. Relational databases with Postgres and TypeORM
- 8. TypeScript Express tutorial #8. Types of relationships with Postgres and TypeORM
- 9. TypeScript Express tutorial #9. The basics of migrations using TypeORM and Postgres
- 10. TypeScript Express tutorial #10. Testing Express applications
- 11. TypeScript Express tutorial #11. Node.js Two-Factor Authentication
- 12. TypeScript Express tutorial #12. Creating a CI/CD pipeline with Travis and Heroku
- 13. TypeScript Express tutorial #13. Using Mongoose virtuals to populate documents
- 14. TypeScript Express tutorial #14. Code optimization with Mongoose Lean Queries
- 15. TypeScript Express tutorial #15. Using PUT vs PATCH in MongoDB with Mongoose
Today our tutorial takes a bit of a turn as we look into relational databases, Postgres in particular. In this article, we go through setting up an environment with Express Postgres. We also set up the pgAdmin platform so that we get an overview of our database. In the upcoming parts of the tutorial, we focus on drawbacks and advantages of using Postgres.
As always, the code for the tutorial is in the express-typescript repository. The master branch still contains the version with MongoDB, while you can find the code for upcoming parts of the tutorial in the postgres branch. Feel free to give the repo a star.
Creating the Express Postgres connection
In this tutorial, we use Docker to set up a running Postgres database. You need to install Docker, as well as Docker Compose.
Preparing the environment with Docker
To run it, create a docker-compose file:
docker-compose.yml
|
1 2 3 4 5 6 7 8 9 10 11 12 13 14 15 16 17 18 19 20 21 22 23 24 25 26 27 28 29 30 31 |
version: "3" services: postgres: container_name: postgres image: postgres:latest ports: - "5432:5432" volumes: - /data/postgres:/data/postgres env_file: - docker.env networks: - postgres pgadmin: links: - postgres:postgres container_name: pgadmin image: dpage/pgadmin4 ports: - "8080:80" volumes: - /data/pgadmin:/root/.pgadmin env_file: - docker.env networks: - postgres networks: postgres: driver: bridge |
The configuration above runs both the Postgres database and the pgAdmin console that gets you an overview of the state of your database and lets you make changes to it.
We also need to create the docker.env file that contains variables used by our Docker containers. It should not be committed, thus we add it to the .gitignore file.
docker.env
|
1 2 3 4 5 |
POSTGRES_USER=admin POSTGRES_PASSWORD=admin POSTGRES_DB=tutorial PGADMIN_DEFAULT_EMAIL=admin@admin.com PGADMIN_DEFAULT_PASSWORD=admin |
The only thing left to do is to run our containers from the console. To do that, go into the directory of the project and run:
|
1 |
docker-compose up |
Making the Express Postgres connection
In this tutorial, we use TypeORM that works well with TypeScript. Let’s install all needed components!
|
1 |
npm install typeorm reflect-metadata pg |
The first thing to do is to create the ormconfig.ts file with our configuration:
src/ormconfig.ts
|
1 2 3 4 5 6 7 8 9 10 11 12 13 14 15 16 |
import { ConnectionOptions } from 'typeorm'; const config: ConnectionOptions = { type: 'postgres', host: process.env.POSTGRES_HOST, port: Number(process.env.POSTGRES_PORT), username: process.env.POSTGRES_USER, password: process.env.POSTGRES_PASSWORD, database: process.env.POSTGRES_DB, entities: [ __dirname + '/../**/*.entity{.ts,.js}', ], synchronize: true, }; export default config; |
The synchronize flag is very important and we will surely cover it in the near future
Please note that these are environment variables from the server and not the docker, so we need to add them to the .env file:
.env
|
1 2 3 4 5 6 |
POSTGRES_HOST=localhost POSTGRES_PORT=5432 POSTGRES_USER=admin POSTGRES_PASSWORD=admin POSTGRES_DB=tutorial PORT=5000 |
Since we got that down, let’s connect to the database.
src/server.ts
|
1 2 3 4 5 6 7 8 9 10 11 12 13 14 15 16 17 18 19 20 21 22 23 24 |
import 'dotenv/config'; import 'reflect-metadata'; import { createConnection } from 'typeorm'; import App from './app'; import config from './ormconfig'; import PostController from './post/post.controller'; import validateEnv from './utils/validateEnv'; validateEnv(); (async () => { try { await createConnection(config); } catch (error) { console.log('Error while connecting to the database', error); return error; } const app = new App( [ new PostController(), ], ); app.listen(); })(); |
Saving and retrieving data with Express Postgres
When we have the connection to the database up and running, we can finally interact with it in our application.
Entity
One of the most important concepts when using Express Postgres with TypeOrm is the entity. It is a class that maps to a database table. To define it, we use the Entity decorator:
src/post/post.entity.ts
|
1 2 3 4 5 6 7 8 9 10 11 12 13 14 15 |
import { Column, Entity, PrimaryGeneratedColumn } from 'typeorm'; @Entity() class Post { @PrimaryGeneratedColumn() public id?: number; @Column() public title: string; @Column() public content: string; } export default Post; |
The PrimaryGeneratedColumn decorator creates a primary column which value is generated with an auto-increment value. It contains primary keys that are used to identify a row uniquely in a table.
The Column decorator creates a column in the database. You can specify additional options, like type, or let TypeORM figure it out based on the type of property – this works thanks to the reflect-metadata package that we’ve installed and imported in the server.ts file. We dive into additional options later.
Repository
Now we can use our entity in the post controller. The first thing to do is to use the getRepository function to access the repository of our entity. The repo itself is a part of the EntityManager, which is a collection of all repositories.
|
1 |
private postRepository = getRepository(Post); |
The repository has a set of functions that let you interact with your entities. The basics of using the repository are similar to Mongoose that we covered before.
With the create function we can create a new instance of a Post. It accepts an object with properties of our newly created Post. The instance can afterward be saved using the save function.
|
1 2 3 4 5 6 |
private createPost = async (request: express.Request, response: express.Response) => { const postData: CreatePostDto = request.body; const newPost = this.postRepository.create(postData); await this.postRepository.save(newPost); response.send(newPost); } |
To retrieve multiple instances we use the find function. If not given any options, it returns all elements.
|
1 2 3 4 |
private getAllPosts = async (request: express.Request, response: express.Response) => { const posts = await this.postRepository.find(); response.send(posts); } |
To get just one instance we use the findOne function. If given a number it returns a record with such id. If the result is undefined, it means that the record was not found.
|
1 2 3 4 5 6 7 8 9 |
private getPostById = async (request: express.Request, response: express.Response, next: express.NextFunction) => { const id = request.params.id; const post = await this.postRepository.findOne(id); if (post) { response.send(post); } else { next(new PostNotFoundException(id)); } } |
To modify an existing post, we use the update function. Afterward, we use the findOne function to return the modified instance.
|
1 2 3 4 5 6 7 8 9 10 11 |
private modifyPost = async (request: express.Request, response: express.Response, next: express.NextFunction) => { const id = request.params.id; const postData: Post = request.body; await this.postRepository.update(id, postData); const updatedPost = await this.postRepository.findOne(id); if (updatedPost) { response.send(updatedPost); } else { next(new PostNotFoundException(id)); } } |
To delete a post, we use the delete function.
|
1 2 3 4 5 6 7 8 9 |
private deletePost = async (request: express.Request, response: express.Response, next: express.NextFunction) => { const id = request.params.id; const deleteResponse = await this.postRepository.delete(id); if (deleteResponse.raw[1]) { response.sendStatus(200); } else { next(new PostNotFoundException(id)); } } |
If you look into the documentation of the DELETE command, you can see that it returns the count of removed records. This data is stored in the deleteResponse.raw[1]. If it is zero, we assume that the post wasn’t found.
Putting everything together, the controller looks like that:
|
1 2 3 4 5 6 7 8 9 10 11 12 13 14 15 16 17 18 19 20 21 22 23 24 25 26 27 28 29 30 31 32 33 34 35 36 37 38 39 40 41 42 43 44 45 46 47 48 49 50 51 52 53 54 55 56 57 58 59 60 61 62 63 64 65 66 67 68 69 70 71 |
import * as express from 'express'; import { getRepository } from 'typeorm'; import PostNotFoundException from '../exceptions/PostNotFoundException'; import Controller from '../interfaces/controller.interface'; import validationMiddleware from '../middleware/validation.middleware'; import CreatePostDto from './post.dto'; import Post from './post.entity'; class PostController implements Controller { public path = '/posts'; public router = express.Router(); private postRepository = getRepository(Post); constructor() { this.initializeRoutes(); } private initializeRoutes() { this.router.post(this.path, validationMiddleware(CreatePostDto), this.createPost); this.router.get(this.path, this.getAllPosts); this.router.get(`${this.path}/:id`, this.getPostById); this.router.patch(`${this.path}/:id`, validationMiddleware(CreatePostDto, true), this.modifyPost); this.router.delete(`${this.path}/:id`, this.deletePost); } private createPost = async (request: express.Request, response: express.Response) => { const postData: CreatePostDto = request.body; const newPost = this.postRepository.create(postData); await this.postRepository.save(newPost); response.send(newPost); } private getAllPosts = async (request: express.Request, response: express.Response) => { const posts = await this.postRepository.find(); response.send(posts); } private getPostById = async (request: express.Request, response: express.Response, next: express.NextFunction) => { const id = request.params.id; const post = await this.postRepository.findOne(id); if (post) { response.send(post); } else { next(new PostNotFoundException(id)); } } private modifyPost = async (request: express.Request, response: express.Response, next: express.NextFunction) => { const id = request.params.id; const postData: Post = request.body; await this.postRepository.update(id, postData); const updatedPost = await this.postRepository.findOne(id); if (updatedPost) { response.send(updatedPost); } else { next(new PostNotFoundException(id)); } } private deletePost = async (request: express.Request, response: express.Response, next: express.NextFunction) => { const id = request.params.id; const deleteResponse = await this.postRepository.delete(id); if (deleteResponse.raw[1]) { response.sendStatus(200); } else { next(new PostNotFoundException(id)); } } } export default PostController; |
Using pgAdmin
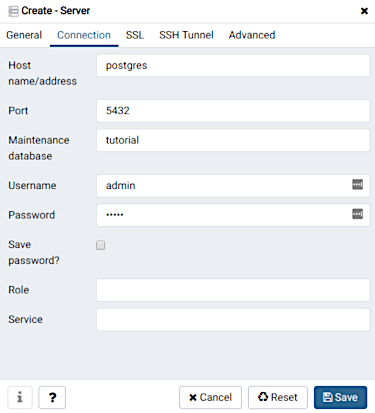
Thanks to the way we wrote our docker-compose.yml, we have the interface for managing our database available. To use it, go to http://localhost:8080 and provide the same credentials than you did in the docker.env file. When you’re in, you can create a new server connection.
The tricky part about it is that the address of the host is not “localhost”, but “postgres” like in the screenshot above. This string is the alias of the service that we defined in the docker-compose.yml.
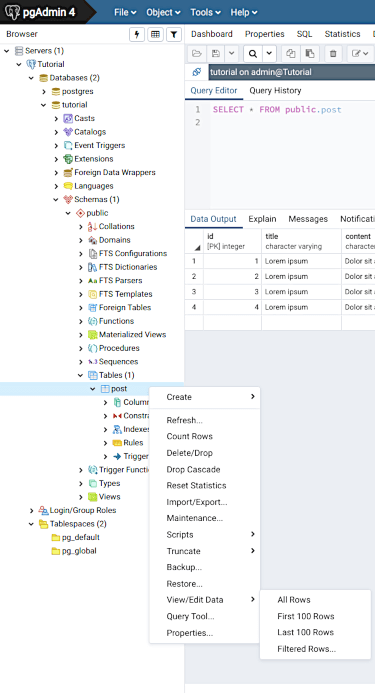
If you posted some data before, you could view it here. To do that, use the left sidebar menu:
As we go deeper into Express Postgres, the pgAdmin will prove to be very useful in monitoring the stare of our database, so it is definitely worth setting up.
Summary
In this article, we covered the basics of creating an Express Postgres project with TypeScript and TypeORM. It included setting up a Docker configuration and connecting to the database in our Express Typescript application. We also went through the basic concepts of using the Postgres database with TypeORM, like the entity. To be able to monitor our database we did set up the pgAdmin platform. In the upcoming parts of the tutorial we will focus on more Postgres features, so stay tuned!


TSError: ⨯ Unable to compile TypeScript
src\middleware\validation.middleware.ts (16,53): Property ‘values’ does not exist on type ‘ObjectConstructor’. (2339)
CreatePostDto : @IsNumber()
public id: number;
@IsString()
public content: string;
@IsString()
public title: string;
post entity:
@PrimaryGeneratedColumn()
public id?: number;
@Column()
public title: string;
@Column()
public content: string;
something wrong?