
- 1. TypeScript Express tutorial #1. Middleware, routing, and controllers
- 2. TypeScript Express tutorial #2. MongoDB, models and environment variables
- 3. TypeScript Express tutorial #3. Error handling and validating incoming data
- 4. TypeScript Express tutorial #4. Registering users and authenticating with JWT
- 5. TypeScript Express tutorial #5. MongoDB relationships between documents
- 6. TypeScript Express tutorial #6. Basic data processing with MongoDB aggregation
- 7. TypeScript Express tutorial #7. Relational databases with Postgres and TypeORM
- 8. TypeScript Express tutorial #8. Types of relationships with Postgres and TypeORM
- 9. TypeScript Express tutorial #9. The basics of migrations using TypeORM and Postgres
- 10. TypeScript Express tutorial #10. Testing Express applications
- 11. TypeScript Express tutorial #11. Node.js Two-Factor Authentication
- 12. TypeScript Express tutorial #12. Creating a CI/CD pipeline with Travis and Heroku
- 13. TypeScript Express tutorial #13. Using Mongoose virtuals to populate documents
- 14. TypeScript Express tutorial #14. Code optimization with Mongoose Lean Queries
- 15. TypeScript Express tutorial #15. Using PUT vs PATCH in MongoDB with Mongoose
Today we cover an essential part of almost every application: registering users and authenticating them. To implement it, we use JSON Web Tokens (JWT). Instead of getting help from libraries like Passport, we build everything from the ground up to get the best understanding of how it works. As always, all of the code is available in the express-typescript repository. Feel free to give it a star if you find it helpful.
Registration
To start things up we create the User interface and model.
src/users/user.interface.ts
|
1 2 3 4 5 6 7 |
interface User { name: string; email: string; password: string; } export default User; |
src/users/user.model.ts
|
1 2 3 4 5 6 7 8 9 10 11 12 |
import * as mongoose from 'mongoose'; import User from './user.interface'; const userSchema = new mongoose.Schema({ name: String, email: String, password: String, }); const userModel = mongoose.model<User & mongoose.Document>('User', userSchema); export default userModel; |
Hashing
A catch here is that we don’t want to save the passwords in plain text! Imagine your database getting breached and all the passwords leaking out. Not good!
The purpose of a hashing algorithm is to turn one string into another string. If you change just one character in a string, the hash is entirely different. The most important thing is that it is a one-way operation: it can’t be reversed easily. When the user attempts to log in, you can hash his password again and compare with the one saved in the database.
Hashing the same string twice gives the same result. To prevent users that have the same password from having the same hash, we use salt. It is a random string that is added to the original password to achieve a different result each time. It should be different for each password.
Bcrypt
In this article, we use a bcrypt hashing algorithm implemented by the bcrypt npm package. It takes care of hashing the strings, comparing plain text strings with hashes and appending salt. Using it we define salt rounds. It is basically a cost factor: it controls the time needed to receive an output hash. Increasing the cost factor by one doubles the time. The more significant the cost factor, the more difficult is reversing the hash by brute-forcing. The salt that’s used for hashing someone’s password is a part of the saved hash itself, so no need to keep it separately.
|
1 2 |
npm install bcrypt npm install --save-dev @types/bcrypt |
|
1 2 3 4 5 |
const passwordInPlainText = '12345678'; const hashedPassword = await bcrypt.hash(passwordInPlaintext, 10); const doPasswordsMatch = await bcrypt.compare(passwordInPlaintext, hashedPassword); console.log(doPasswordsMatch); // true |
Generally speaking, an amount of 10 salt rounds should be fine. As you can see the hashing and comparing strings is asynchronous – this is because the hashing done by bcrypt is intensive for the CPU and hashing strings it synchronously would block the application. Our bcrypt implementation uses a thread pool that allows the algorithm to run in an additional thread. Thanks to that, our app is free to do other tasks while waiting for the hash to be generated.
In this example I use async/await. If you would like to know more about it, check out Explaining async/await. Creating dummy promises
Registration and logging in implementation
Knowing all that we can implement the basics of registration and logging in functionalities.
src/authentication/authentication.controller.ts
|
1 2 3 4 5 6 7 8 9 10 11 12 13 14 15 16 17 18 19 20 21 22 23 24 25 26 27 28 29 30 31 32 33 34 35 36 37 38 39 40 41 42 43 44 45 46 47 48 49 50 51 52 53 54 55 56 57 58 59 |
import * as bcrypt from 'bcrypt'; import * as express from 'express'; import UserWithThatEmailAlreadyExistsException from '../exceptions/UserWithThatEmailAlreadyExistsException'; import WrongCredentialsException from '../exceptions/WrongCredentialsException'; import Controller from '../interfaces/controller.interface'; import validationMiddleware from '../middleware/validation.middleware'; import CreateUserDto from '../users/user.dto'; import userModel from './../users/user.model'; import LogInDto from './logIn.dto'; class AuthenticationController implements Controller { public path = '/auth'; public router = express.Router(); private user = userModel; constructor() { this.initializeRoutes(); } private initializeRoutes() { this.router.post(`${this.path}/register`, validationMiddleware(CreateUserDto), this.registration); this.router.post(`${this.path}/login`, validationMiddleware(LogInDto), this.loggingIn); } private registration = async (request: express.Request, response: express.Response, next: express.NextFunction) => { const userData: CreateUserDto = request.body; if ( await this.user.findOne({ email: userData.email }) ) { next(new UserWithThatEmailAlreadyExistsException(userData.email)); } else { const hashedPassword = await bcrypt.hash(userData.password, 10); const user = await this.user.create({ ...userData, password: hashedPassword, }); user.password = undefined; response.send(user); } } private loggingIn = async (request: express.Request, response: express.Response, next: express.NextFunction) => { const logInData: LogInDto = request.body; const user = await this.user.findOne({ email: logInData.email }); if (user) { const isPasswordMatching = await bcrypt.compare(logInData.password, user.password); if (isPasswordMatching) { user.password = undefined; response.send(user); } else { next(new WrongCredentialsException()); } } else { next(new WrongCredentialsException()); } } } export default AuthenticationController; |
In this example the return of this.user.create and this.user.findOne is a MongoDB document. The actual data is represented in user._doc and user.password is just a getter that returns the data from user._doc.password. To prevent sending the password back with a response you could also do delete user._doc.password, but setting the user.password to undefined also does the trick and there is no trace of the password in the response.
I created a few additional files along the way, such as exceptions and DTO classes used for validation that we covered in the previous part of the tutorial. You can check them out in the repository. In the AuthenticationController above we created two route handlers: /auth/register and /auth/login with some basic error handling, such as not allowing more than one person with the same email.
A thing worth noticing is that we don’t make it clear whether it was the username or the password that the user got wrong when attempting to log in. Thanks to displaying a generic error message we prevent potential attackers from getting to know any valid usernames without knowing the passwords.
In the example, we create new users and let them access their data. The crucial thing to implement now is a way for them to authenticate to other parts of our application.
Authentication with JWT tokens
We want to restrict the access to certain parts of our application so that only registered users can use it. In the application that we are using as an example, such a part is creating posts. To implement it we need to create a certain way for users to authenticate and let us know that the request that they send is legitimate. A simple way to do it is with the usage of JSON Web Tokens. JWT is a piece of JSON data that is signed on our server using a secret key when the user is logged in and then sent to him in. When he makes other requests, he sends this token in the headers so that we can encode it back using the same secret key. If the token is valid, we know who the user that made the request is.
Signing tokens
The first thing to implement is creating the tokens. To do this, we use an implementation of JSON Web Tokens available in the NPM.
|
1 2 |
npm install jsonwebtoken npm install --save-dev @types/jsonwebtoken |
|
1 2 3 4 |
interface TokenData { token: string; expiresIn: number; } |
|
1 2 3 |
interface DataStoredInToken { _id: string; } |
|
1 2 3 4 5 6 7 8 9 10 11 |
private createToken(user: User): TokenData { const expiresIn = 60 * 60; // an hour const secret = process.env.JWT_SECRET; const dataStoredInToken: DataStoredInToken = { _id: user._id, }; return { expiresIn, token: jwt.sign(dataStoredInToken, secret, { expiresIn }), }; } |
To the environment variables covered in the previous part of the tutorial, we added the JWT secret key. It can be any string but remember not to share it with anyone because using it they would be able to encode and decode tokens in your application. To generate a token we also should set its expiry time to increase security – this is because if someone’s token is stolen, the attacker has access to the application similar as if he would have the username and the password. Thanks to setting an expiry time, the issue is a bit smaller because the token expires soon anyway.
In the example above we encode the id of a user in the token so that when he authenticates, we know who he is. You could put more data there such as the name of the user to avoid fetching it from the database, but if the user changes for example his name, the data in the token wouldn’t be up-to-date until a new token is created.
Now we can update the code of our AuthenticationController.
|
1 2 3 4 5 6 7 8 9 10 11 12 13 14 15 16 17 18 19 20 21 22 23 24 25 26 27 28 29 30 31 32 33 34 35 36 37 38 39 40 |
private registration = async (request: express.Request, response: express.Response, next: express.NextFunction) => { const userData: CreateUserDto = request.body; if ( await this.user.findOne({ email: userData.email }) ) { next(new UserWithThatEmailAlreadyExistsException(userData.email)); } else { const hashedPassword = await bcrypt.hash(userData.password, 10); const user = await this.user.create({ ...userData, password: hashedPassword, }); user.password = undefined; const tokenData = this.createToken(user); response.setHeader('Set-Cookie', [this.createCookie(tokenData)]); response.send(user); } } private loggingIn = async (request: express.Request, response: express.Response, next: express.NextFunction) => { const logInData: LogInDto = request.body; const user = await this.user.findOne({ email: logInData.email }); if (user) { const isPasswordMatching = await bcrypt.compare(logInData.password, user.password); if (isPasswordMatching) { user.password = undefined; const tokenData = this.createToken(user); response.setHeader('Set-Cookie', [this.createCookie(tokenData)]); response.send(user); } else { next(new WrongCredentialsException()); } } else { next(new WrongCredentialsException()); } } private createCookie(tokenData: TokenData) { return `Authorization=${tokenData.token}; HttpOnly; Max-Age=${tokenData.expiresIn}`; } |
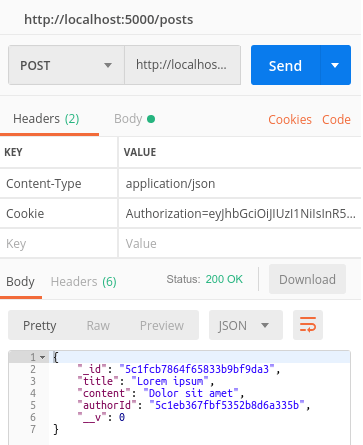
When the user registers or logs in, we create the token and send it to him with the request in the Set-Cookie header.
If you would like to know more about cookies and why should we use the HttpOnly directive, check out Cookies: explaining document.cookie and the Set-Cookie header
Validating the token using middleware
We now expect our users to send the JWT in the form of cookies along with every request that they make. Since the cookie is just a simple string, for our convenience we use the cookie middleware that transforms it into an object.
|
1 2 |
npm install cookie-parser npm install --save-dev @types/cookie-parser |
src/app.ts
|
1 2 3 4 5 6 7 8 9 10 11 12 |
import * as cookieParser from 'cookie-parser'; import * as express from 'express'; class App { public app: express.Application; // (...) private initializeMiddlewares() { this.app.use(bodyParser.json()); this.app.use(cookieParser()); } |
Thanks to cookie-parser we have the contents of the cookies accessible through request.cookies.
Now we can create the middleware that checks the JWT token that the user sends. If the operation succeeds, the function appends the user data to the request object.
src/interfaces/requestWithUser.interface.ts
|
1 2 3 4 5 6 7 8 |
import { Request } from 'express'; import User from 'users/user.interface'; interface RequestWithUser extends Request { user: User; } export default RequestWitUser; |
src/middleware/auth.middleware.ts
|
1 2 3 4 5 6 7 8 9 10 11 12 13 14 15 16 17 18 19 20 21 22 23 24 25 26 27 28 29 30 31 |
import { NextFunction, Response } from 'express'; import * as jwt from 'jsonwebtoken'; import AuthenticationTokenMissingException from '../exceptions/AuthenticationTokenMissingException'; import WrongAuthenticationTokenException from '../exceptions/WrongAuthenticationTokenException'; import DataStoredInToken from '../interfaces/dataStoredInToken'; import RequestWithUser from '../interfaces/requestWithUser.interface'; import userModel from '../users/user.model'; async function authMiddleware(request: RequestWithUser, response: Response, next: NextFunction) { const cookies = request.cookies; if (cookies && cookies.Authorization) { const secret = process.env.JWT_SECRET; try { const verificationResponse = jwt.verify(cookies.Authorization, secret) as DataStoredInToken; const id = verificationResponse._id; const user = await userModel.findById(id); if (user) { request.user = user; next(); } else { next(new WrongAuthenticationTokenException()); } } catch (error) { next(new WrongAuthenticationTokenException()); } } else { next(new AuthenticationTokenMissingException()); } } export default authMiddleware; |
The function above verifies the JWT token using the same secret string that we used to create it. If the token is wrong, or it expired, the jwt.verify function throws an error and we need to catch it.
Using the authentication middleware
We can use the middleware above in a few ways. One of them would be to apply it to a whole controller.
|
1 |
this.router.use(this.path, authMiddleware); |
The issue with this is that we want everyone to be able to see our posts, guests included. We can apply the middleware for a specific handler:
|
1 |
this.router.post(this.path, authMiddleware, validationMiddleware(CreatePostDto), this.createPost); |
That would mean adding it to every handler separately. To make our code shorter, we can create a chain of route handlers.
|
1 2 3 4 5 6 7 8 9 |
private initializeRoutes() { this.router.get(this.path, this.getAllPosts); this.router.get(`${this.path}/:id`, this.getPostById); this.router .all(`${this.path}/*`, authMiddleware) .patch(`${this.path}/:id`, validationMiddleware(CreatePostDto, true), this.modifyPost) .delete(`${this.path}/:id`, this.deletePost) .post(this.path, authMiddleware, validationMiddleware(CreatePostDto), this.createPost); } |
Using the route.all in such a way applies the middleware only to the route handlers in the chain that match the `${this.path}/*` route, including POST /posts.
Now the user data is available in the createPost function. Let’s use it to save the id of the post author.
|
1 2 3 4 5 6 7 8 9 |
private createPost = async (request: RequestWithUser, response: express.Response) => { const postData: CreatePostDto = request.body; const createdPost = new this.post({ ...postData, authorId: request.user._id, }); const savedPost = await createdPost.save(); response.send(savedPost); } |
Logging out
The thing with JWT is that it is stateless. It means that you can’t set the token to be invalid on demand. The easiest way is just to implement logging out as removing the token from a browser. Since the cookies storing the token are HttpOnly, we create an endpoint that serves that purpose.
|
1 2 3 4 5 6 7 8 |
private initializeRoutes() { this.router.post(`${this.path}/logout`, this.loggingOut); } private loggingOut = (request: express.Request, response: express.Response) => { response.setHeader('Set-Cookie', ['Authorization=;Max-age=0']); response.send(200); } |
After requesting this endpoint from the browser, the cookie is removed. The issue with that is the fact that the token that was deleted from the browser is still valid. It will expire after a certain amount of time if you set it up this way, but If you want to you can create a blacklist of tokens in your database and every time someone accesses the application check if his token is blacklisted.
Summary
In this article, we covered registering and logging in users in the Typescript Express application. To implement it we’ve got to know how to hash a password using bcrypt to keep it safe. The authentication that we implement here is done using JSON Web Tokens (JWT) that provide an easy way to identify the users and validate requests. Thanks to all that work we implemented a crucial part of a web application. Stay tuned because there are still things to cover!

Hi, thank you very much for the good tutorial, it’s been a great help. I downloaded your project but seem to have some issues validation.middleware.ts: Cannot find module ‘class-transformer’., Cannot find module ‘class-validator’ & Property ‘values’ does not exist on type ‘ObjectConstructor’.. The modules seem installed, tried several things but keep getting the issue. I use Visual Studio Code. Do you have an idea what the issue can be?
The
Object.valuesis a part of ES2017 and it seems like you are transpiling your TypeScript code to an older version of JavaScript. Make sure that you have"target": "es2017"in your compilerOptions intsconfig.json. You can also try adding"lib": ["es2017"]there.When it comes to the “class-transformer” issue, try adding
"moduleResolution": "node"in yourtsconfig.jsonjust like here.Hope that helps!
What happens after token is expired? User forced to login again? Should it be handled on frontend side?
In case someone has the same issue: I had to use user?: User; in my RequestWithUser interface in order to be able to compile and run…
I have encountered the same issue
Thanks you for this!!
async function authMiddleware(request: RequestWithUser,req:Request, response: Response, next: NextFunction) {const cookies = req.cookies;
if (cookies && cookies.Authorization) {
const secret = process.env.JWT_SECRET;
try {
const verificationResponse = jwt.verify(cookies.Authorization, secret) as DataStoredInToken;
const id = verificationResponse._id;
const user = await userModel.findById(id);
if (user) {
request.user = user;
next();
} else {
next(new WrongAuthenticationTokenException());
}
} catch (error) {
next(new WrongAuthenticationTokenException());
}
} else {
next(new AuthenticationTokenMissingException());
}
}
I have corrected the above code. I don’t know what mistake I am doing. It is not connecting with authenticated _id. Please help!
Hi Marcin,
Thanks for the tutorial so far, it’s been really easy to follow and I’ll definitely be using this as a boilerplate for mid-scale projects I have planned.
In this section though I got a little stuck at the cookie section, turns out, that when setting a cookie with ‘Set-Cookie’, it defaults its ‘Path’ value to the current path (which is /auth in our case) preventing the cookie from being accessed on any other routes.
To fix that I set it to ‘/’ in the code below:
private createCookie(tokenData: TokenData) {Authorization=${tokenData.token}; HttpOnly; Max-Age=${tokenData.expiresIn}; Path=/return
;}
Had the same issue.
Express now ships with
response.cookie(). Thepathoption defaults to"/". You just have to watch out that themaxAgeoption is in milliseconds.Hello Marcin, thanks for this tutorial. Could you help me with a problem?:
I have an error with the RequestInterface, in my routes file appear:
No overload matches this call.Overload 1 of 3, ‘(path: PathParams, …handlers: RequestHandler<Dictionary>[]): Router’, gave the following error….
same prob here
use const requestWithUser = request as RequestWithUser; to convert the request type to RequestWithUser. Ex:
Just a quick question, why should set the jwt token in the cookie after the registration? shouldn’t just be sent after logging? If you send the token after registration, and then you can just create new post even without logging(as cookie already contains the token), this behaviour does not make sense from my opinion.